
In my infinite experience as a person with boobs, I can't help but feel that it's not entirely fair for me to say that I have a hard time with bras. A lot of other people with boobs have a much harder time with theirs (the boobs and the bras) than I do, and I'm certainly not the first person to attempt to make my own bra. My struggle, though it does exist, is not unique. Suffice it to say that I've battled with off the rack bras long enough, and one last traumatizing shopping trip combined with the well-timed discovery of Amy's Bra-making Sew Along on Cloth Habit pushed me over the edge.
I took a pattern drafting course from a costuming professor while I was studying, and as part of that class I managed to score an out of print pattern drafting book - Pattern Drafting and Grading by M. Rohr. The book is from the 50's, but has been an invaluable if dated guide ever since. There's even a page on bras!

Bullet Bras. Torpedoes, if you will. Seriously, you could take an eye out with one of those things. But it's a starting point, right? Besides, I figured adjusting the cup shape would be easy as pie after I got all the sizing right. I just needed somewhere to start.
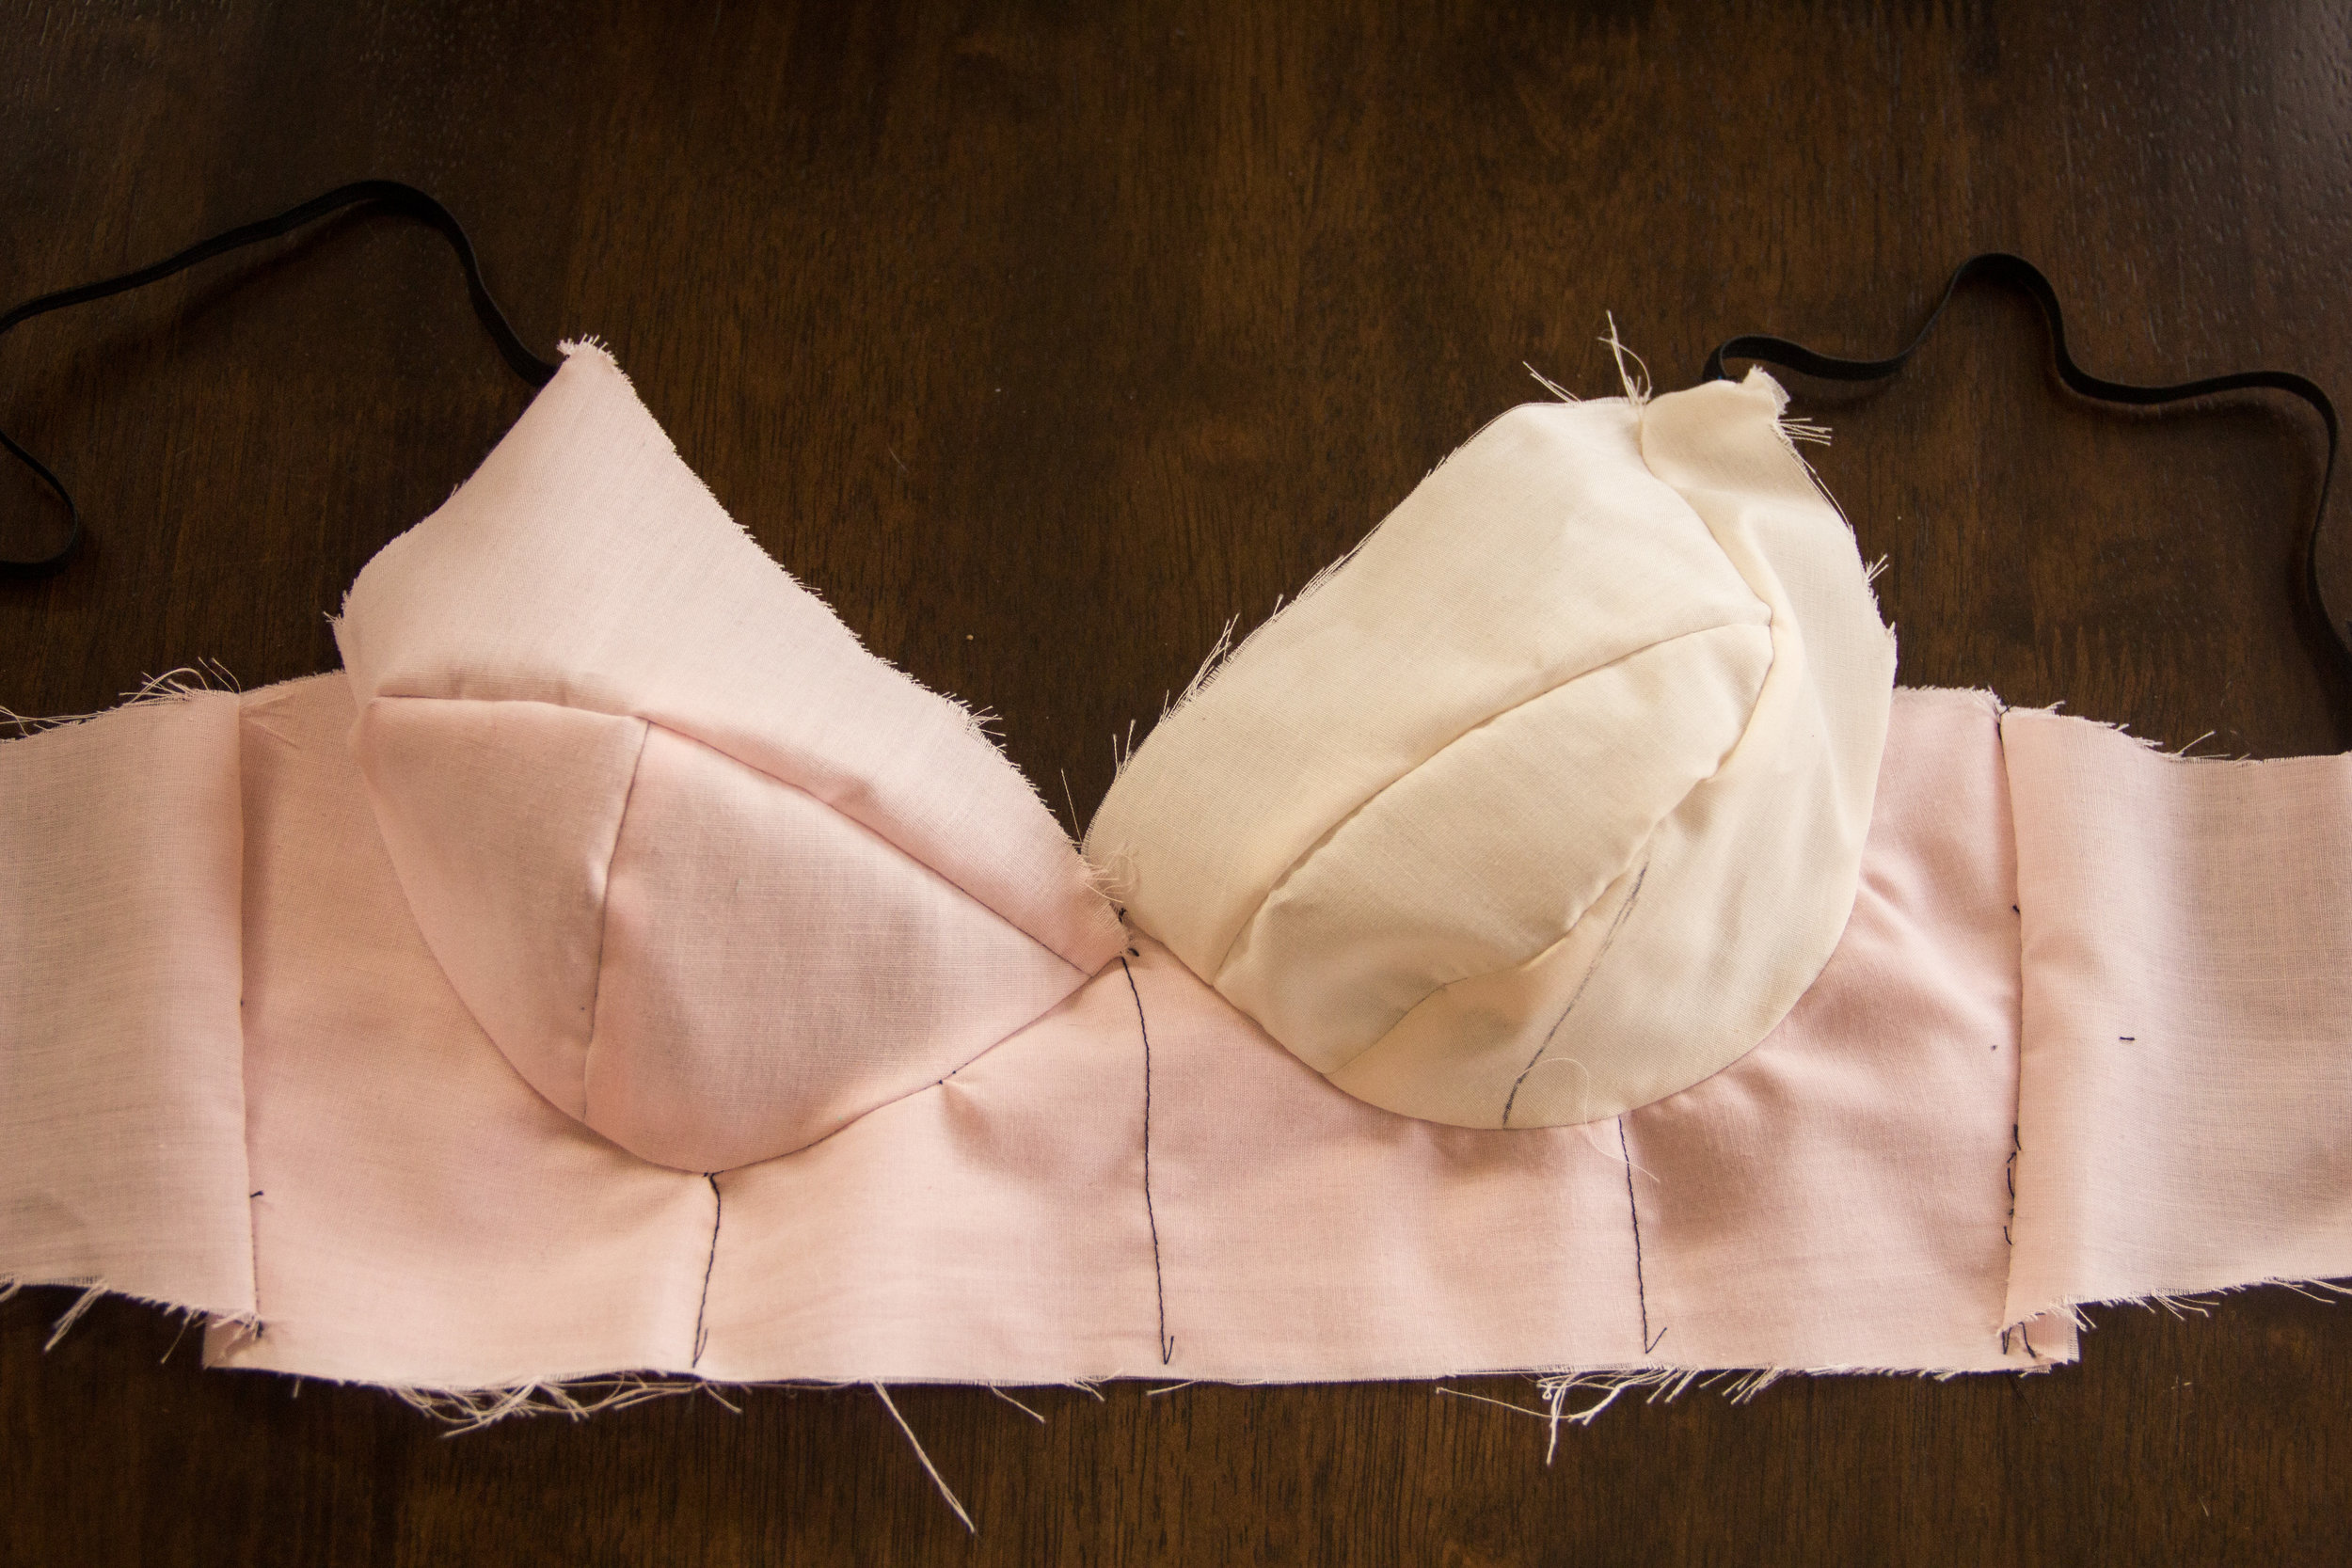
Armed with my trusty roll of kraft paper, a ruler, and a pencil, I got to work. I got the band and cradle close to perfect on about the second try, but the cups were a little more tricky. I went through seven different cup drafts in muslin over the course of a week, constantly inhaling every bra-related blog and article I could find along the way and trying to figure out what was going wrong. Finally, I took Amy's advice from the sew along and taped my paper pieces together, realized all I really needed was a curvier seam on the underbust, and suddenly, voila! Not only did the thing fit the boob in question, but I had achieved lift!
I finally trusted my draft enough to order some supplies - New Zealand's lingerie supply sources are fairly limited, but I found Lynda of Elle Joans who has a great variety of everything a kiwi might need to make a bra, with bonus overnight courier delivery! Also, she wrote me a cute little birthday note, and I'm a sucker for those.

While my new bra (in its raw form) was in transit, I stumbled across Emerald Erin's blog, and her post on the unique benefits of a powerbar. I, as a person with a pretty severe case of armpit-boob, was intrigued. I redrafted my cup to include a powerbar and a diagonal seam, and that made a frankly alarming (but wonderful) amount of difference in both shape and lift.

I decided to go with the powerbar cup, as I liked the fit better. I have a pretty unfortunate track record with starting projects in the evenings, so I waited until I finished Friday's half-day at my grown up job before cutting out my pieces. There were so many little bits!

I did all of the sewing on Saturday, and the whole process took about four hours of solid sewing machine time. That includes sewing the cups together (and top-stitching) backwards before unpicking and re-sewing, then a brief interlude for my initial confusion over how to encase the side seams, then discovering when inserting my underwires that they were 1.5" too long (!) and cutting them down with a pair of pliers, and finally, sewing the little elastic tabs to the back without attaching the strap loop twice. That's right. I made exactly the same mistake twice. In a row. On the same strap, even. My sewing machine also tried to eat the hook side of the hook and eye closure, which was literally the actual very last thing I had to do before seeing if it fit, but we got there after a little begging and pleading. Really, she's usually so well behaved. Realistically once I get a few of these done I'm thinking it would take about an hour, maybe one and a half.

I probably made so many mistakes towards the end because I was so nervous that all my work would be wasted - after all, what are the chances that a bra I drafted alone from a pattern book from the 50's would end up fitting even remotely the way I wanted it to? I was switching so quickly between pumped to be sewing a bra and terrified it wouldn't fit every few seconds, it was nerve-wracking. I can't even explain to you how relieved/excited I was when I finally put it on and, much to my surprise, it fit!
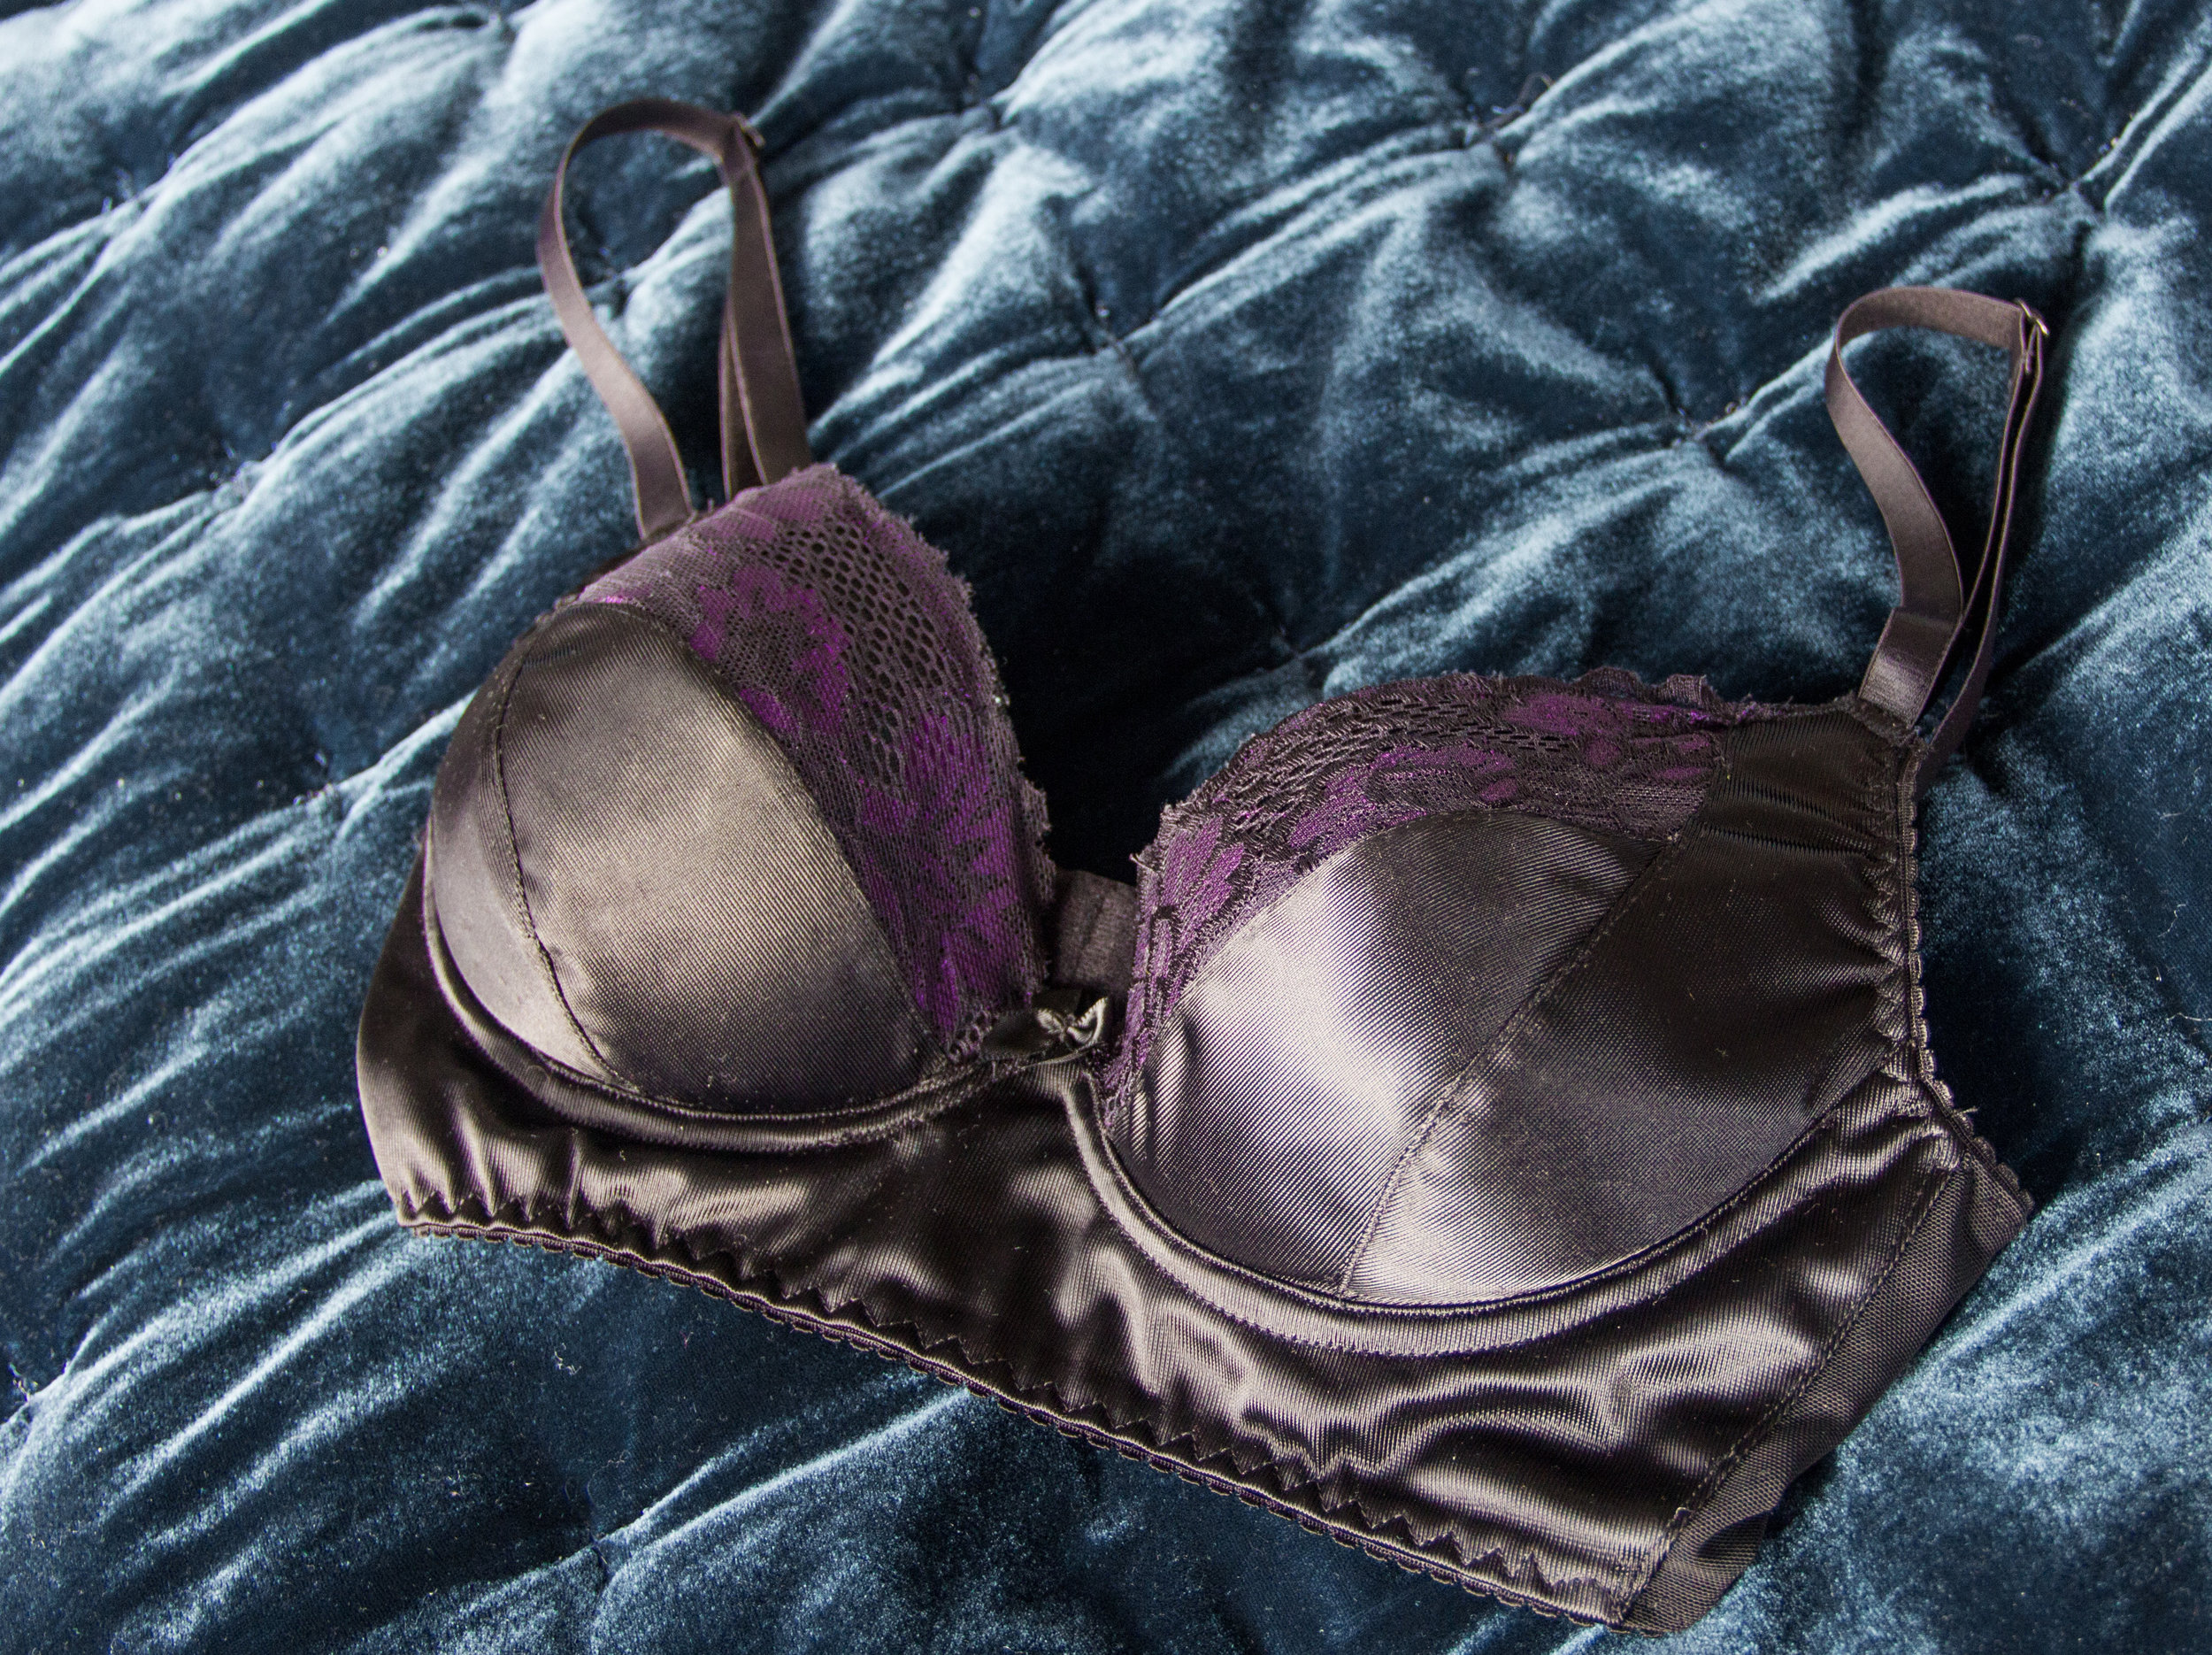
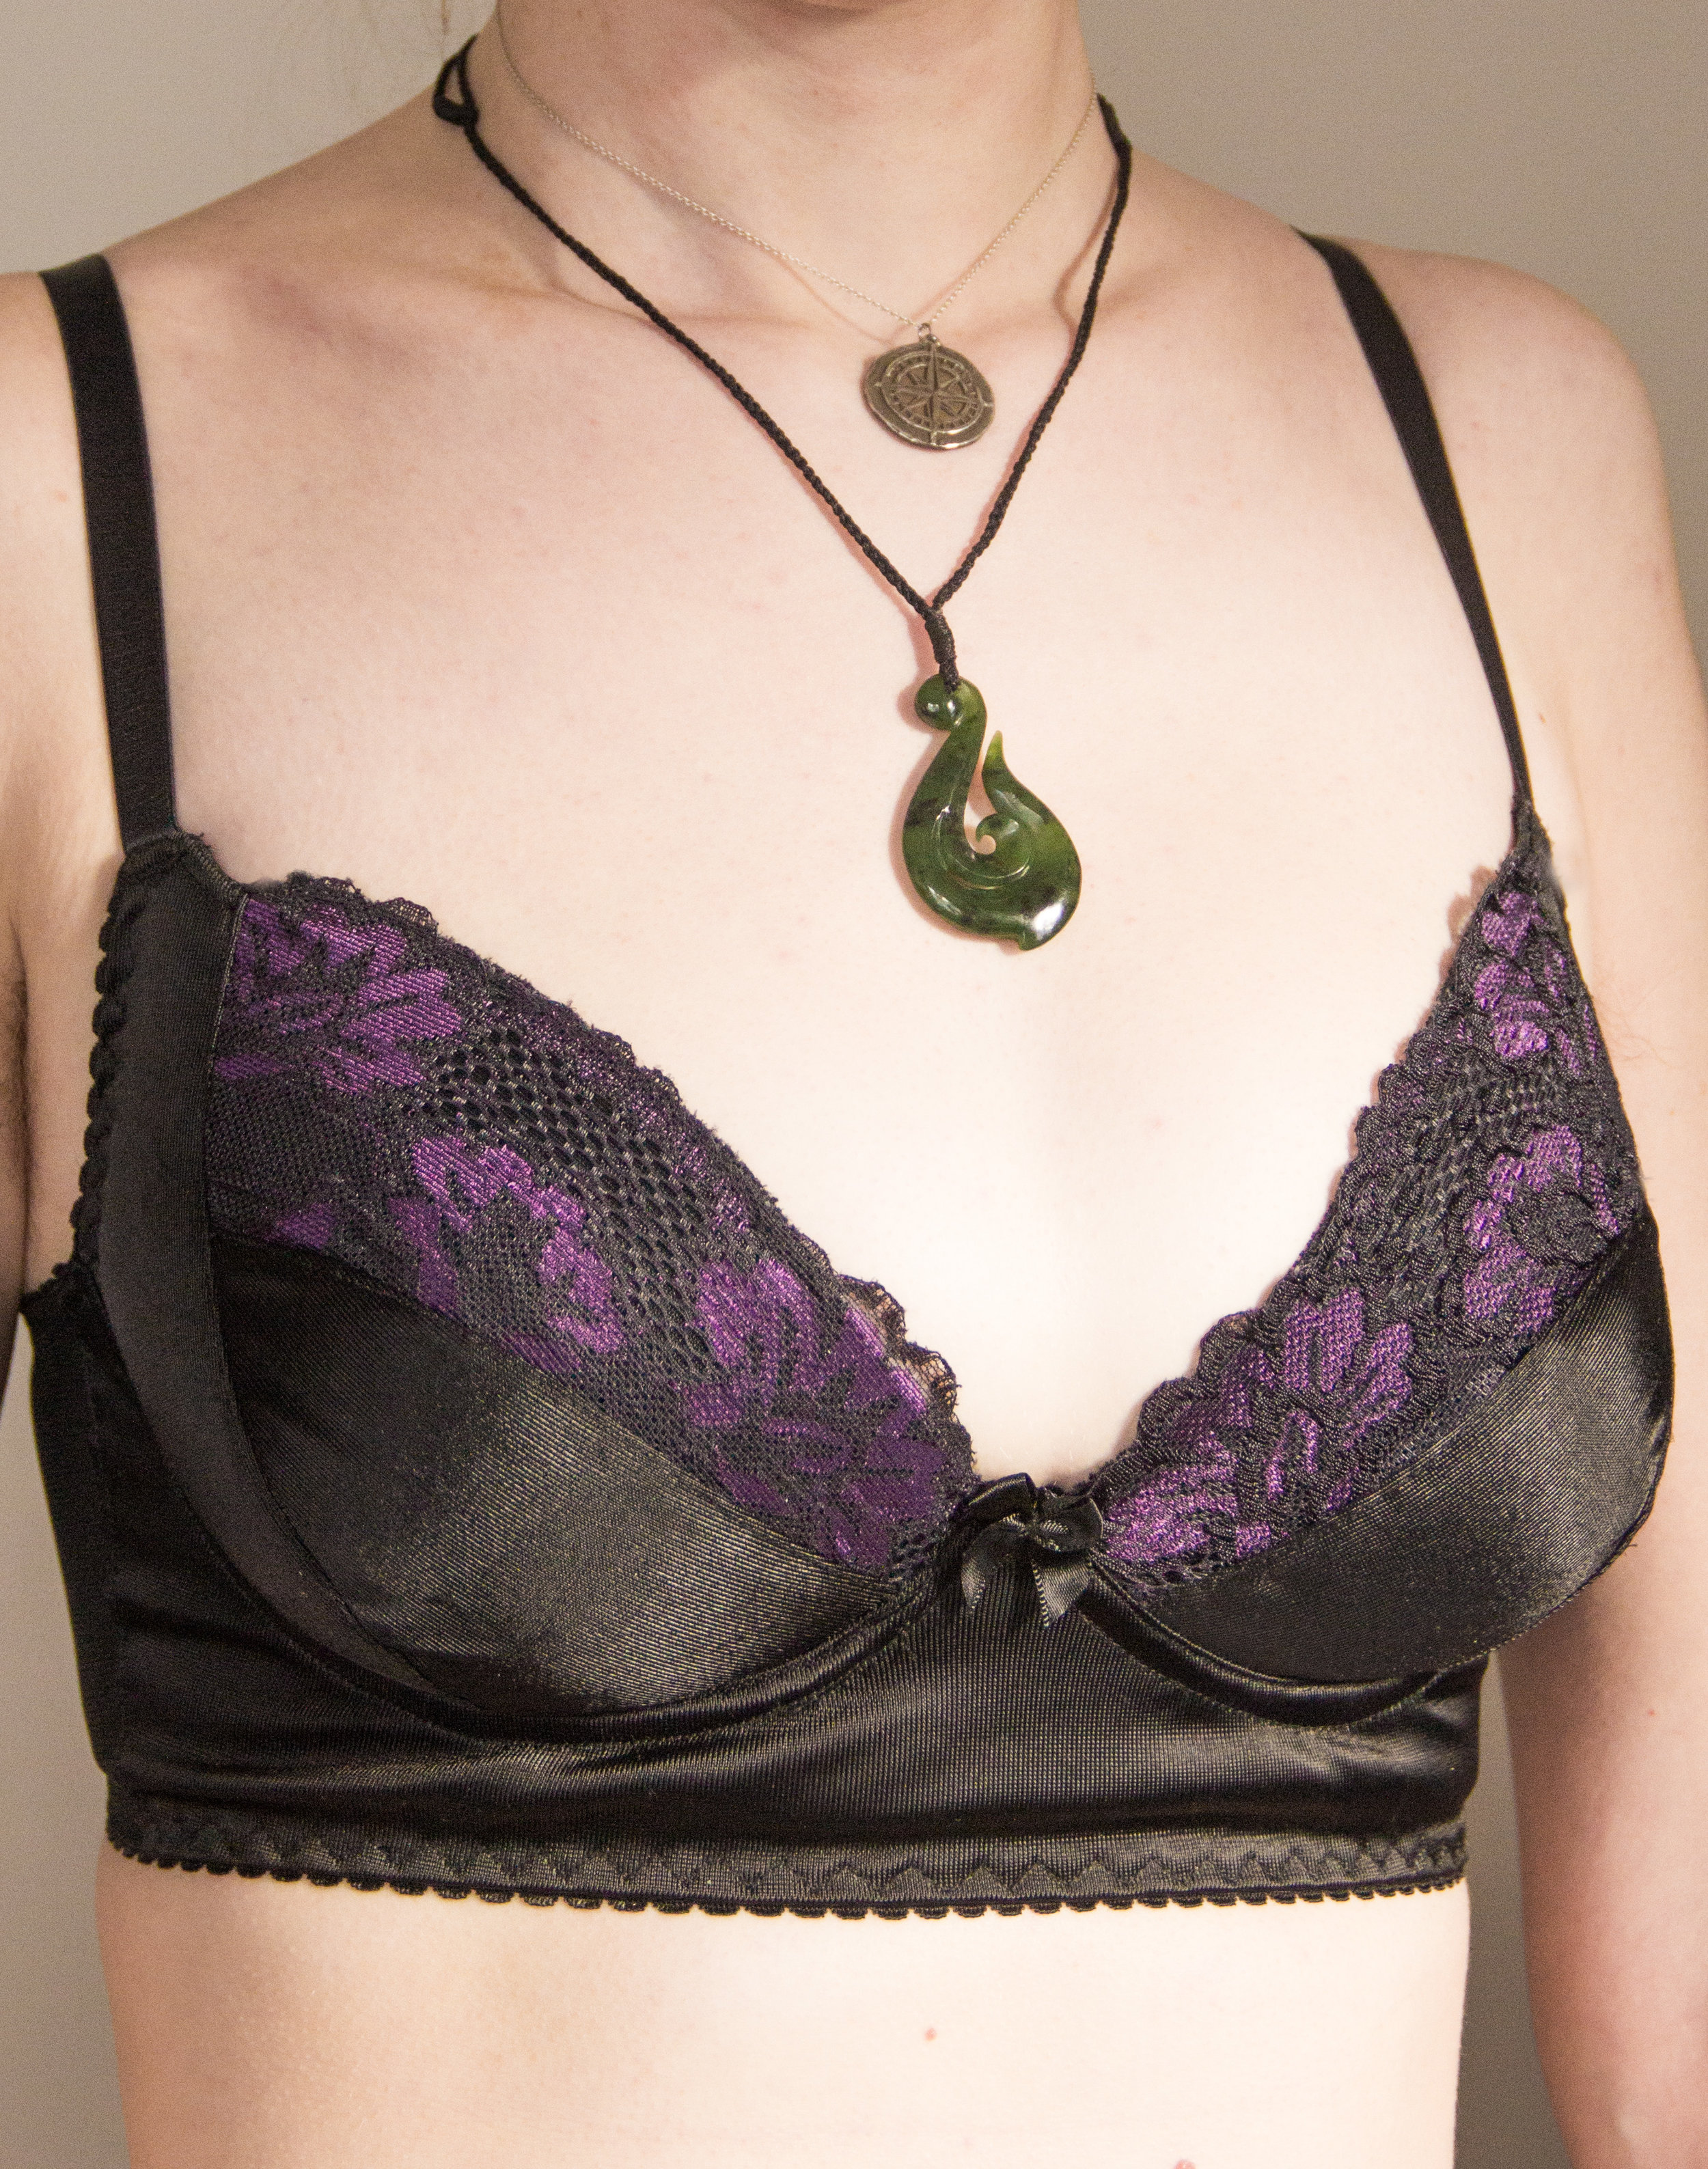
Like, guys. There may be some minor issues with this thing, but it genuinely fits me better than any bra I've ever worn. That's what a custom draft will do to a girl, I guess.
I was so excited with the fit that I completely forgot to sew the little bow on! I had to force myself to take off my new masterpiece in order to stitch it on.

As would be expected from my first exploration into bra making, it has a few quirks.
-The straps do a funny wiggle in the back where they attach to the band- I think I've placed them too far towards my sides, perhaps not on the right angle. (Edit: a few days of wearing seems to have settled them a bit..)
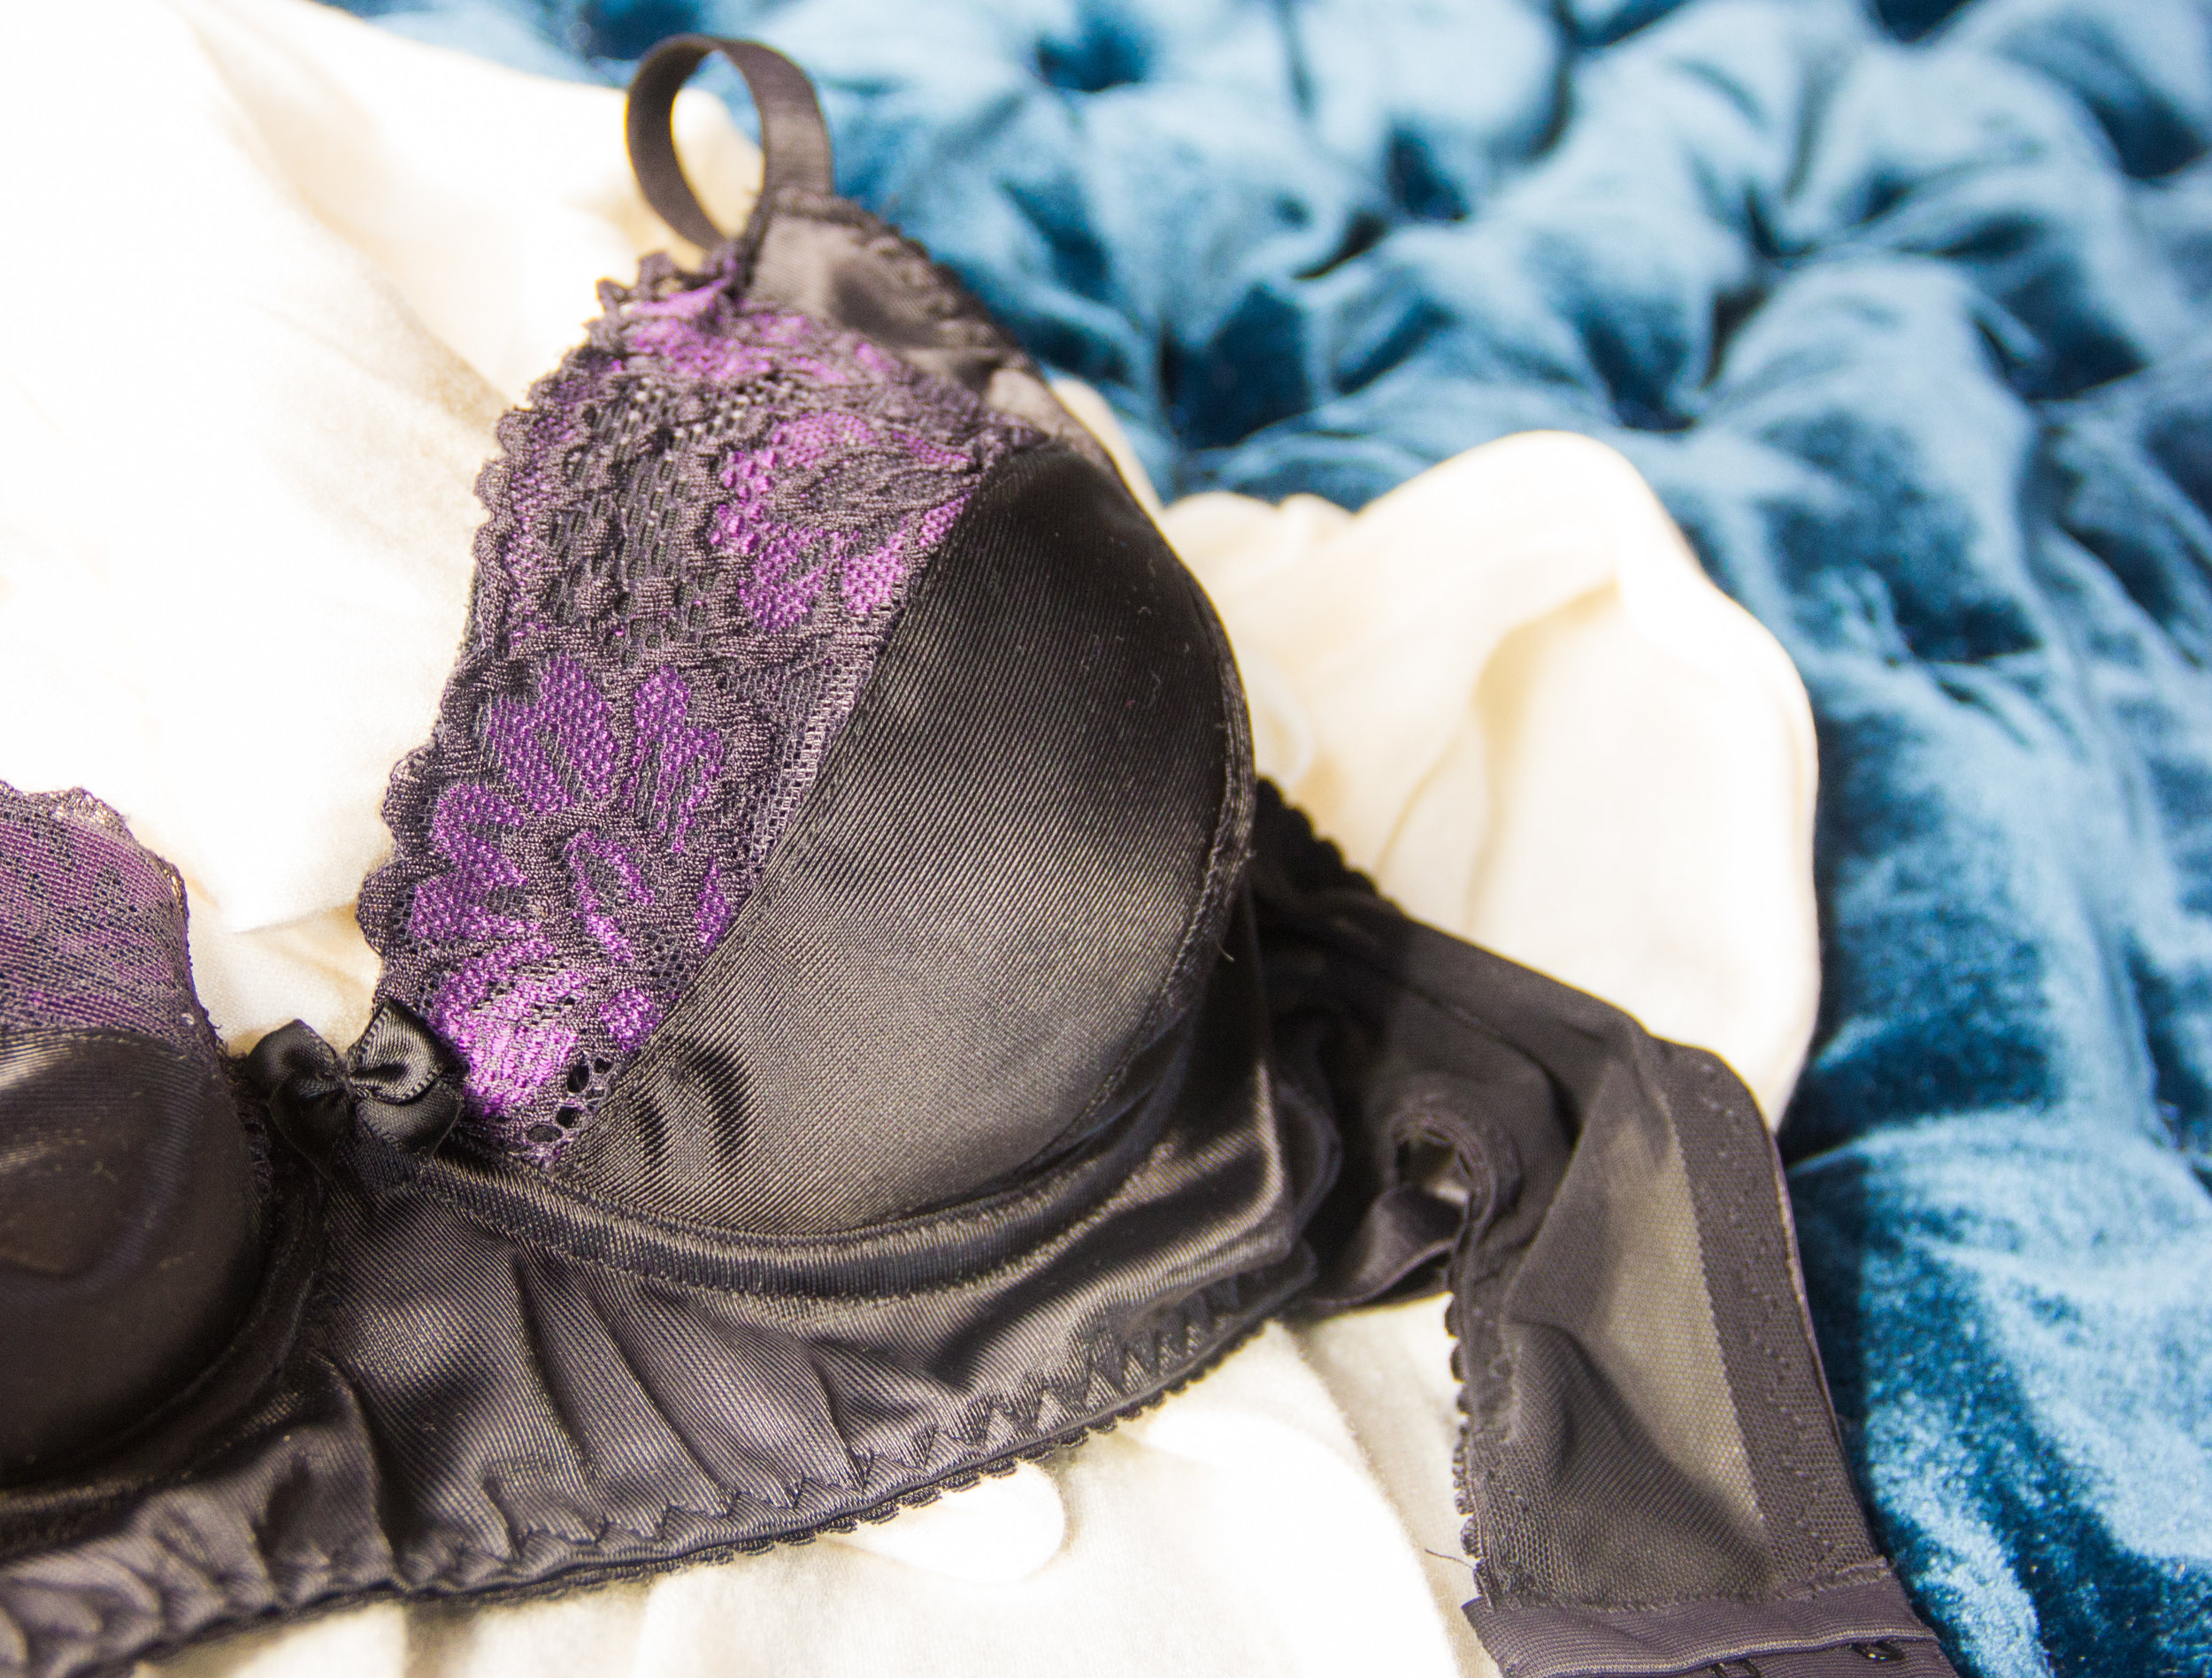
-One of the cups flattens on the top edge while the other rounds gracefully over my boob. Either my left boob is slightly larger than the right, or I've sewn or cut one cup crooked by about 1/4". I haven't figured out whether the culprit is the sewing or the boob, but I will let you know when I find out.
-I've cut one of the lace panels inside out. I didn't even notice until Day #2 of this bra's new life. I think the left boob's lace is the right, but they are definitely different.

I wish I'd shortened the front of the band a bit, because it sort of climbs up my ribcage and sits where it wants to sit anyways, but these are the sorts of things I'm learning for next time. Also, I have never, ever, ever in my life met a bra that I didn't immediately tighten to the third set of closures, and let me tell you what a thrill it is to start on number one! I feel like this is the way life is meant to be! What a time to be alive.
I spent about $70 for this project, which was enough of all the base fabric to make about 4 bras, and I was fairly prepared for this first try to crash and burn spectacularly. Despite my bra's flaws, it's perfectly wearable, and I've learned so much from the process! The next one I make (expect photos soon!) will use the rest of the purple lace, and all I need to buy to complete it is another set of underwires. I'd expect my average bra cost to be around $20 - $25 once I build a small stash of fabrics... which is pretty spectacular considering ready to wear bras can easily cost over $100. I was nervous that the seamed cup would look odd under my clothes (especially the things I've drafted specifically over some of my old bras) but so far everything's behaving fairly normally! Basically, happy to report that nobody has looked funny at my boobs. Not even me.
My biggest struggle in life at the moment is no longer old bras with questionable fit, it's avoiding the urge to yell "I made this!" while flashing people my new lingerie! (Okay I did this to one person, but it was not in public)...
I've really caught the bug now- I already have plans for about six more bras. I need one with a cat print. Also absolutely one in hot pink to match my hair... and then I really want to have a go at drafting a bra for someone else's boobs to see if I can make the magic work again!