• blog
  • What Kat's Made
  • The Wedding Dress
  • Tambour Embroidery
    • Workshops and Teaching
    • Shop
    • Beadwork Portfolio
    • Tutorials & Guides
    • About Me
Menu

Kat Makes

Kat Waters
  • blog
  • What Kat's Made
  • The Wedding Dress
  • Tambour Embroidery
  • More
    • Workshops and Teaching
    • Shop
    • Beadwork Portfolio
    • Tutorials & Guides
    • About Me

Blog: Kat Makes

Adventures in Obsession

make your own tailors ham and seam roll tutorial

Tutorial: Tailor's Pressing Tools (Part 1)

March 10, 2020

Hello! Welcome to another episode of the segment of my blog I like to call “Kat Makes Things to Help Kat Make More Things!” (just kidding, I’m not calling it that…) but you know. This one’s a set of finished objects, but they’re finished objects to aid in the finishing of other objects.

I used to have a tailor’s ham. It’s not the kind of thing you think to grab when you’re packing up your suitcase to move across the world, but I knew I’d have to replace it eventually. I delayed, first because pressing tools take up a lot of space when you’re not using them, and then because - once I’d finally committed to one - they were SO expensive, and I couldn’t confirm that the ones I was considering purchasing weren’t filled with polyfill (something to investigate - a lot of the mass produced ones don’t seem to mind being plastic filled these days) so I finally decided to just make my own.

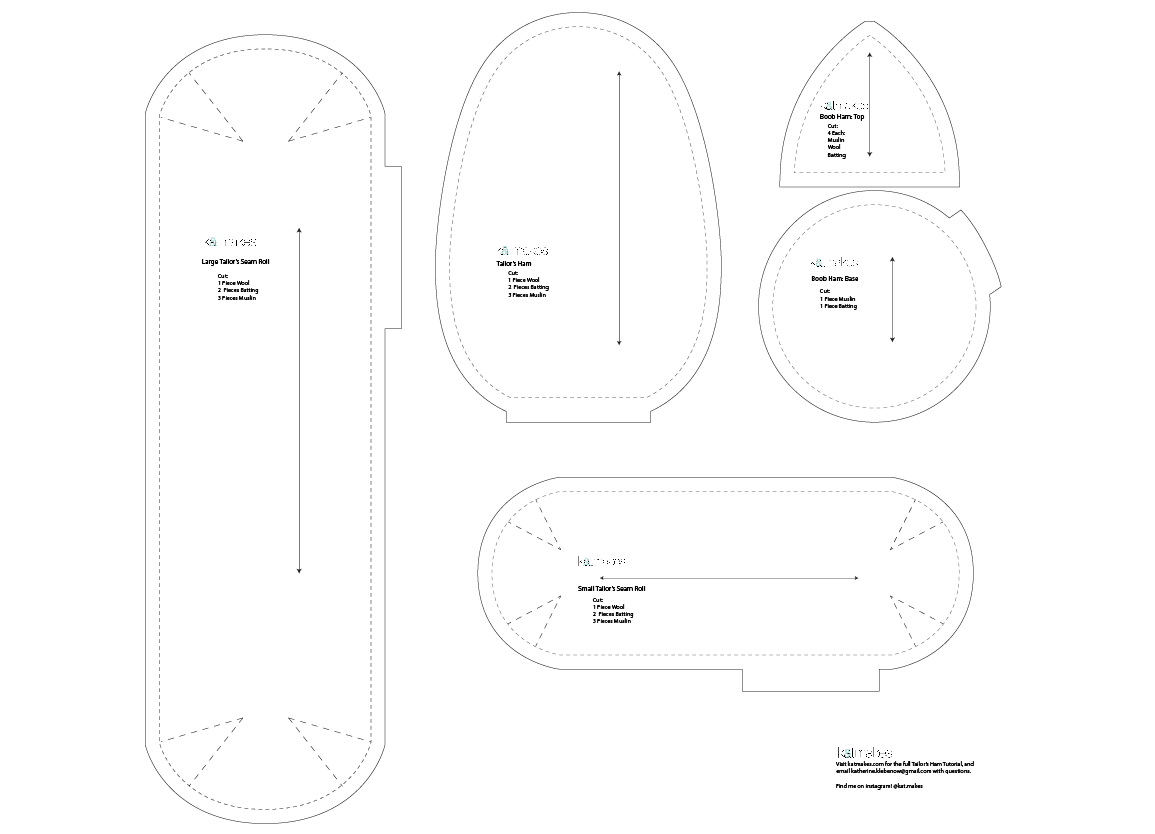
I decided on a ham, a standard sized seam roll, and a super sized seam roll. I ended up having materials left over, so I made a boob ham as well (bust ham? breast form? Who knows…) but she’s a bit special so she’s getting a post all her own in the next day or two. (I’ll cover the drafting then - but if you want to make one in my size, the pattern pieces are available if you just keep reading!)

Using measurements from an existing (probably vintage) ham and seam roll I borrowed from a friend, I drew rough shapes for pattern pieces. I also drew the larger seam roll piece, which is the perfect size for pressing leg seams in pants - I like the larger size because you don’t need to move it around as much, and it’s actually the one I use most frequently. I’ve made a little PDF download for you of the pattern pieces - mostly just to practice my pattern digitizing skills - that’s available in my shop, though it is is free! You’ll need to go through the checkout process with an email address to get the pattern, and if the payment screen comes up, just ignore it and click ‘continue’- my blog platform doesn’t know what to do with free stuff! Here’s a little preview though, if you just want to see the shapes:

make your own tailor's ham pattern

So. You’ve got a pattern. Here’s your materials list:

  • 100% Wool fabric, preferably plain weave (the 100% wool thing is REALLY non-negotiable here! I got 50cm, which was enough to make everything in my set with a small swatch left over.

  • Cotton muslin - I used unbleached because that tends to be what I have around. Try to shop around for muslin as densely woven as possible. Save your small off-cut scraps of this, we’ll use it later!

  • Cotton or wool batting - Don’t get polyester! Also, check that your batting doesn’t have scrim - scrim is a web-like stabilizing layer on some battings and it’s made of polyester, which melts. Sometimes you can peel off the layer of scrim, but if you’re shopping for batting specifically just get one without.

  • Wood Shavings - A lot of people stuff their hams with fabric scraps. It’s not the end of the world if you choose to do this. The tailoring gods will not descend from the heavens and smite you while you sew. It’s just that wood shavings (or sawdust, or some combination thereof) won’t compress over time like fabric will, so your ham will be firmer and last longer. If you’re just a casual ham user, go forth and stuff with fabric, but if you’re planning on doing long term steam setting and such, go for the shavings. If you don’t know a friendly neighbourhood woodworker, get yourself over to your probably equally friendly neighborhood pet shop (say hi to the kitties for me) and then get yourself a bag of wood shavings they sell for for rodent cages. They’re usually untreated, they’re a good size, and they come in a manageable pack size. I chose aspen instead of traditional pine - it’s more expensive but I’m allergic to pine, and aspen has such a nice smell… but pine is totally fine too.

  • An empty toilet paper roll and a chopstick or similar - for help in stuffing!

  • Thick hand sewing thread - upholstery thread works well here. If you’re stuffing hard enough, regular sewing thread will break under the pressure!

sew a diy tailors ham

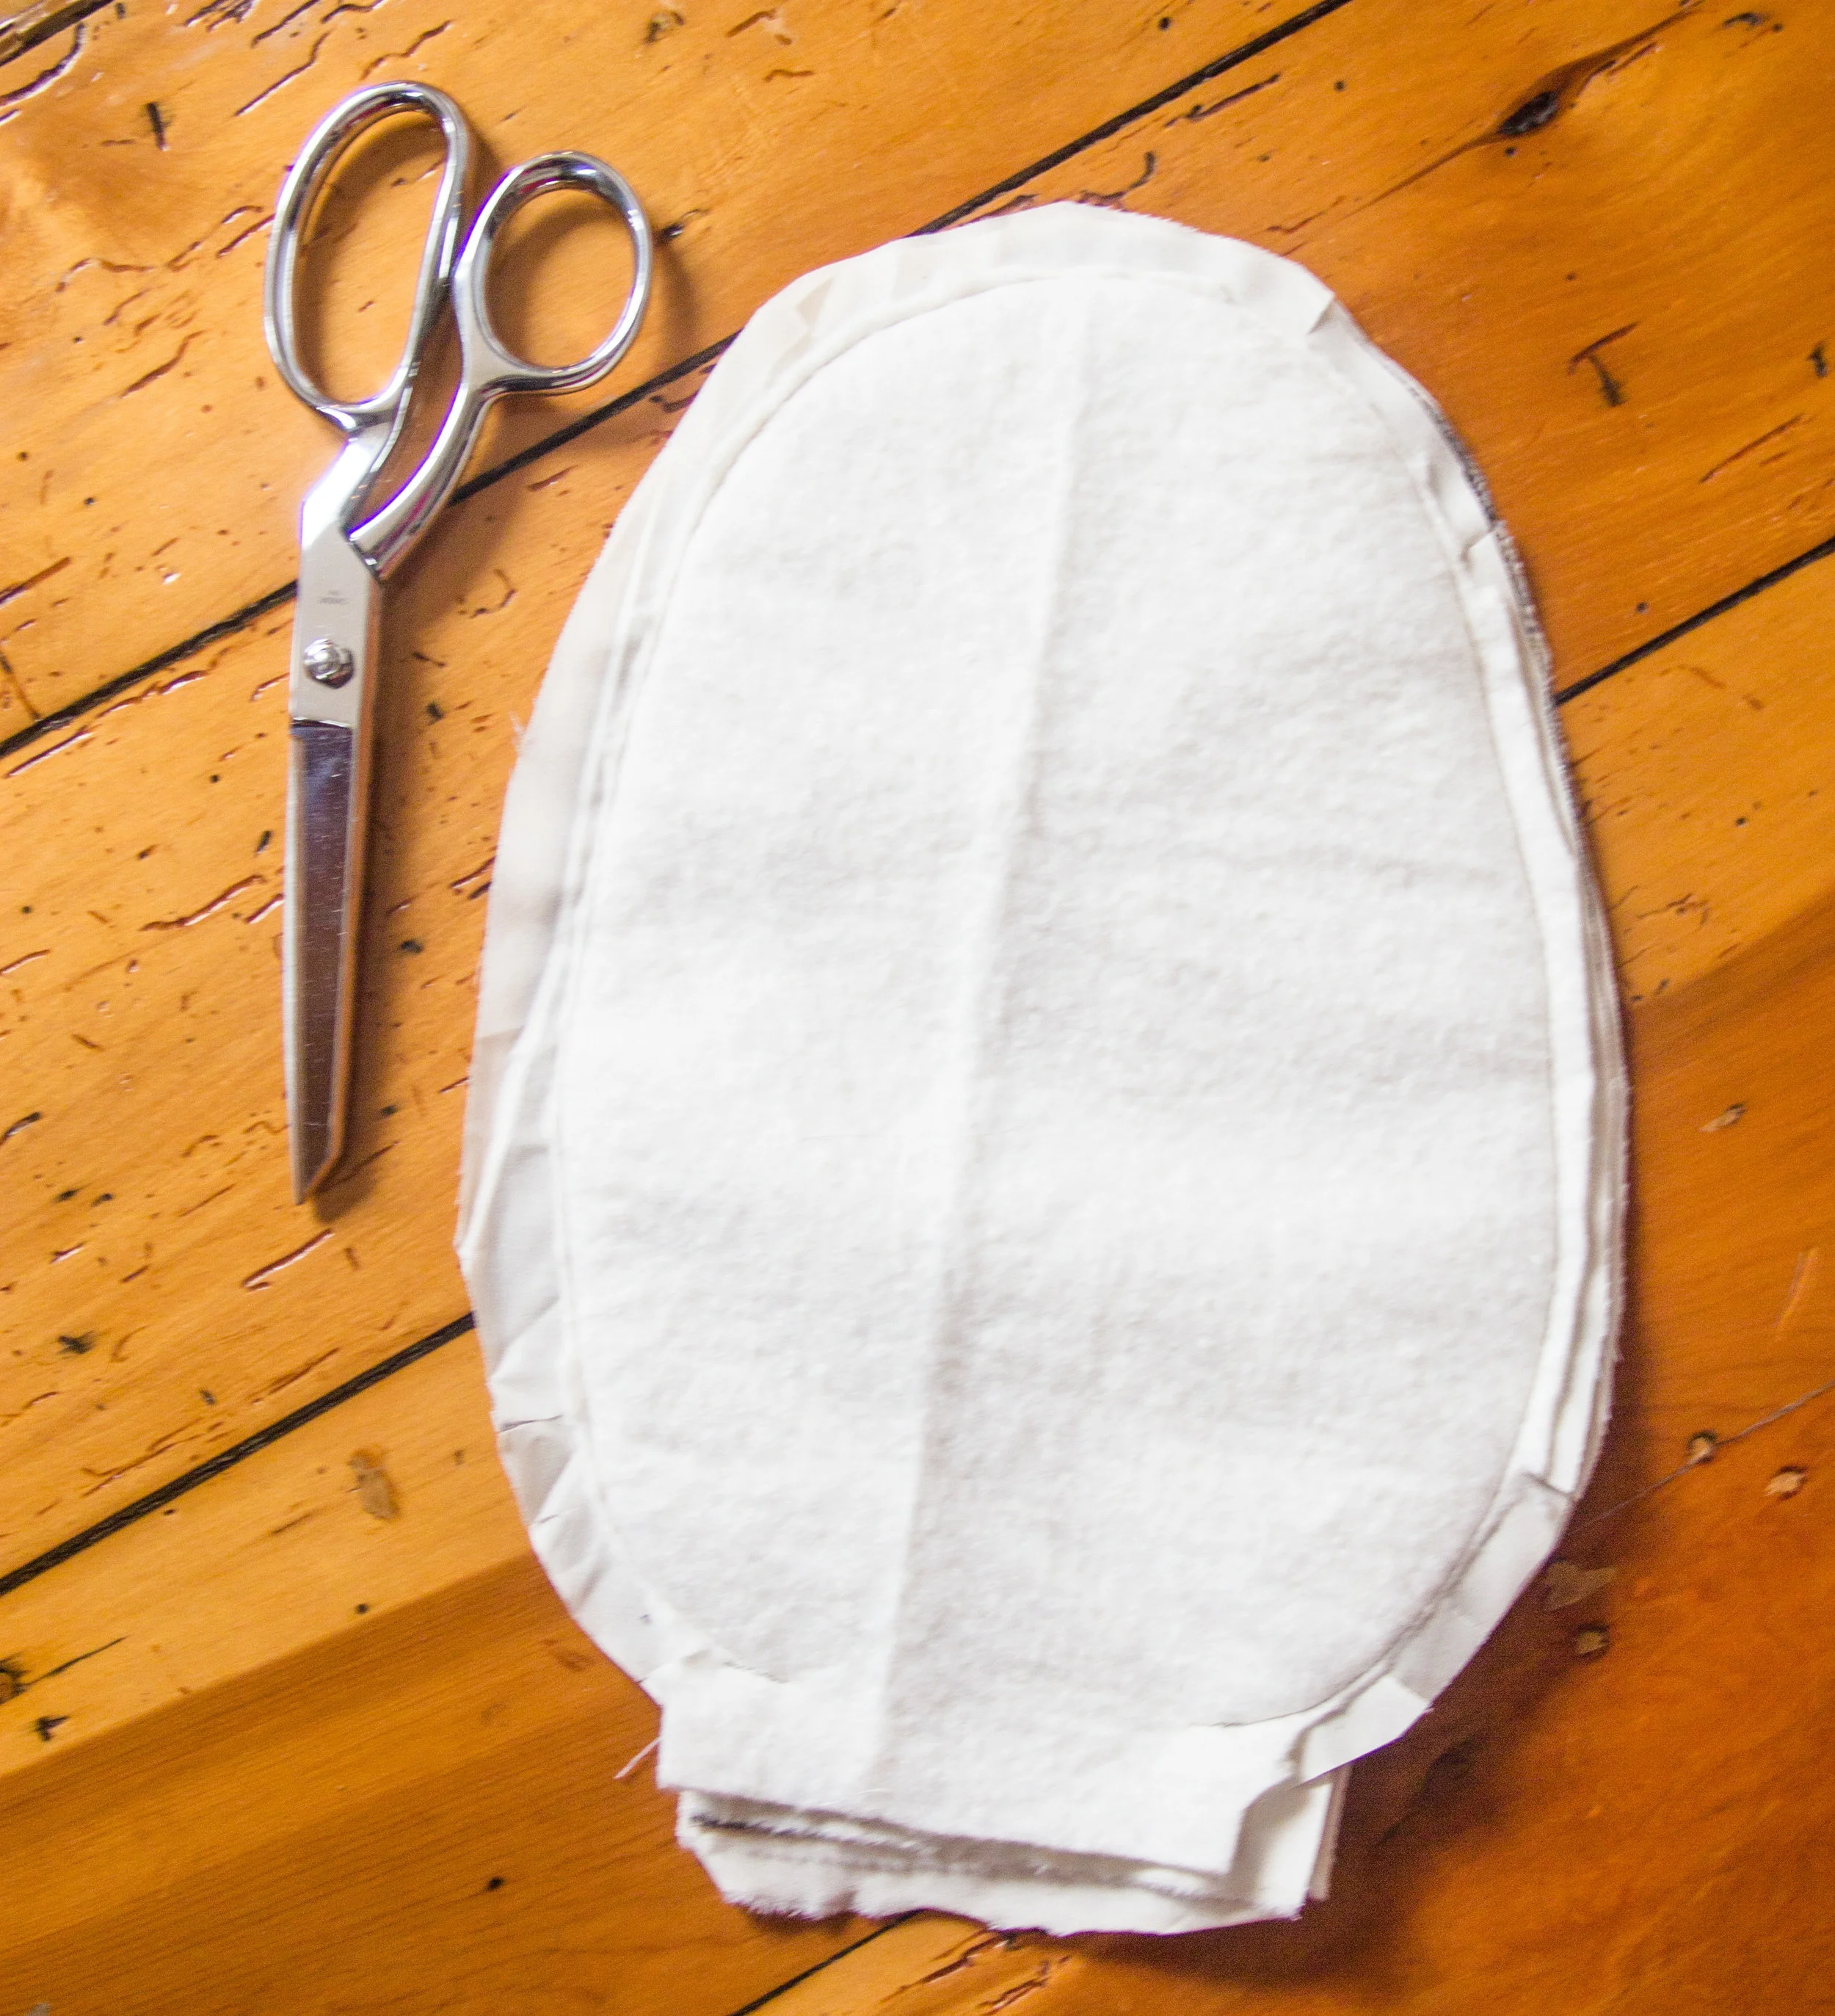
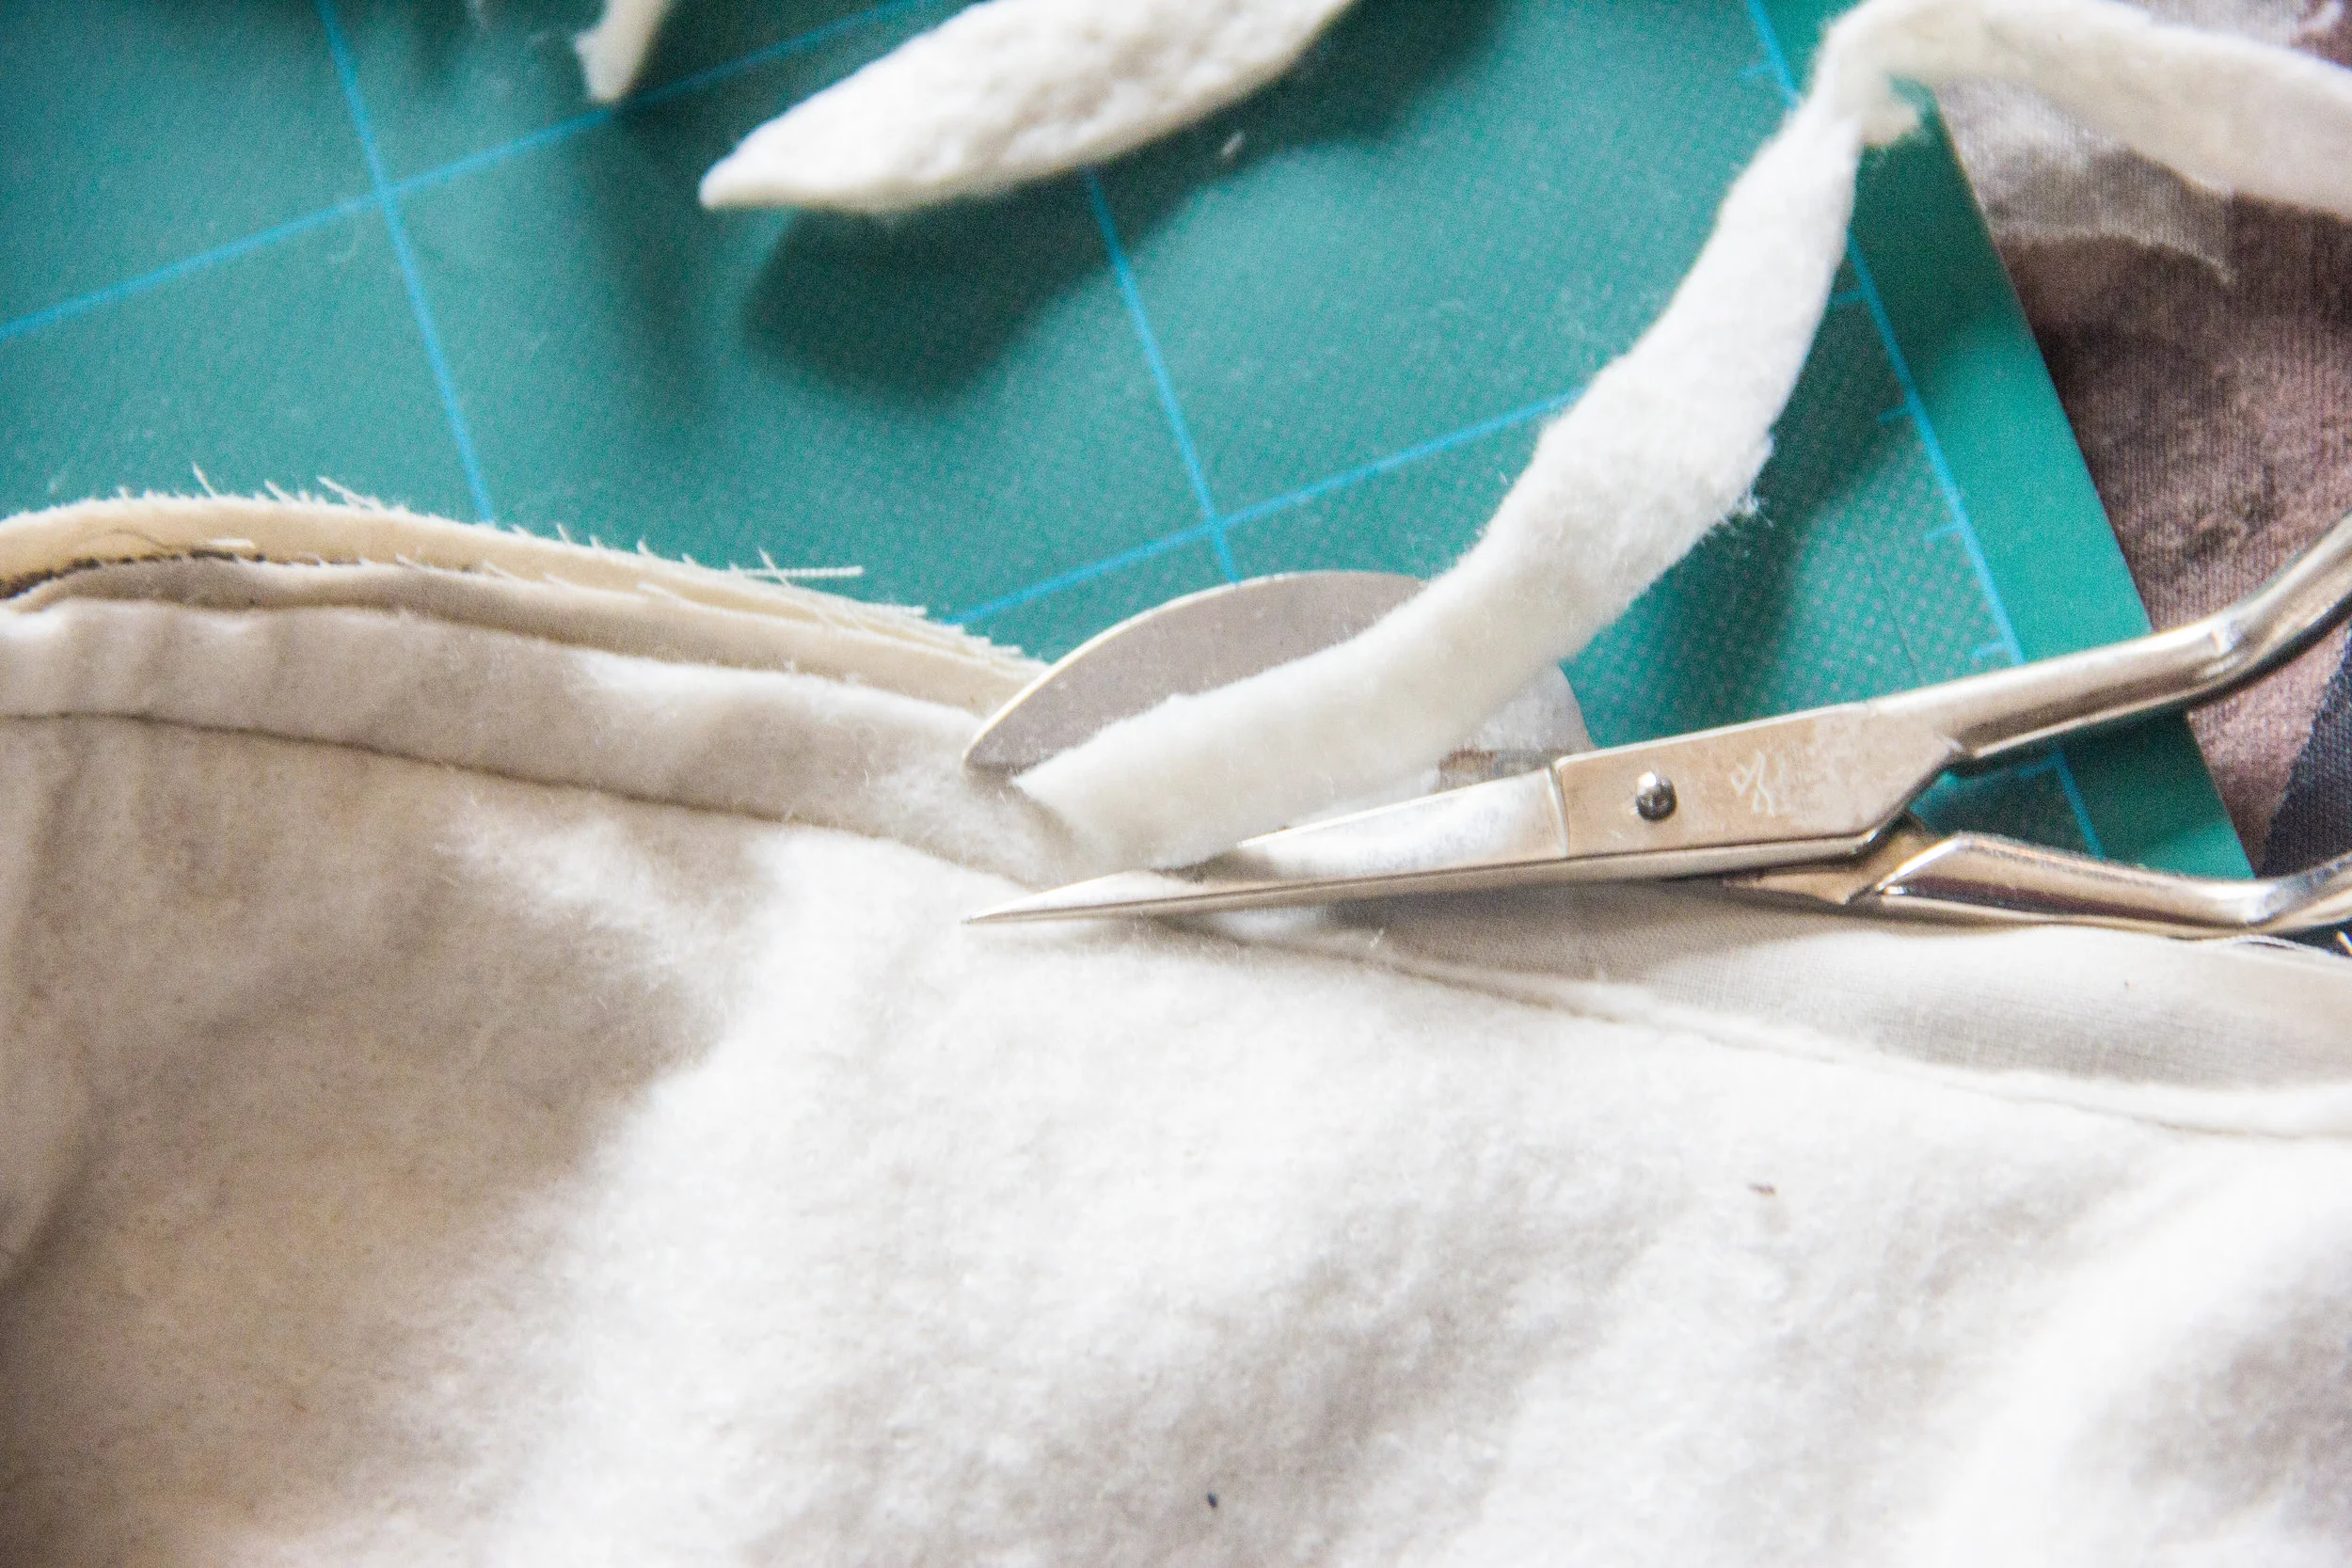
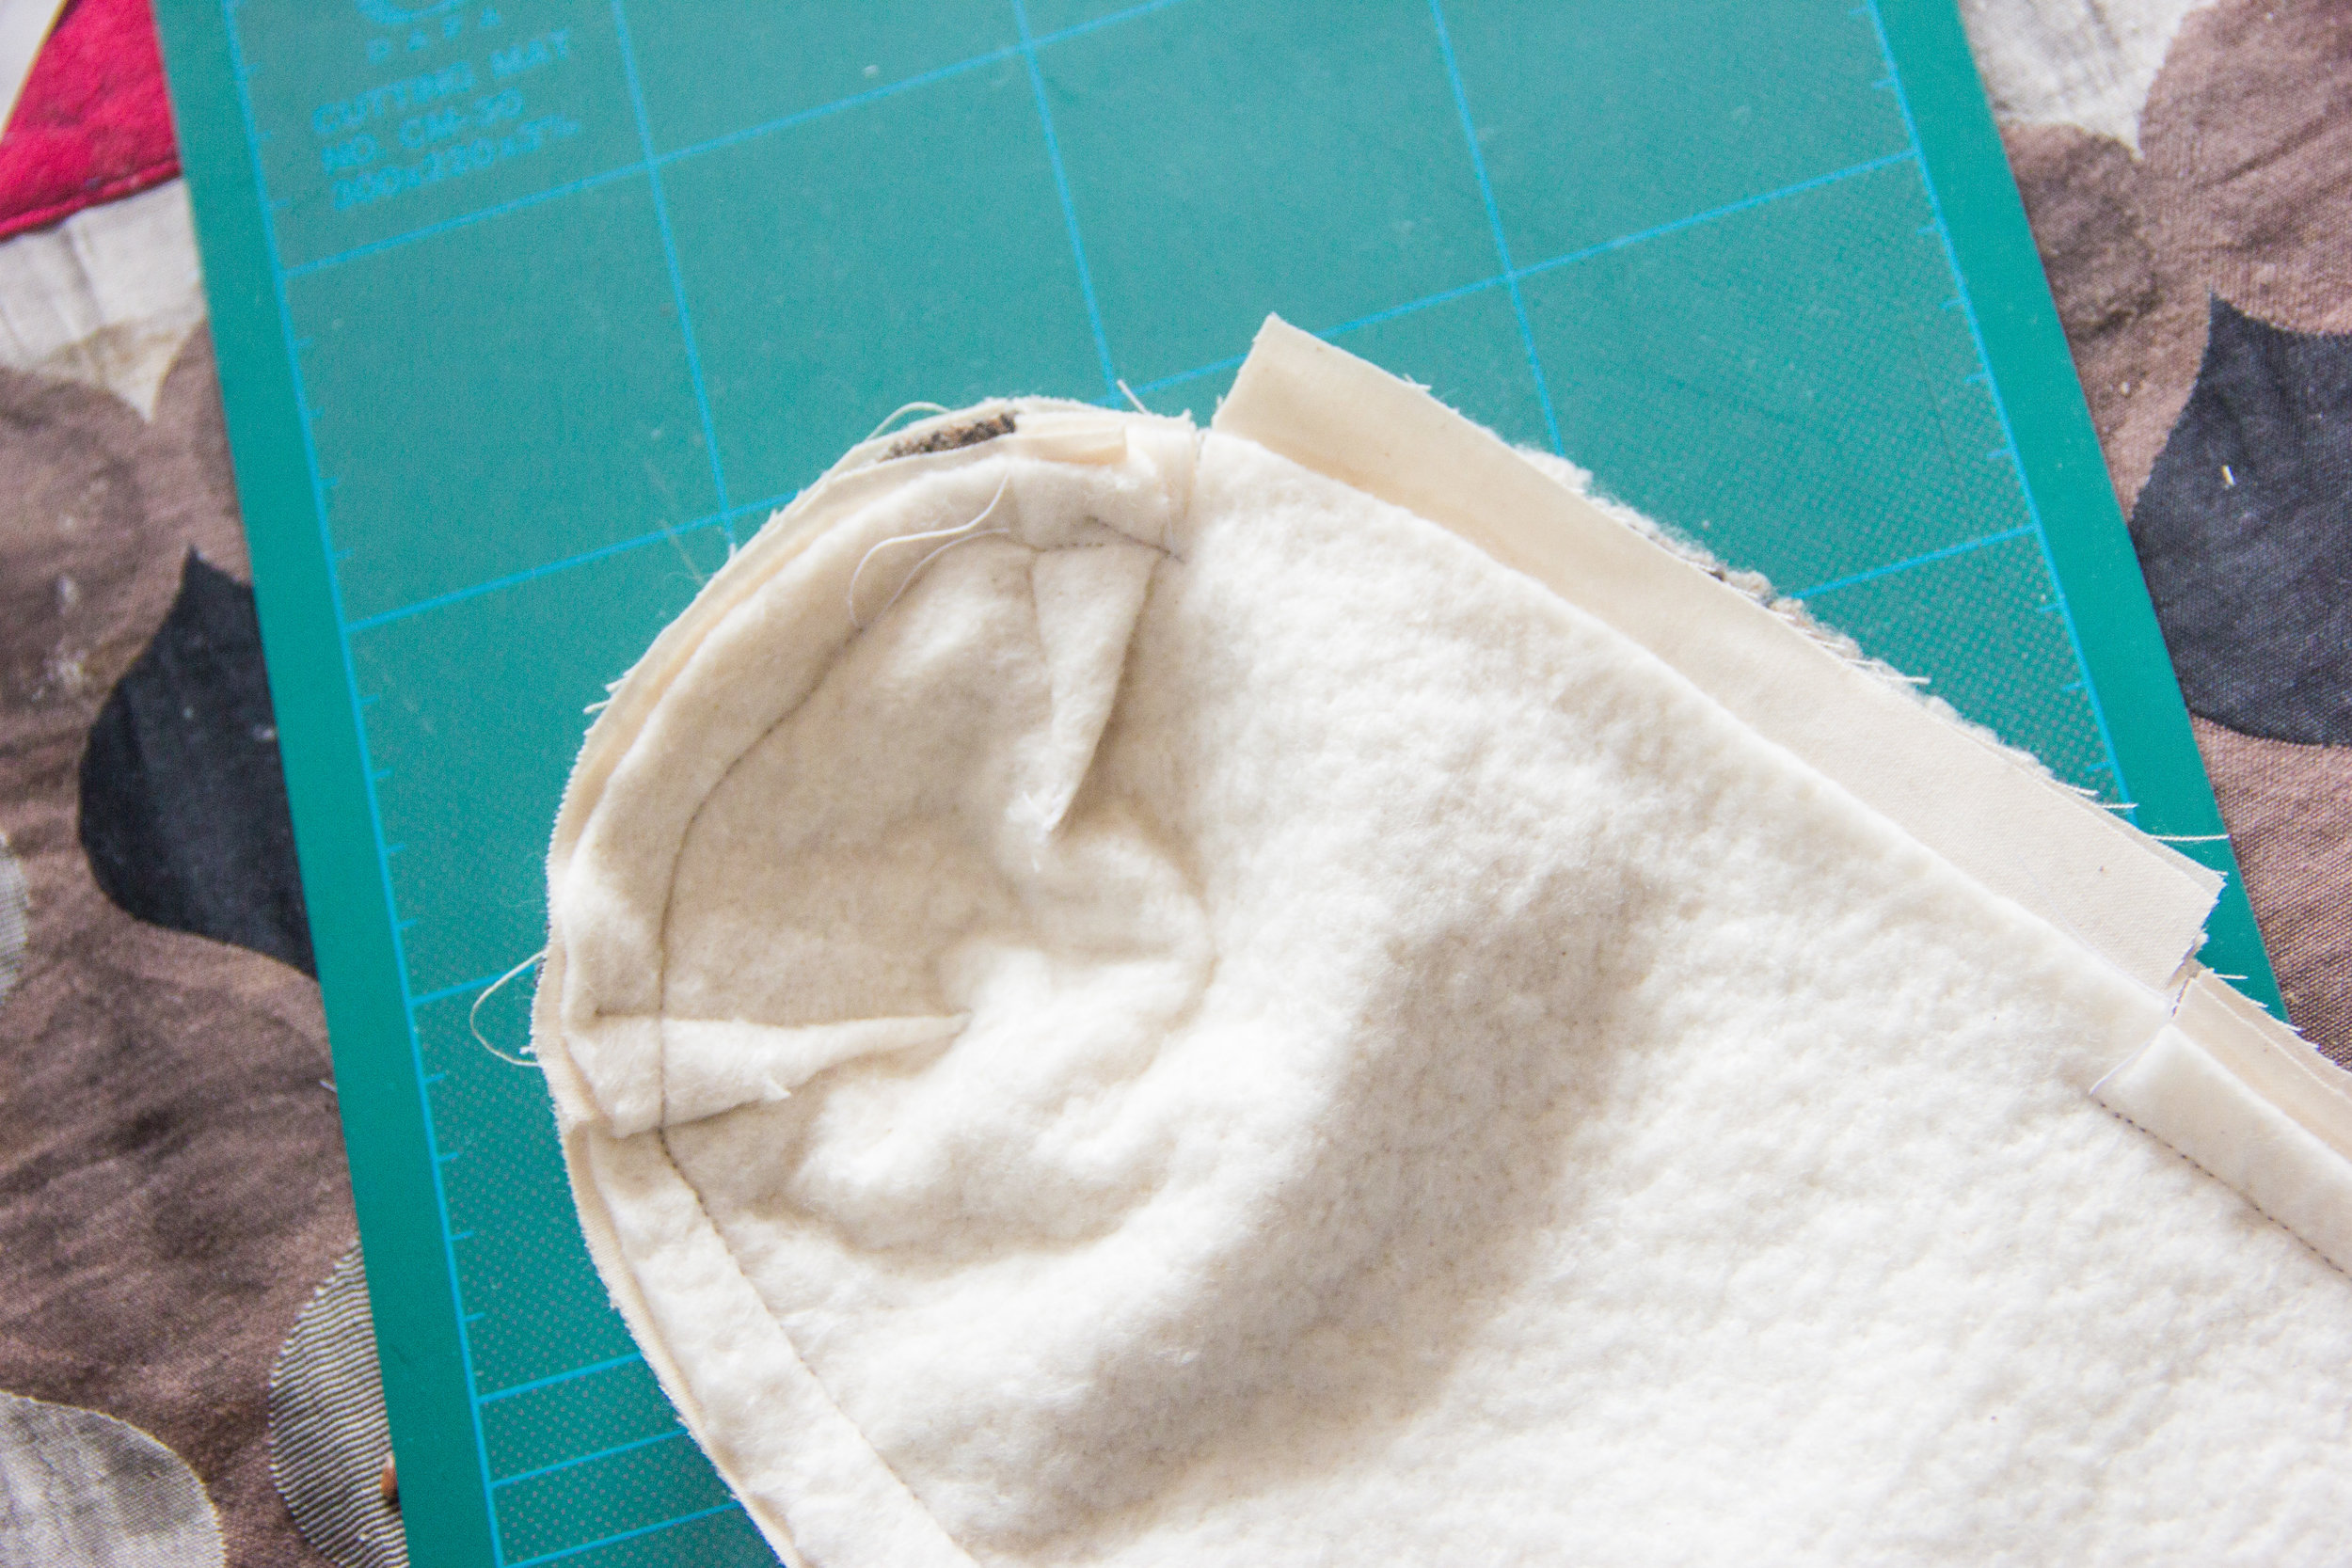
Cut out all your pieces - one of each piece out of wool, two of batting and three out of the muslin: for the top of your ham, the layers go wool: muslin: batting, and the bottom goes muslin: muslin: batting. To achieve that layering, the total stack you’ll be sending through your sewing machine will go: Batting, muslin, wool, muslin, muslin, batting. Stitch around the edges of the ham, backstitching at each mark so that your ham doesn’t start to unravel as you stuff it. Clip your curves, and turn the ham right side out - the two batting pieces should now be facing each other.

diy tailors ham

To make the seam rolls, you’ll sew the darts before attaching the top and bottom pieces. Sew the darts through all three layers of each side, and press them well. Grading the darts before you sew the top to the bottom will help reduce bulk, but don’t grade too aggressively, those seams are going to be under stress!

stuffing a diy ham

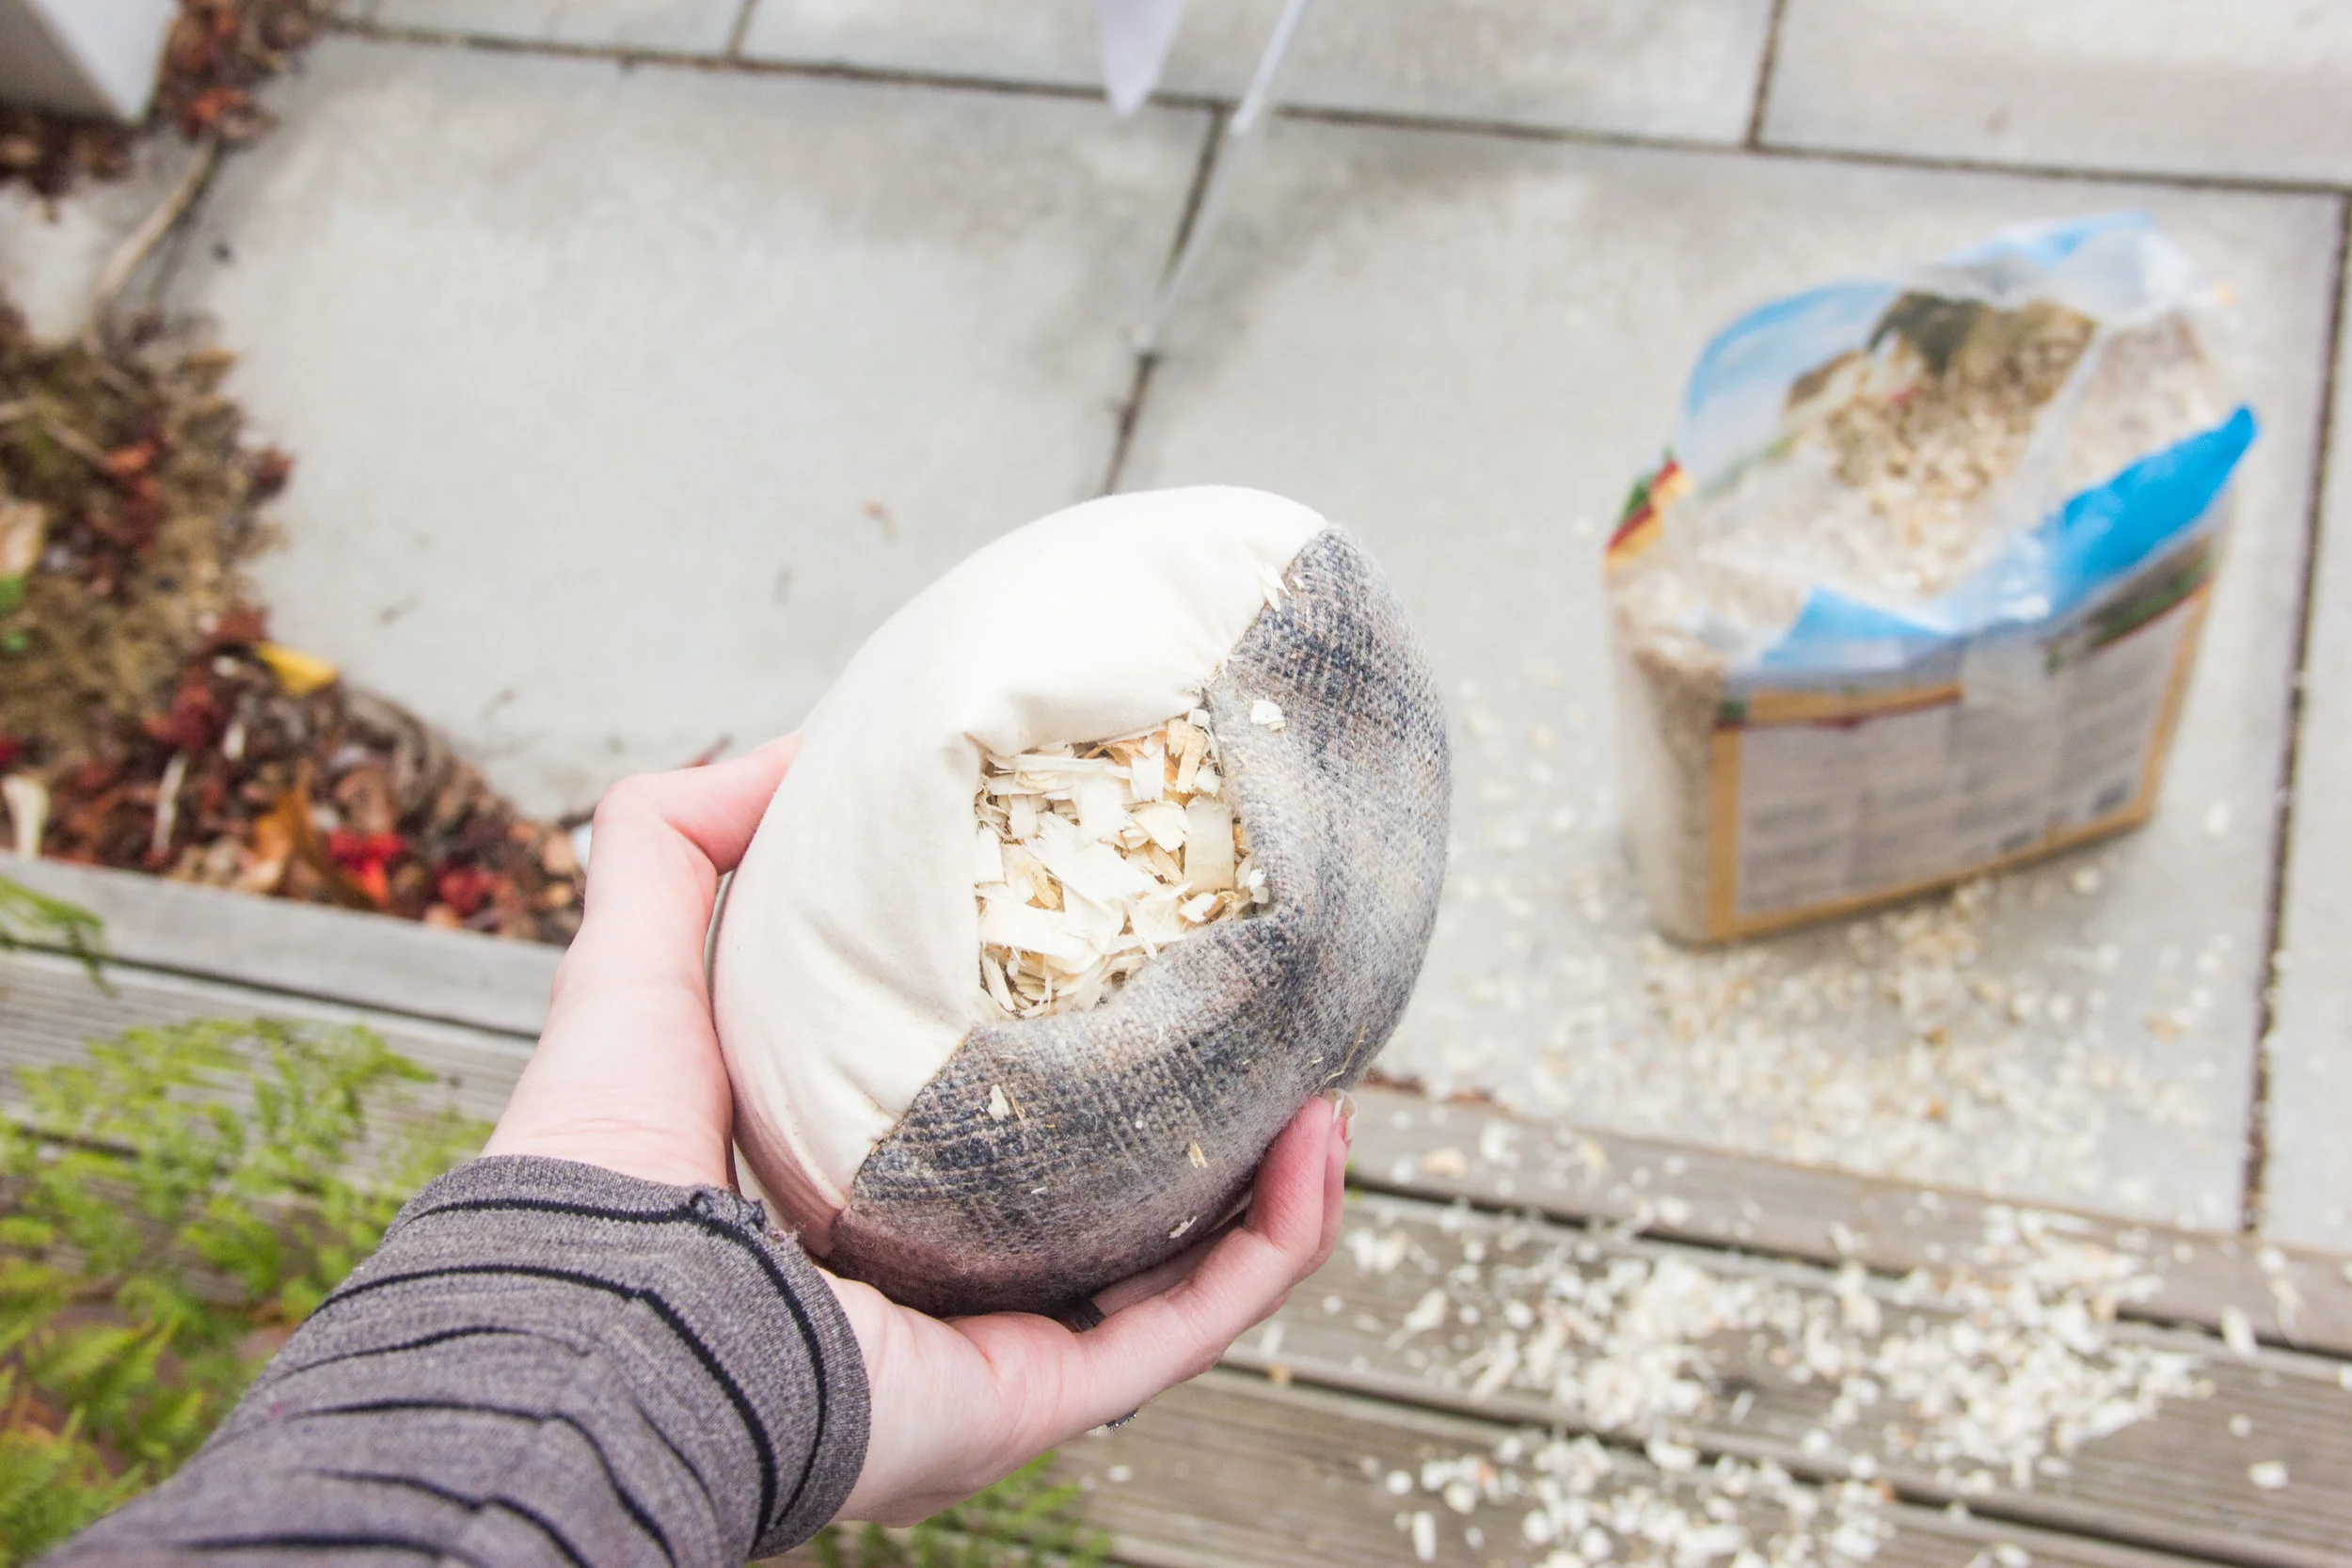
I won’t lie to you - stuffing a ham is fiddly and annoying. It’s kind of the one reason to consider buying one pre-made instead of making it yourself. You, the floor, the outside of your ham, and everything else in sight are going to be covered in a layer of wood shavings, and they’re going to be very hard to vacuum up. If it’s a nice day outside, I highly recommend ham-stuffing outside. Avoid carpet if at all possible. You can also lay a piece of newspaper down to catch the dropped shavings and funnel them back into your ham. Just.. be prepared to be at it for a while. Put some sunscreen on.

diy tailors ham

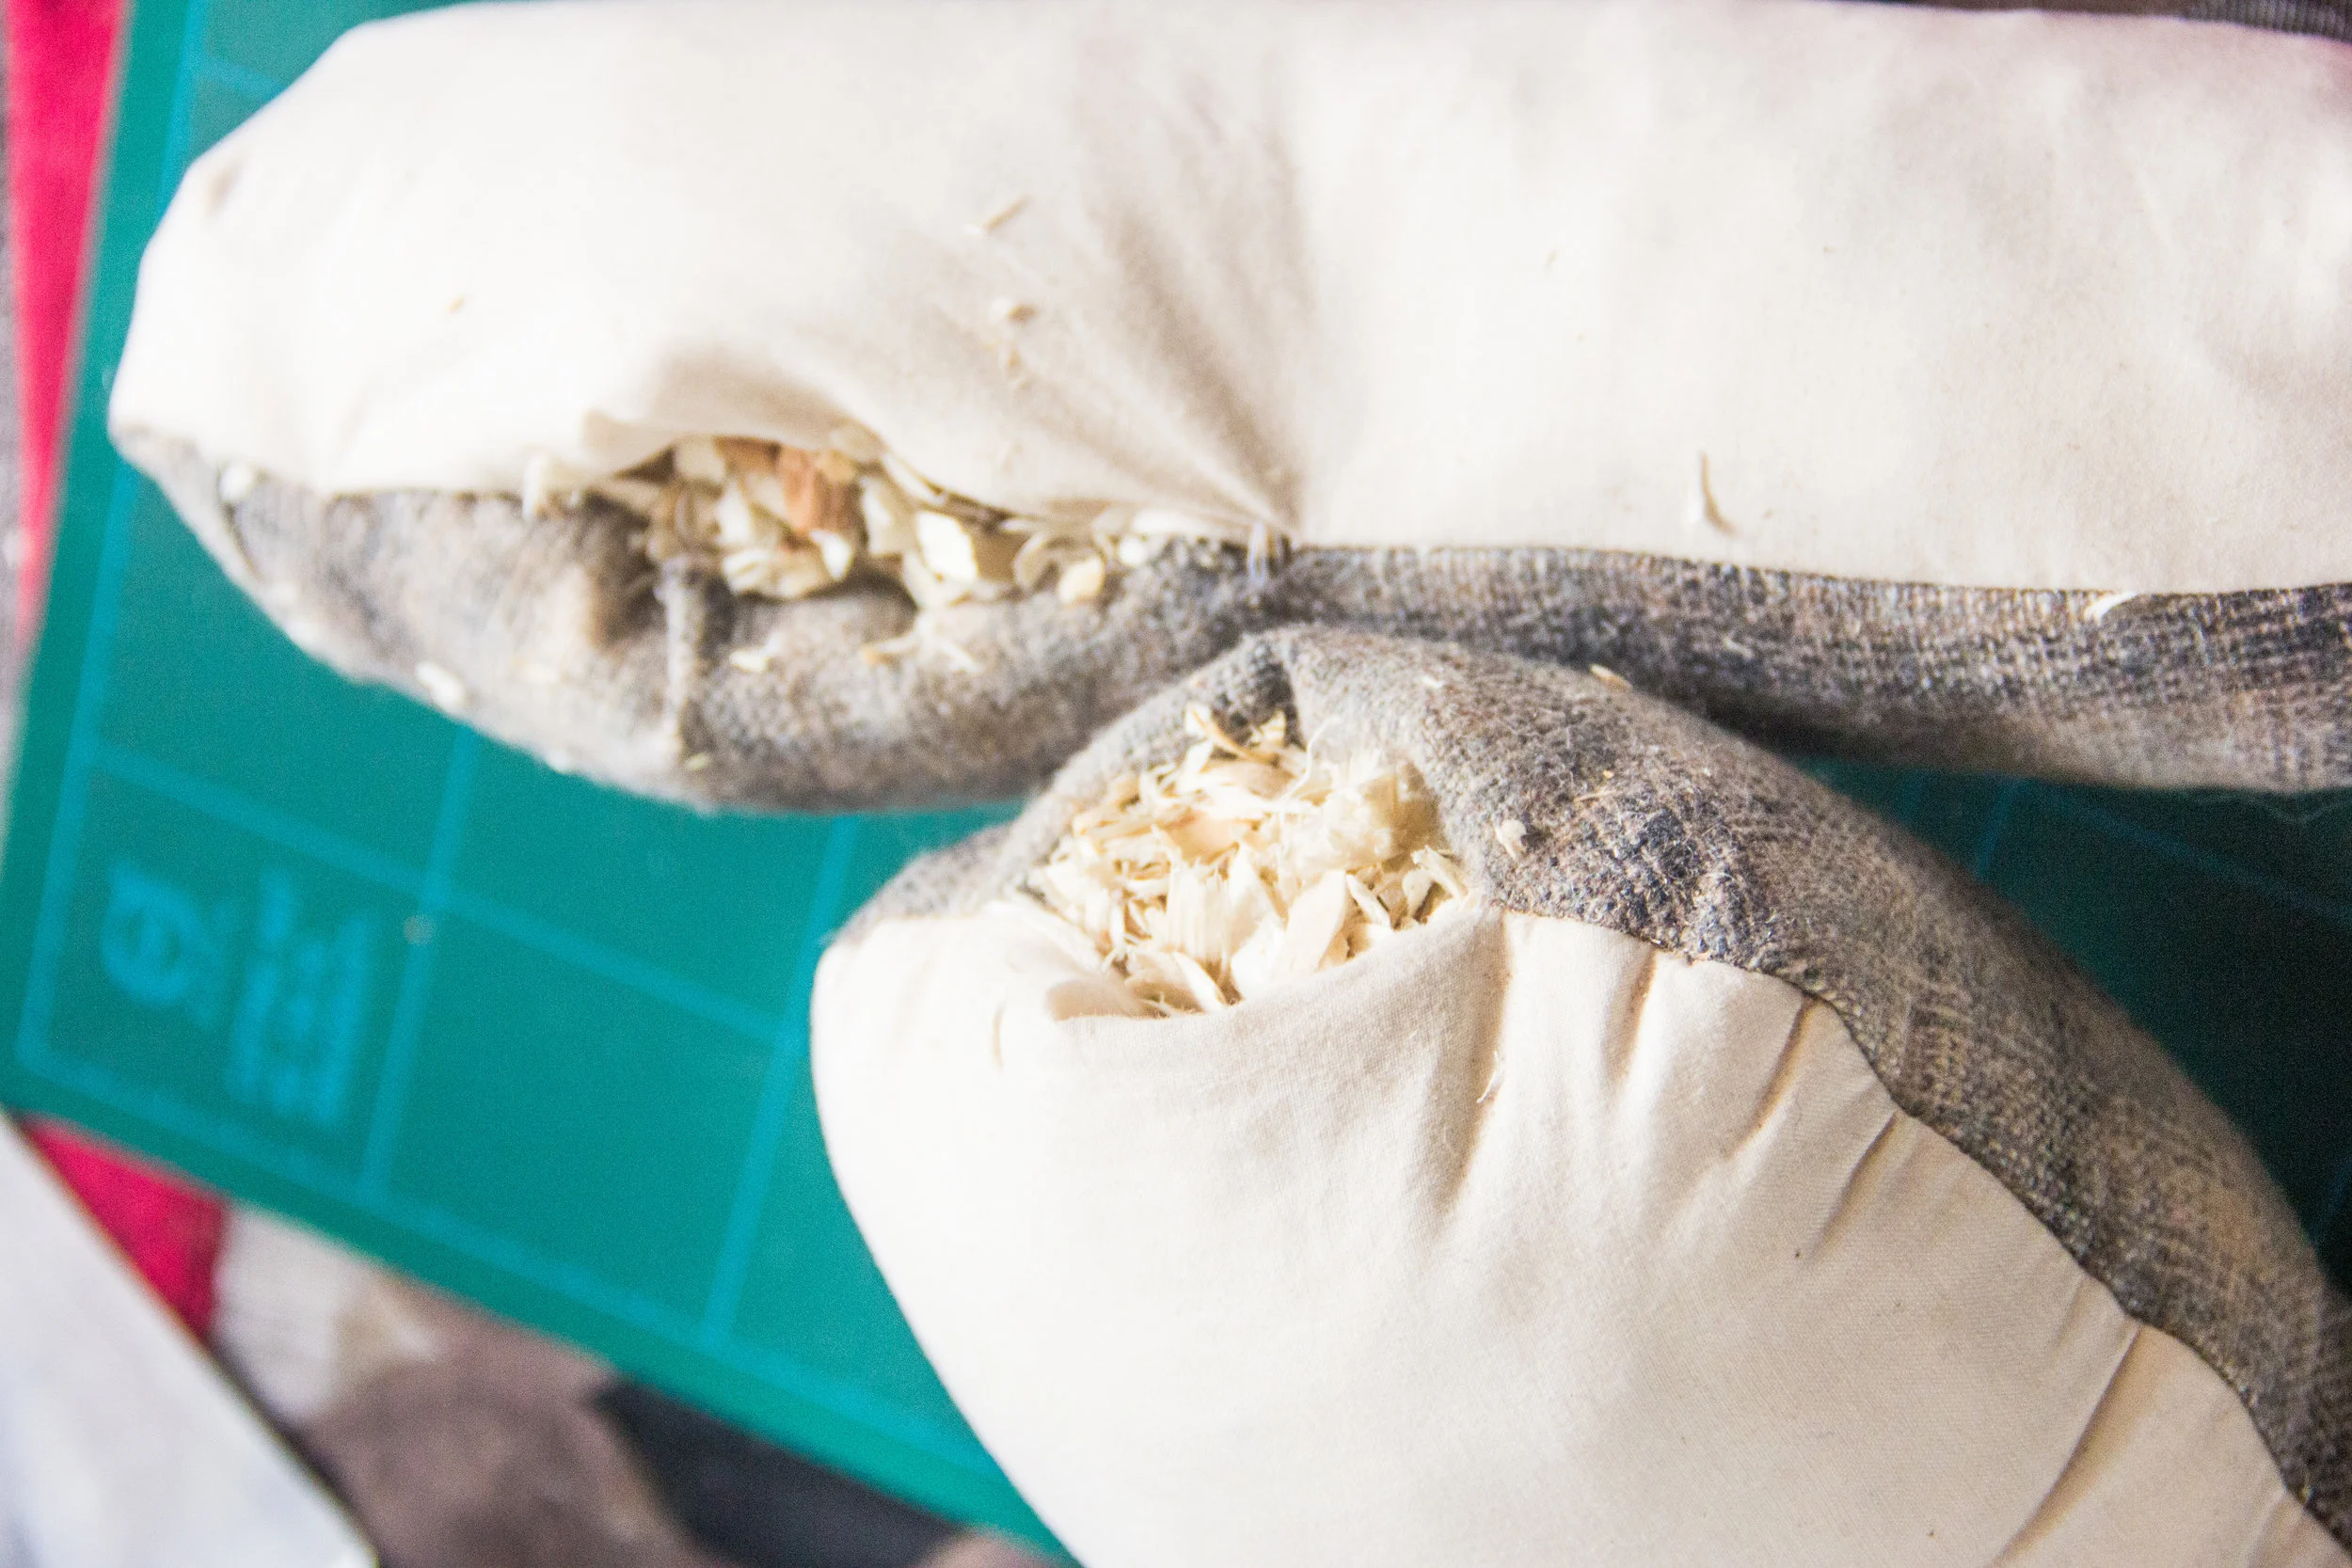
Using your toilet paper tube and chopstick, funnel wood shavings into the ham, and compress them as much as you can. Use force, you want the stuffing to be as firm as possible. Keep stuffing until you physically cannot stuff any more inside of your ham… and then keep going. You know how you squeeze avocados at the supermarket to see if they’re still firm or soft and ready to eat? This ham needs to be the hardest, most unripe avocado you’ve ever squeezed in your LIFE.

sew closed tailors ham

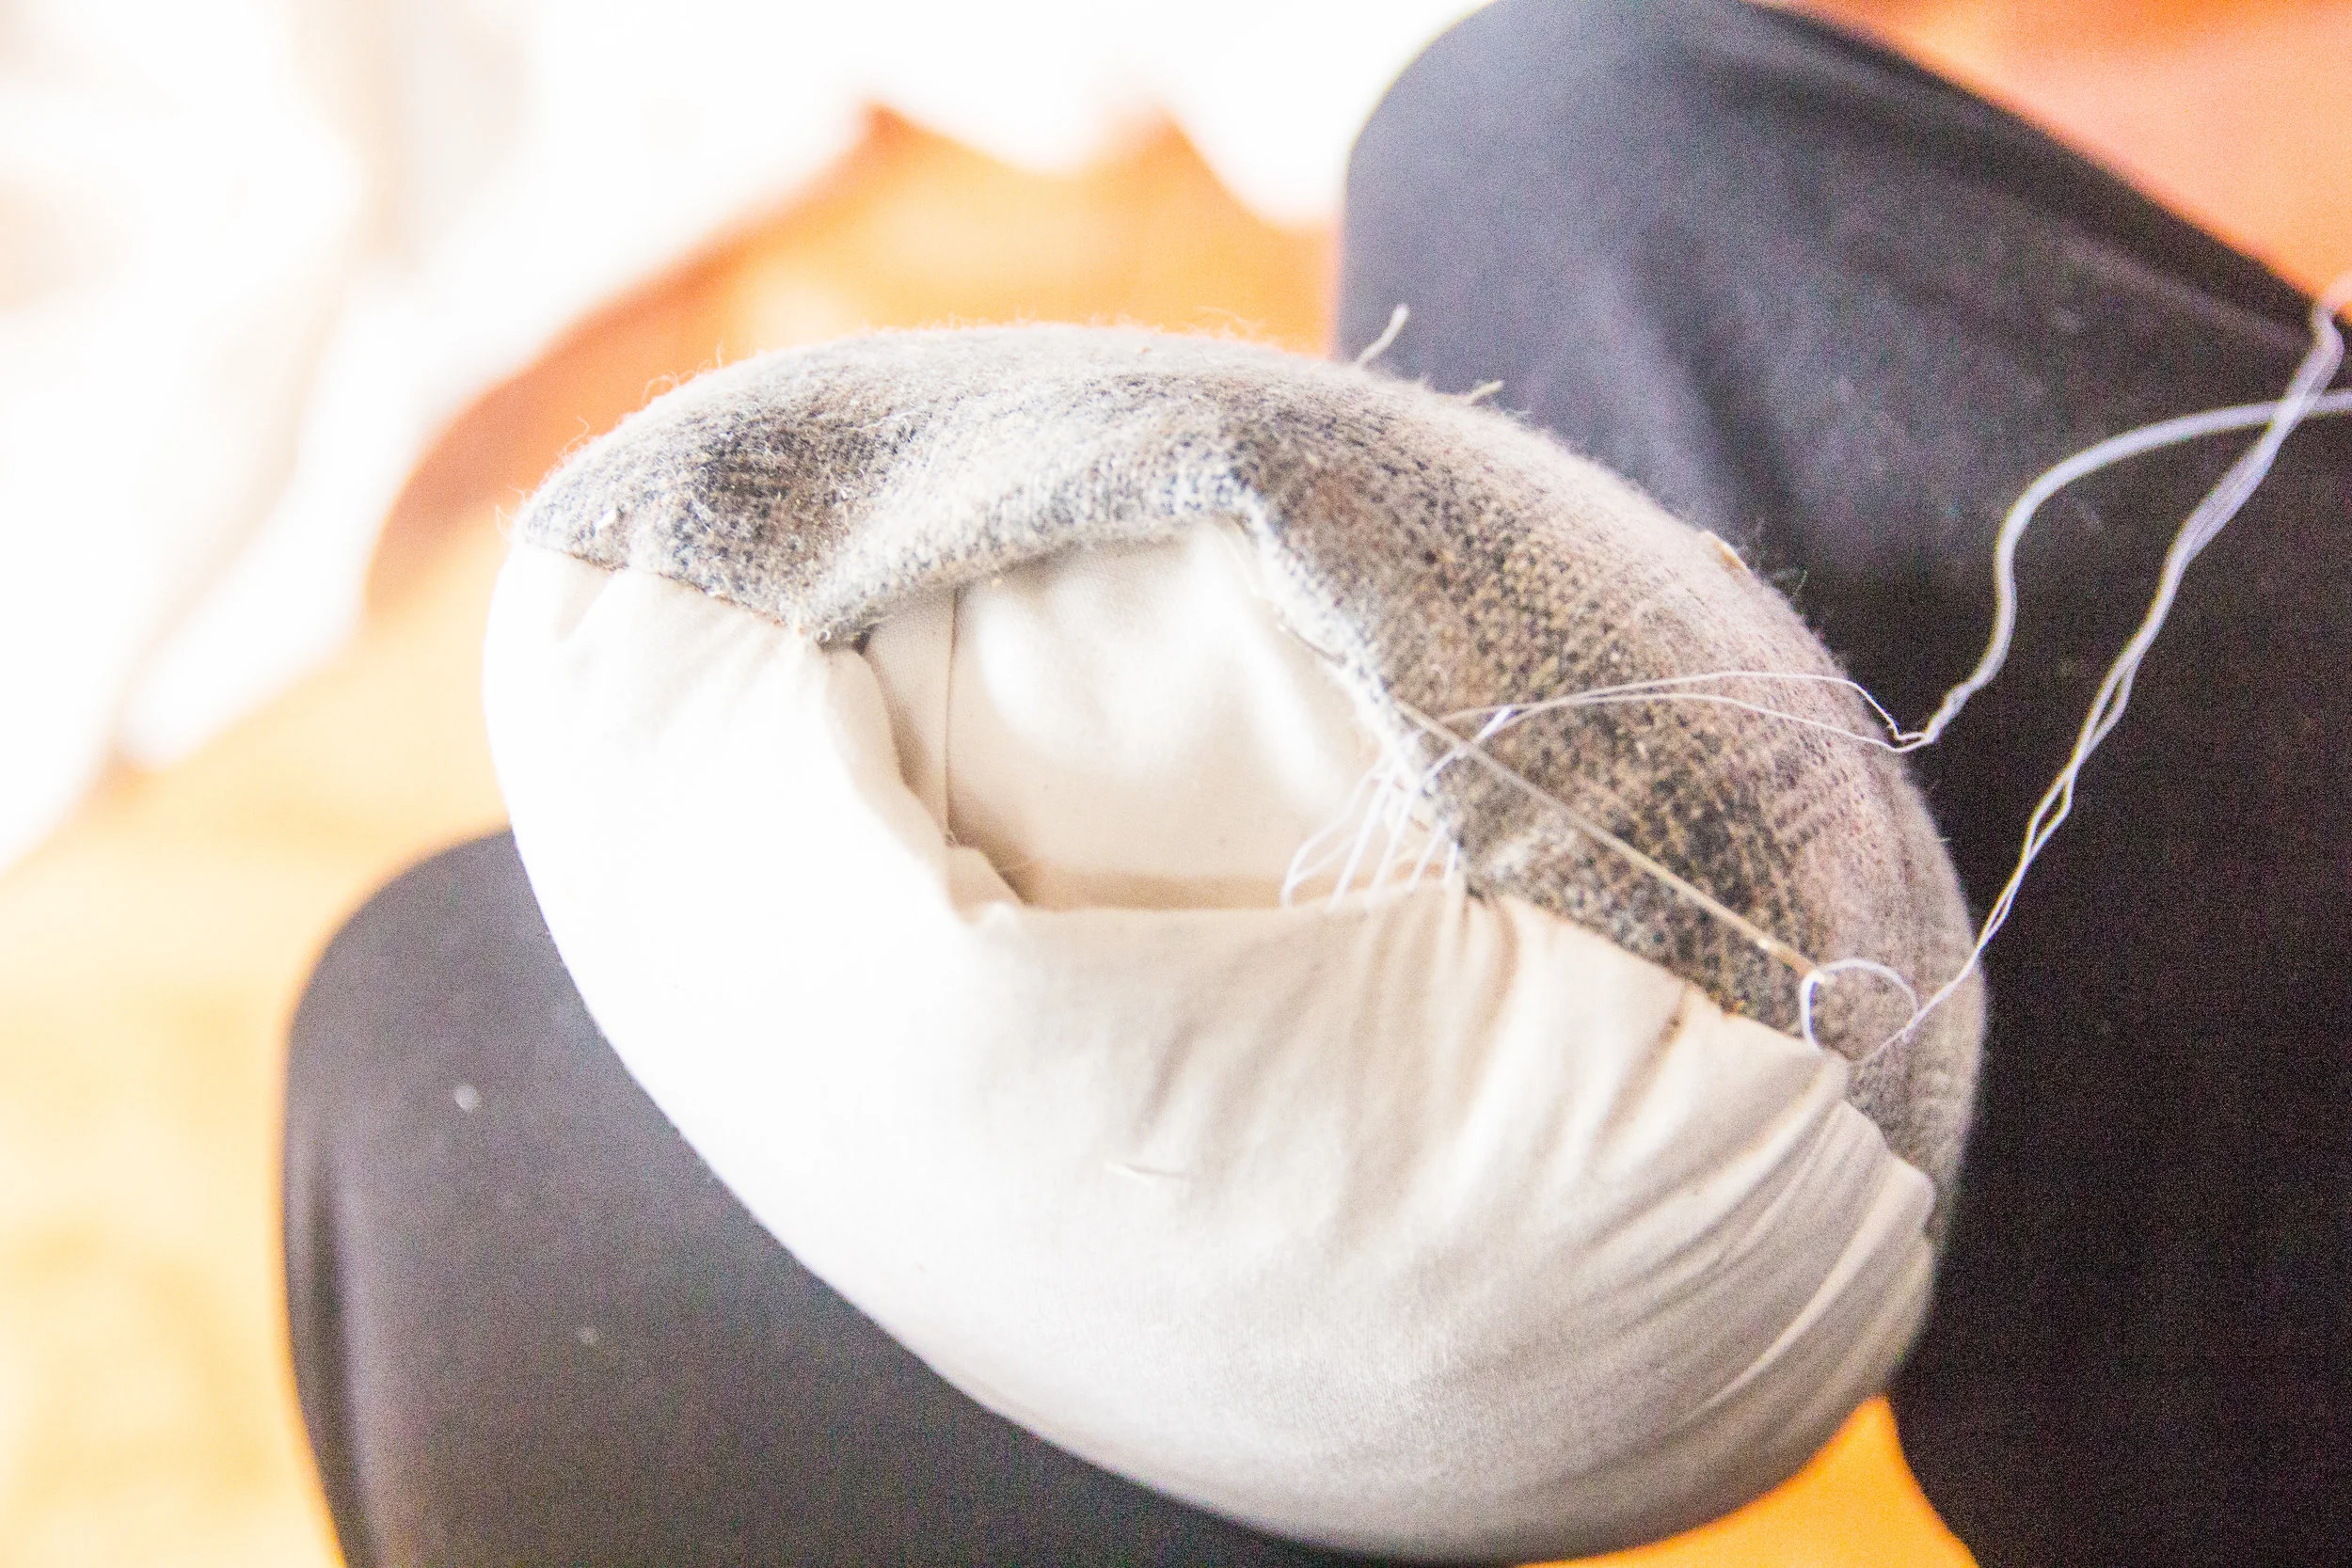
The opening of your ham will be gaping open from all the stuffing - this is okay - we’re going to stitch it back together. To keep the stuffing contained while you do that, wedge a bit of muslin inside the opening. Secure your thread, and mattress stitch the opening closed. This is another hard part. Pull the thread hard as you go to tighten the opening up, and tie knots at the end to make sure your precious new ham doesn’t spring open. That’s it, you’re done!

sewing a seam roll diy

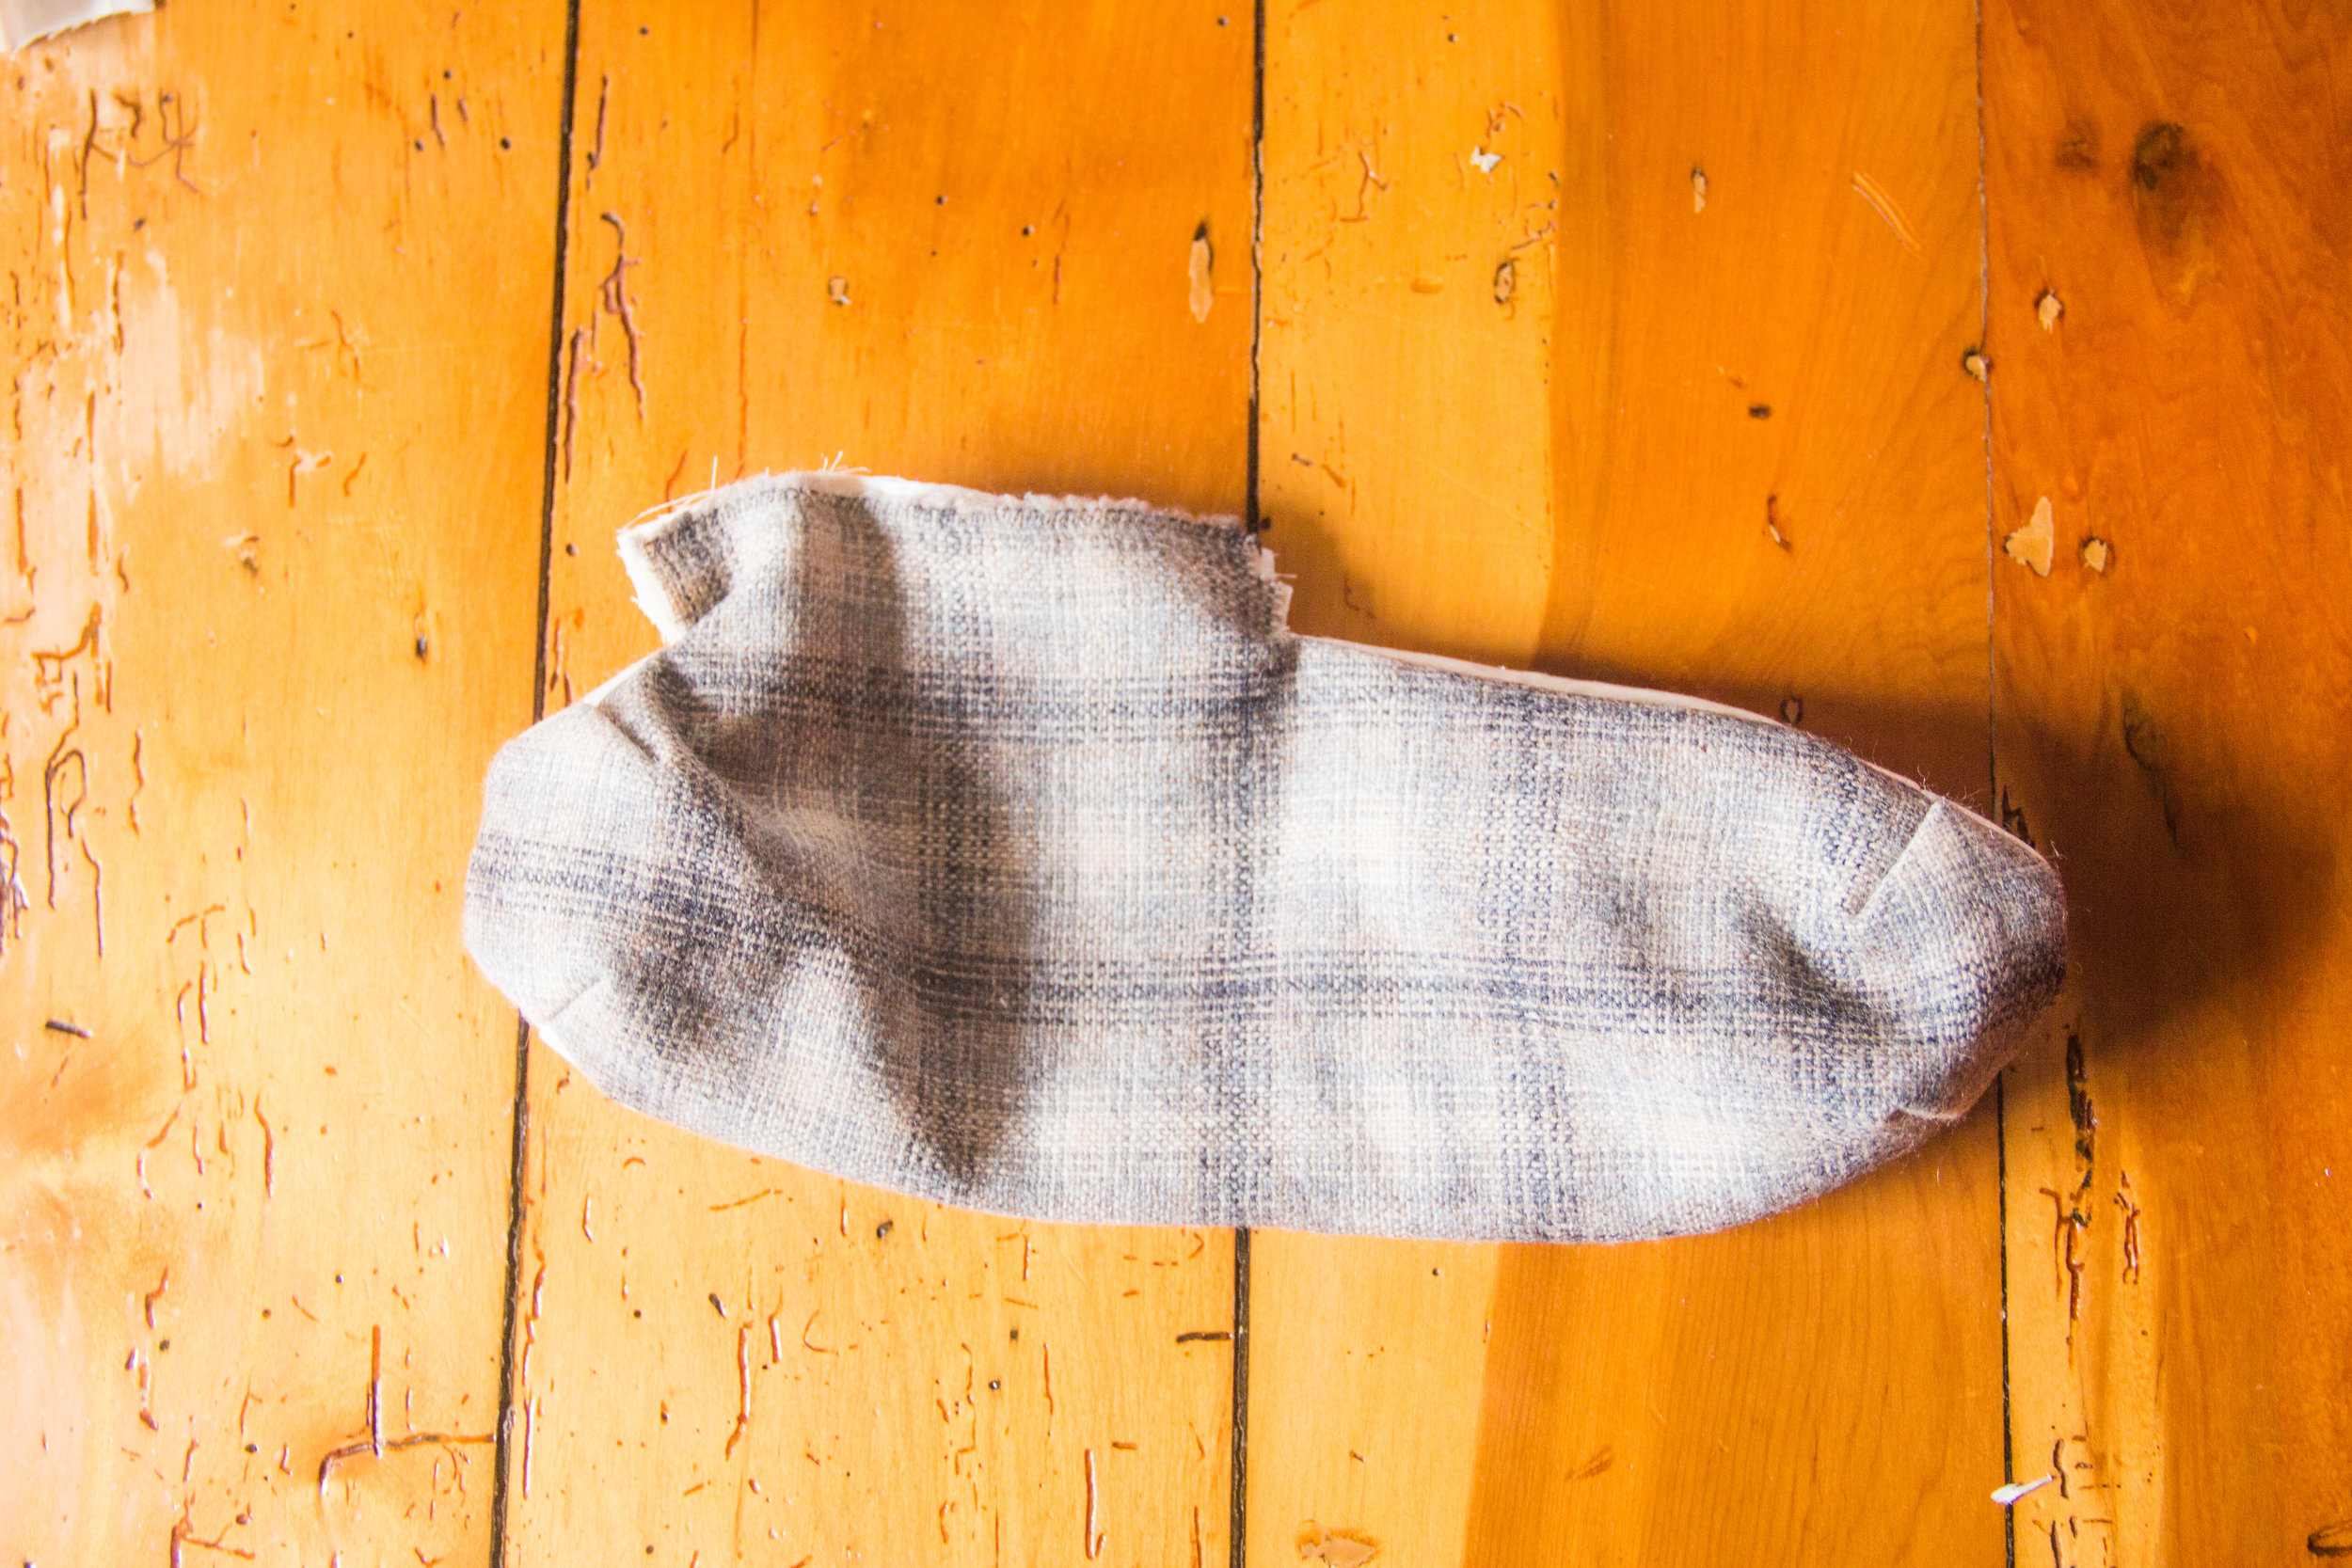
Repeat for the seam rolls - they’re a bit fussier to stuff because the opening is on the side, but I promise it’s better than trying to stitch closed the curved end of the seam roll.

IMG_7576.jpg

The next post is going to focus on the drafting of the boob ham - you’ll use all the same materials, but the seam rolls and tailor’s ham will work with any body shape or size, whereas a boob ham will be most helpful to you if it’s approximately the size of the boob you’re sewing for - so I’ll show you how to draft it to work for your size!

See you next week!

In Projects, Tutorials Tags tailors ham, seam roll, tutorial, tailoring tools, make your own tailors ham, make a seam roll, diy wardrobe, tailoring at home, nz sewing blog
← Tutorial: Tailor's Pressing Tools Part 2 - the Boob HamShoemaking Part 4: If the Shoe Fits... →

Support me on Patreon

Hi! I'm Kat, I don't have any cats, and this is organized chaos. If you'd like to chat about catlessness, sewing, knitting, or other forms of world domination, I'd love to hear from you!katherine.klebenow@gmail.com

Hi! I'm Kat, I FINALLY have a cat, and this is organized chaos. If you'd like to chat about cats, sewing, knitting, or other forms of world domination, I'd love to hear from you!

hellokat.makes@gmail.com

Category
  • Bernina
  • Bramaking
  • Machine Embroidery
  • Making Clothes
  • Pattern Sewing
  • Project Wedding Dress
  • Projects
  • Self Drafted Sewing
  • Shoemaking
  • Tambour and Beadwork
  • The Monthly Draft
  • Travel
  • Tutorials
  • Yarn and Handknits
Subscribe on YouTube
Featured
Tutorial: Sewing a custom Cat Carrier Cover for your cat's travel box
Oct 9, 2024
Tutorial: Sewing a custom Cat Carrier Cover for your cat's travel box
Oct 9, 2024

Today's project is a cover, custom made to fit over my cats' travel carrier. This project has everything - custom drafting, magnets, hardware installation, problem solving: All in the name of keeping my kitties happy in transit! It's a long one - you've been warned.

Oct 9, 2024
Weaving your First Project on a Rigid Heddle Loom
Apr 26, 2023
Weaving your First Project on a Rigid Heddle Loom
Apr 26, 2023

My very first project on my new rigid heddle loom! I so enjoyed learning this new skill - here are a collection of tips as well as links to tutorials I found helpful as I made my first project!

Apr 26, 2023
DIY, Sewing, and Craft Supply Shops in New Zealand
Apr 13, 2023
DIY, Sewing, and Craft Supply Shops in New Zealand
Apr 13, 2023

Ever wondered where to get a weirdly specific hardware? supplies for making shoes, bags, or embroidered tea towels? Dye supplies or fancy zips? I've compiled a list of my favourite sources!

Apr 13, 2023
Sewing the Haptic Lab Constellation Quilt (again)
Mar 30, 2023
Sewing the Haptic Lab Constellation Quilt (again)
Mar 30, 2023

I’m making a northern stars constellation quilt to match my southern stars one! This one has started quite a bit differently from the last one - so I’ve shared my process in case it helps you with a similar project!

Mar 30, 2023
The Tambour Embroidery Hoop Holder: A Woodworking DIY
Mar 23, 2023
The Tambour Embroidery Hoop Holder: A Woodworking DIY
Mar 23, 2023

In which our intrepid tambour embroidery fanatic once again attempts woodworking in the name of beads. (Also, in which fortunately the attempt is once again successful!)

Mar 23, 2023
The Home Sewist's Guide to Snap Fasteners for baby clothes, bag making, and more
Mar 15, 2023
The Home Sewist's Guide to Snap Fasteners for baby clothes, bag making, and more
Mar 15, 2023

A deep dive into the world of snap fasteners! Did you know there were so many options to choose from? We go through five popular options for fasteners and discuss the pros and cons, as well as applications, of each

Mar 15, 2023
Lillian's Embroidered Wedding Veil
Mar 1, 2023
Lillian's Embroidered Wedding Veil
Mar 1, 2023

Making Lill’s cathedral length floral embroidered wedding dress - all in one monster post!

Mar 1, 2023
Art Deco Wardrobe Collection
Feb 19, 2023
Art Deco Wardrobe Collection
Feb 19, 2023

This was going to be the year I finally attended the Art Deco festival in Napier - here’s everything I made to wear for the weekend, all in one place!

Feb 19, 2023
Tutorial: Pullover Hoodie with Cat Pocket
Nov 9, 2022
Tutorial: Pullover Hoodie with Cat Pocket
Nov 9, 2022

Do you have a velcro kitty like me? I made my very own cat-pocket hoodie so I can carry my little guy around wherever he wants to go, and it’s a tutorial now so you can make one yourself!

Nov 9, 2022
The Prick and Pounce Method for Tambour Embroidery
Nov 9, 2022
The Prick and Pounce Method for Tambour Embroidery
Nov 9, 2022

Today we’re exploring one of the oldest methods of embroidery design transfer - the prick and pounce method!

Nov 9, 2022
Ko-fi donationsSupport Me on Ko-fi

Get the Updates!

Customize Updates
choose 'Blog Updates' to get an email whenever I publish a new post, and 'Newsletter' for the newsletter. Or choose both!
Thank you!

Instagram

Woven scarf number two! For this one, I tried weaving with laceweight which I was *certain* would require a 15 dent heddle but the wpi math said 12.5 so I went with it. Woven on my @ashford_wheels_looms 16” rigid heddle loom using alpaca yarn w
Pink scenes from a weekend of sewing: I’m having a summer birthday for the first time in almost a decade, and the occasion calls for a summer birthday dress! I’m tackling the bustier style, which i anticipate may be a bit of a mission bec
Happy first Gotcha Day to this little dude! It’s been so fun to watch him grow up from a tiny little puffball into a Whole Cat, who is somehow also just a tiny human fellow in a cat suit 💕 here’s to another 365, and may the future, perha
Finished Scarf!! It took a while for the weather to cooperate for these photos but that’s all good because it gave me time to write my blog post! 

This is my Very First Ever project on a rigid heddle loom- mine is the @ashford_wheels_looms 16&
Archive
  • October 2024
  • April 2023
  • March 2023
  • February 2023
  • November 2022
  • March 2022
  • January 2022
  • November 2021
  • September 2021
  • July 2021
  • January 2021
  • April 2020
  • March 2020
  • August 2019
  • July 2019
  • June 2019
  • May 2019
  • April 2019
  • March 2019
  • February 2019
  • December 2018
  • November 2018
  • October 2018
  • September 2018
  • August 2018
  • July 2018
  • June 2018
  • May 2018
  • April 2018
  • March 2018
  • February 2018
  • January 2018
  • December 2017
  • November 2017
  • October 2017
  • September 2017
  • August 2017
  • July 2017
  • June 2017
  • May 2017
  • April 2017
  • March 2017
  • February 2017
  • January 2017
  • December 2016
  • November 2016
  • October 2016
  • September 2016
  • August 2016
  • July 2016
  • June 2016
  • January 2016
  • December 2015
  • May 2015
  • April 2015
  • March 2015
  • December 2014
  • November 2014
  • October 2014
  • August 2014
  • June 2014
  • March 2014
  • January 2014

Get the Updates!

Put your Email Address in the box, and I'll ask the friendly internet robots to send you a message when I post an update!

I'll send an email for each new post.

Thank you!