
It's bra time again! I'm not going to lie, I've been looking forward to this post more and more with every single comment all you lovely humans gave me on my floral bustier - and it is in fact, due to your kind pestering, that this tutorial exists!
When I was planning the matching clasp for that bra, there was a surprising lack of knowledge available in the area of constructing your own hook and eye clasp. Aside from a mention on Ying's Tailor Made Blog that she once made one, I could find nary a whisper of anyone else creating such a thing.
On reasons you might want to add a DIY clasp to your DIY bra: I can think of a few, but saving time is not one of them. To be able to bring the pretty cradle/cup fabric around to the back for continuity, maybe, for the technical challenge, because you can't find a clasp that matches, or because you're making a longline and you don't want to choose between black or white hook and eye tape. To name a few. Whatever your reason, just make sure you have a few hours and a nice cup of coffee. For a first clasp especially, expect to spend about as long on the clasp as you will on the rest of your bra. As long as you know up front that it's fiddly, slow, time consuming, and that we're basically doing something on a home sewing machine that a home sewing machine isn't meant to be able to do.
Okay, enough of my introductory blathering. Onwards to the good stuff!
You Will Need:
- Fabric! - Generally something woven, with a bit of stability- the clasp fabric basically needs to meet the same requirements as your stable cradle/cup fabric. I'll show you clasps with two types of fabric so that we can investigate some different treatments for each.
- Interfacing! - preferably of the iron-on variety although that's not required. This will help stabilize your fabric even further and keep your clasp flat against your body when you're wearing your bra. Also have some sheer nylon cup lining scraps around if your fabric is less stable.
- Thread! - Polyester is good (you'll rarely hear me say that, but it is strong)- whatever you're making the rest of your bra with will be just peachy.
- Bra hooks and eyes! - this we'll cover in depth momentarily as well. I buy cheap 'bra extenders' and take the hooks and eyes out. They're shaped differently to those you buy in the sewing section, and you also need hooks and eyes at a 1:3 ratio, which means the pricing is about the same ( in my experience). (you could extend the number of settings if you wish as well! Infinite possibilities!)

That's it for supplies! you'll also want sharp scissors, some pins, a small ruler, an iron, a sewing needle, and of course, your trusty sewing machine (although this is 100% doable by hand if you're so inclined! - I use a button foot and a zipper foot.) I also highly recommend a sewing awl if you haven't already got one - it's great for helping to feed our tiny pieces of fabric through the machine, so you can avoid sewing your fingers...
For this tutorial, I'm making two clasps out of two very different fabrics. The first is my floral satin from Elle-Joan's (leftover from the bustier!) - it's polyester, fairly thick, stable, with no mechanical give up and down, and a bit of horizontal stretch. The second is a beautiful 100% silk Liberty of London fabric from The Fabric Store which was so insanely beautiful and expensive that I could only make something very small with it. It's woven, and pretty stable both lengthwise and crosswise, but it turns to liquid if you even look at it on the bias. In this tutorial, we'll talk about ways to improve the structural integrity of this wiggly silk and make sure it'll hold up to the strain of being a bra clasp. If you're just dying to use a knit or stretch fabric, stabilizing will also be a good trick because the bra clasp is an area in which we definitely are not looking for stretch.
The What's and How's:
Step 1 is cutting, but before that we need to answer a quick question: How tall do you want your finished hook measurement to be? This will be influenced by how many hooks you want and their spacing, but it mostly depends on the length of the center back edge of your bra band. The industry average (according to my collection) is 3/4" between each hook, and 1/2" between the last hook and the edge of the clasp. This, obviously, is up to you, but it's always good to know what's standard. Do you have your measurement? or an approximate? Cool. We're going to call that x, for clarity. My x heights for the two clasps I'm making are 2.5" - both my clasps will be three hooks tall.

Now, grab your scissors! Below is a 8.5x11 printable PDF of all the pieces you'll need, but they're all just rectangles so read on for the pieces in measurement format - it's an easy way to save a tree!
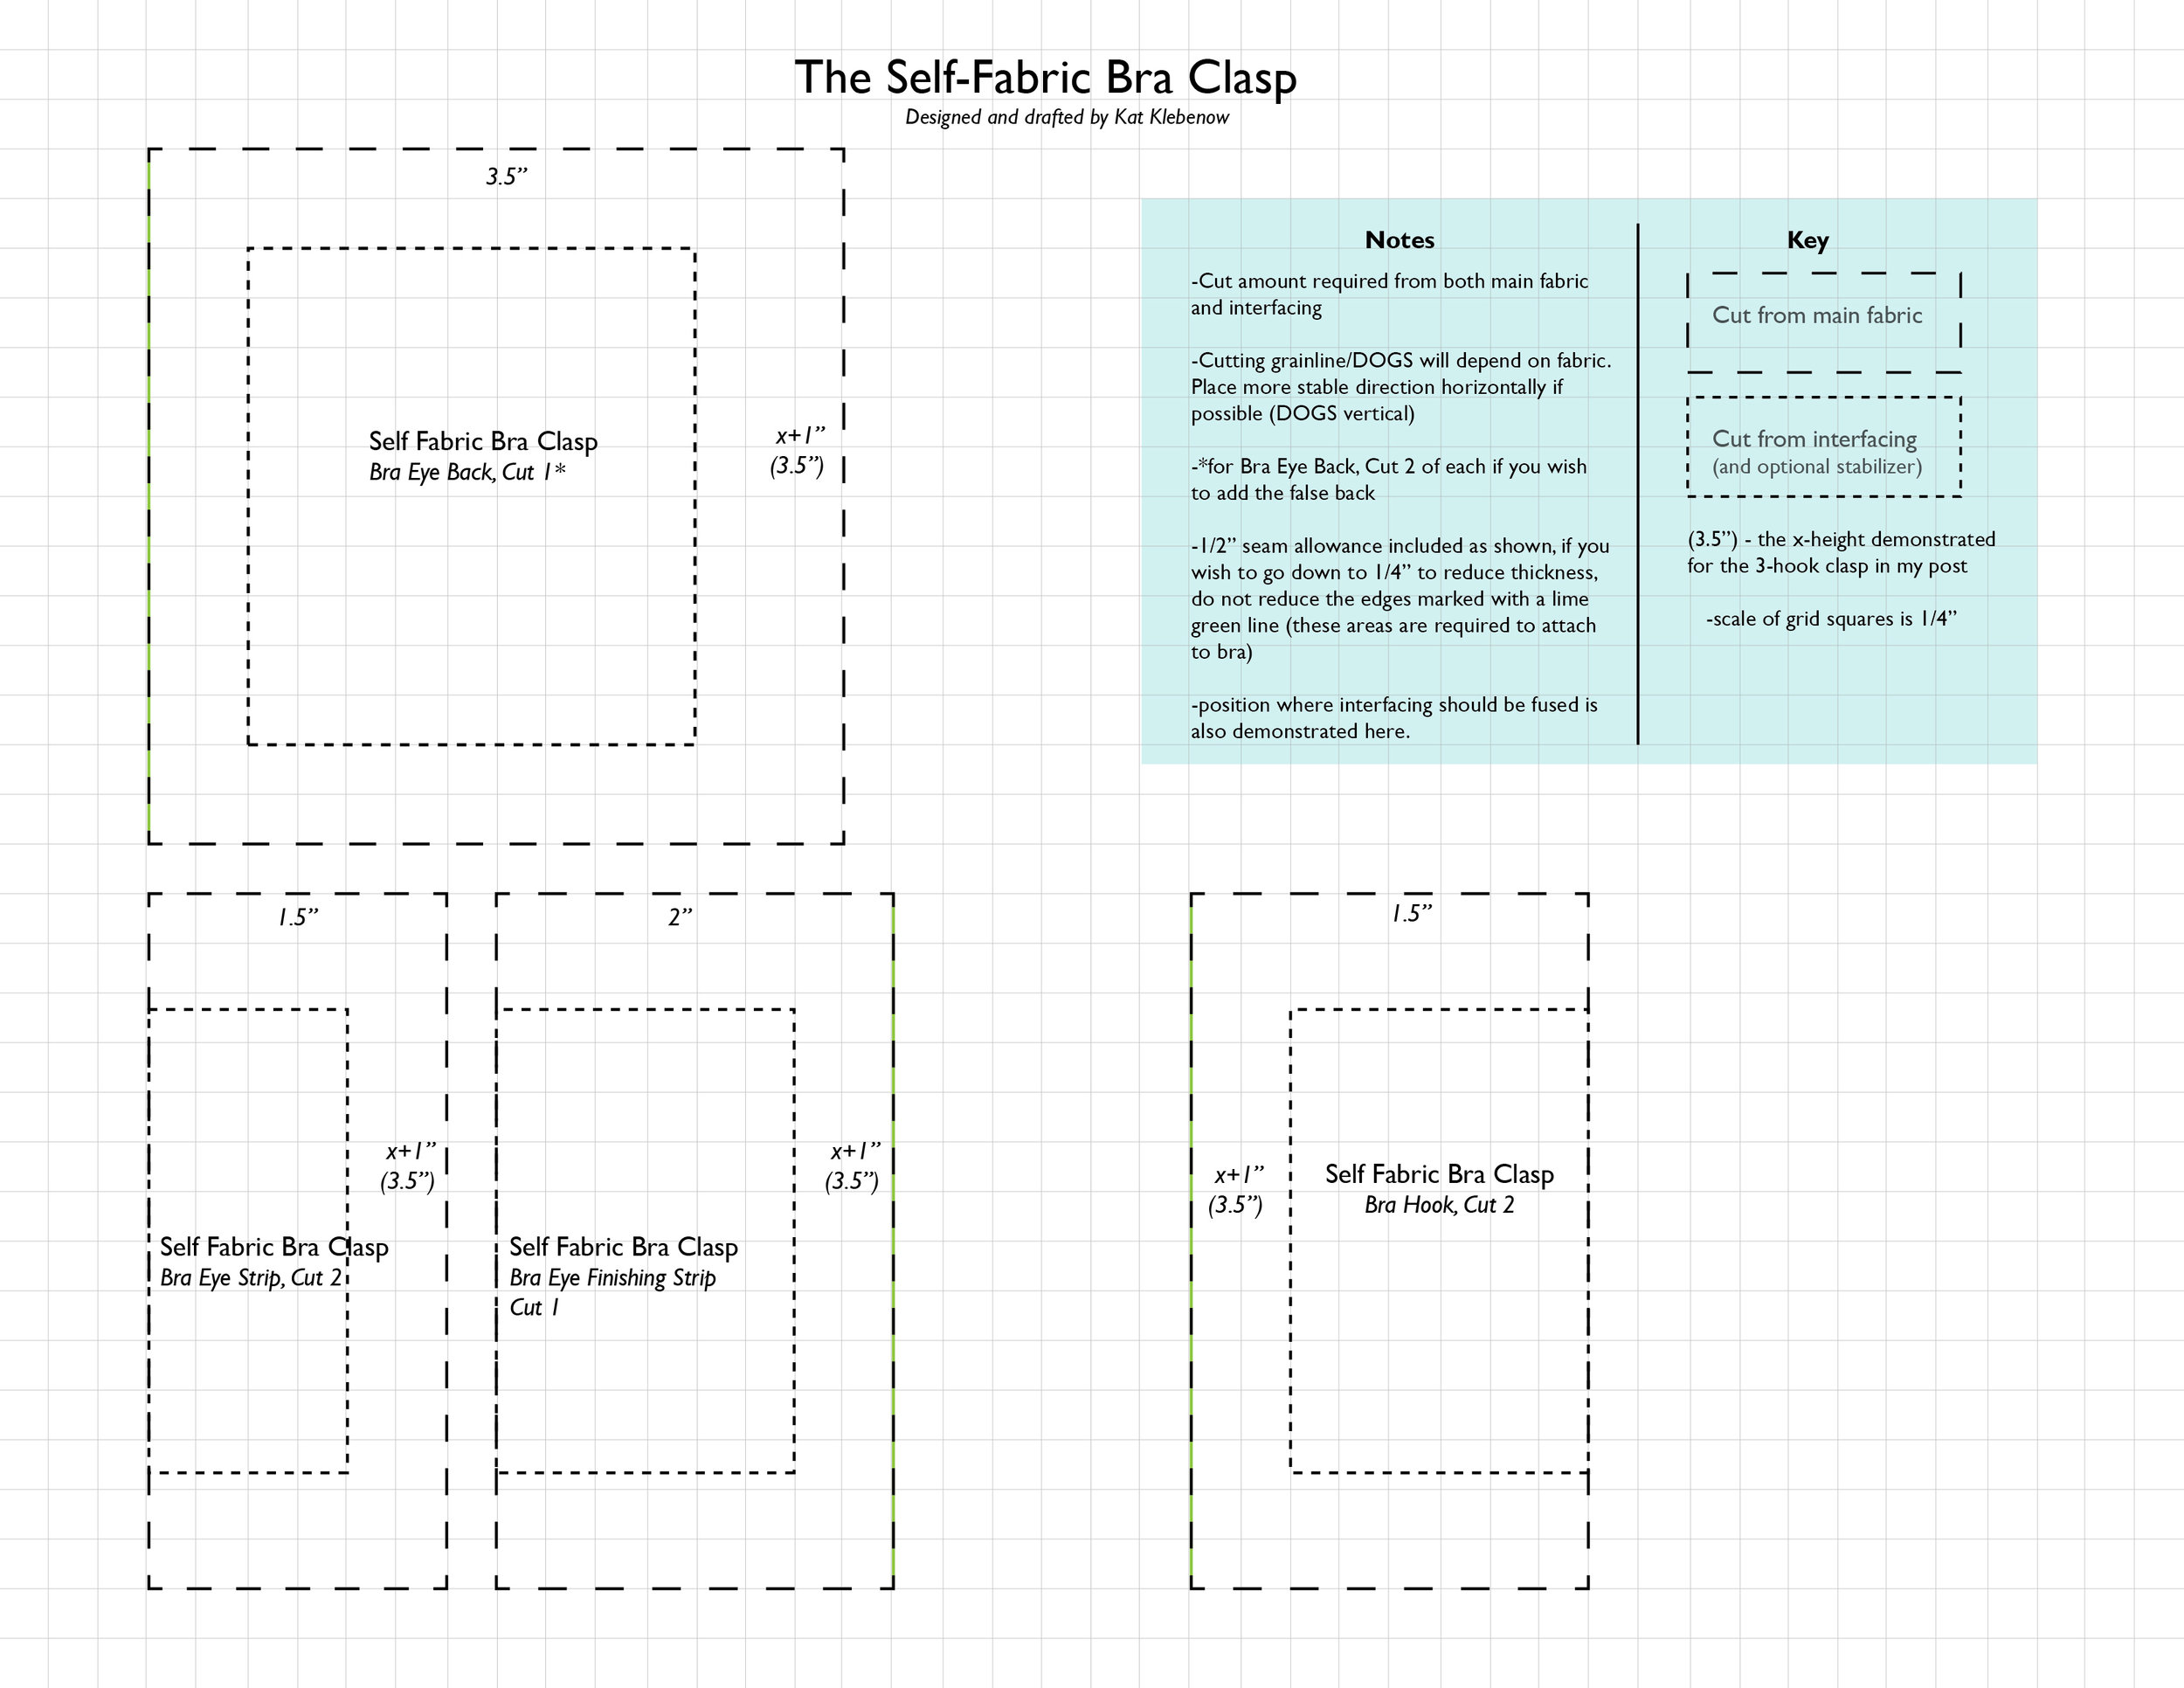
Here's the PDF version:bra-clasp-cutting-diagram
For the eye side, you're going to need one back piece, two 'eye strips', and a finishing strip. The back piece will be 3.5" by x+1", the two eye strips will be 1.5" by x+1", and the finishing strip will be 2" by x+1". Check out the photo or PDF for interfacing sizes (we're not interfacing the 1/2" seam allowances- decrease bulk wherever possible!) Optionally, you can also cut an extra back piece to hide the stitching, which I'll show you how to apply. For now, cut an extra back piece and iron it as instructed below :)

For the hook side (not pictured but I promise it's there), you're going to need two pieces, 1.5" by x+1". and two pieces of interfacing. That was easy! (for my silk clasp, I'll be adding an additional underlining of sheer nylon to help the stitching area stay strong!)
Ironing Prep
Pieces cut? Next, fuse all those pieces of interfacing to your fabric rectangles - you should have 1/2" seam allowances all the way around everywhere, except for the eye strips, eye finishing strip (it's wrong in the photo), and the hook pieces, where the interfacing goes all the way to the edge on one side. Like So:

Now's also a good time to mention that if your fabric is very flimsy (like my Liberty silk) or you're worried about it for whatever reason, I'd recommend two layers of sheer cup lining as an interlining for both the hook and the eye side. The clasp is one of the highest-stress areas of a bra, so giving it a good foundation like this, although a bit fiddly, will help its longevity down the line!
Okay, have we got all our pieces cut and fused? Great! Just a quick side note to talk about hooks and eyes: The ones that come in pre-made bra clasps are Very Different to the ones you buy in the clasps section of your friendly neighborhood sewing store:

I can't say with any conviction that terror will rain from the skies if you use the 'normal' kind, but I'm sticking with the bra-specific kind because there's not a cost difference between the two, and because I like the little square shape of the eyes, as opposed to the rounded kind. The only negative is that I can't seem to find them anywhere except by ripping up existing cheaply made 'bra extenders'
edit: Kelly from Canada has an in, you guys! She found some hooks and eyes of the square variety - they're sold under 'bridal' and come only in white, but it's a start!
Gina has also found a link for those of you in the US (Washington, it looks like) that sells 'bridal' hook and eyes as well- here's the link!
Alright - have you made up your mind about the hooks and eyes? Let me know in the comments if you can think of an argument one way or the other! Let's get back to our clasps. We need to do a bit (okay, a lot) of ironing prep before we can sew our clasps together. For the hook, fold in both top and bottom edge 1/2" and press, then fold the left and right edges in 1/2" and press. Like so:

Those pieces will fit together with the hooks. For now, though, set them aside so we can iron the eye side.
Take your back piece, and fold its top and bottom edges in 1/2", then fold its left edge in 1/2". Fold the right edge in 3/4". If you're using interlining, place those pieces under the folded edges now.
Both of your eye strips need the following treatment:Fold and press the two short edges under 1/2". On the long edge where the interfacing goes all the way to the edge, fold under 1/2" and press. (we need the interfacing stability for later!)
Last piece! For your finishing strip, fold 1/2" in from each side, and 1/2" from the top and bottom. That little group of pieces should look like this:

At this point, you can stack up all the pieces and start to see how they fit together!

Sewing The Eyes
Alrighty, now that we've got our bits ironed, the next step is attaching the hooks and eyes! First, the eyes: It's helpful at this stage to have a button foot on your machine, but if you don't, or you're confident in your hand sewing abilities, you can absolutely do this bit by hand. To find the distance between your eyes, you can take the ~standards~ to heart, measure 1/2" from the top edge, then place your hooks and eyes 3/4" apart ending 1/2" from the bottom.... or you can just kind of wing it and come up with something that looks good to you. Just keep in mind that the further apart you place them, the more chance there is of gaping. I'd say stick towards closer together for more delicate fabric.

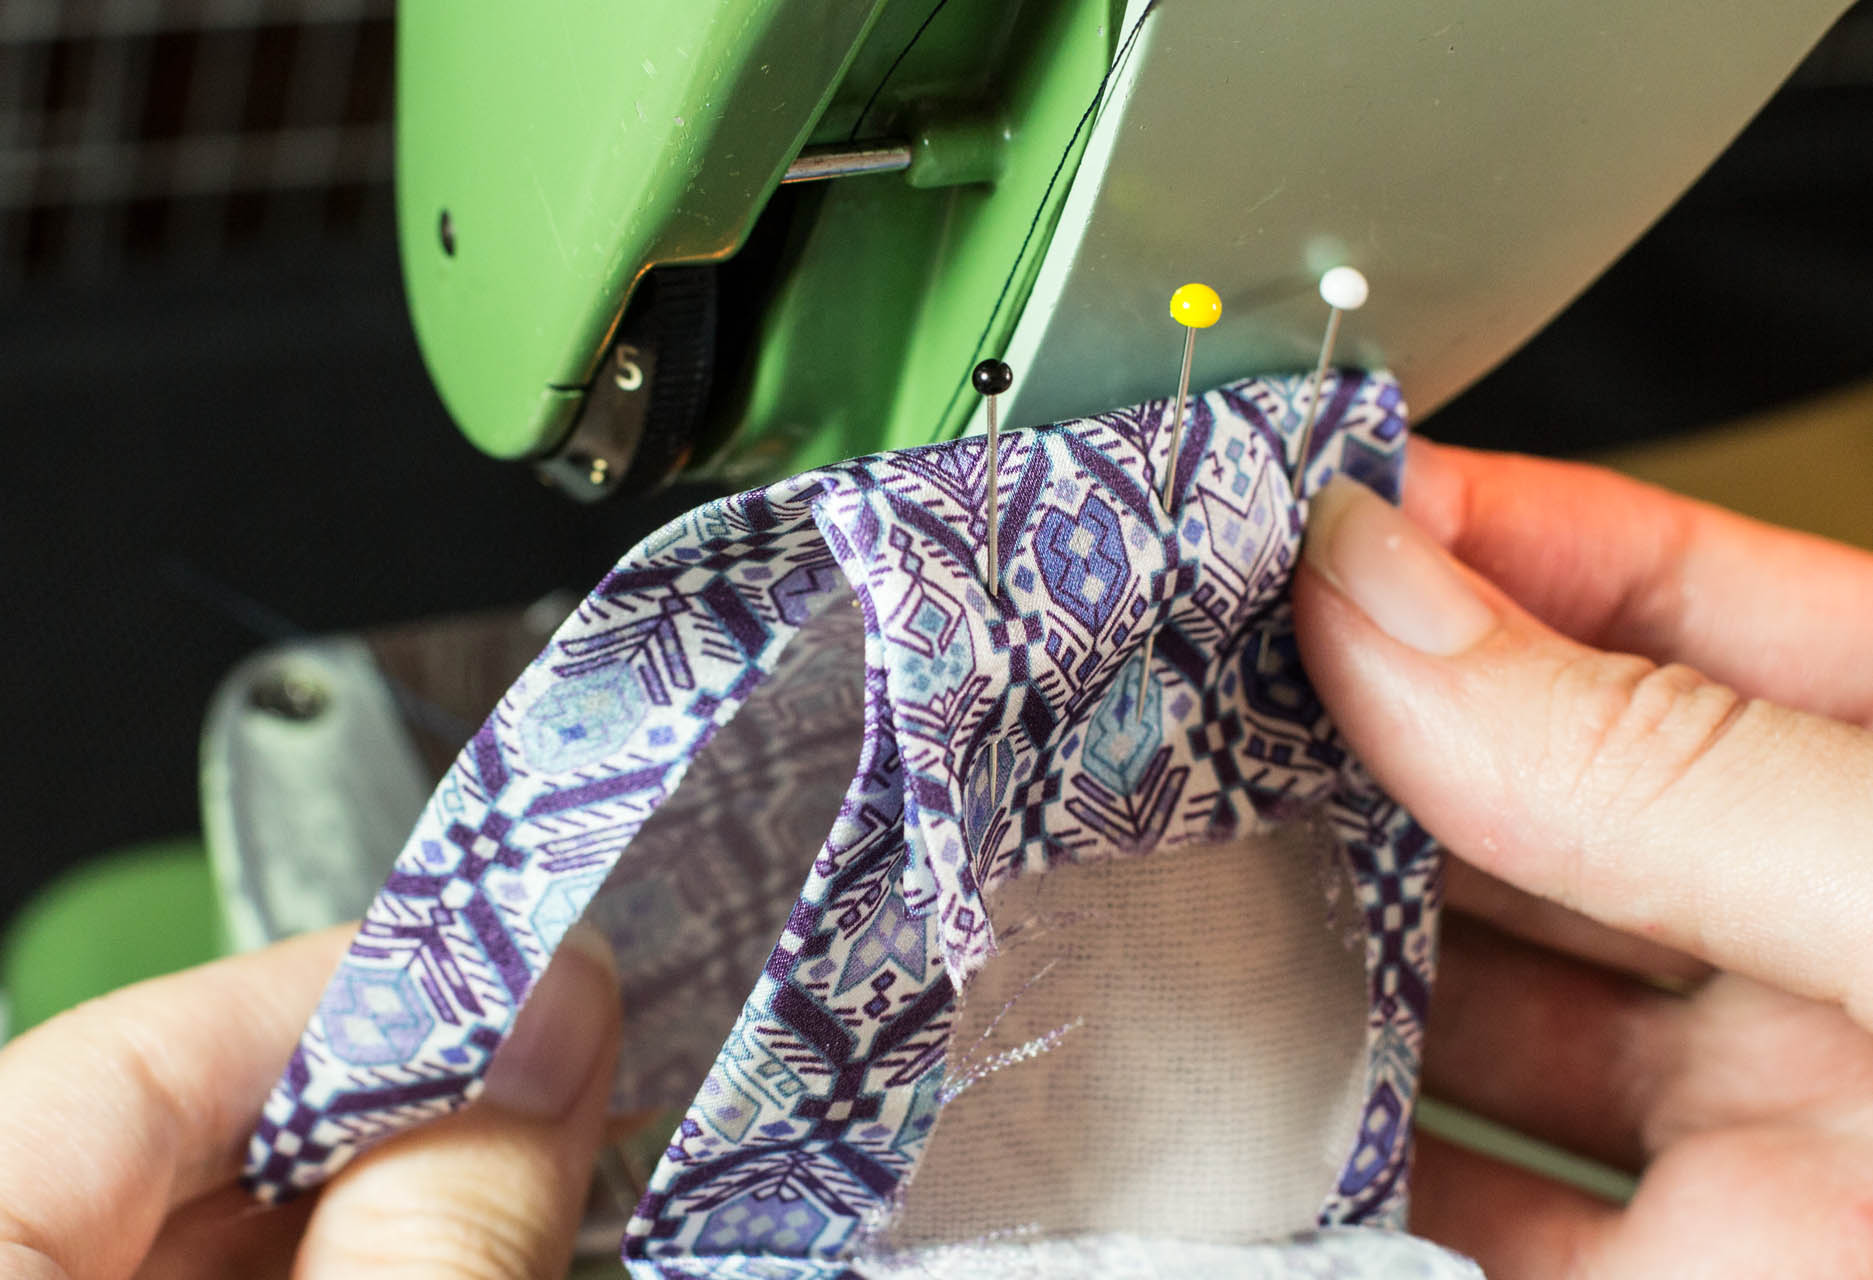
If you're adding an extra back piece, do this now by folding the right side (the side with the 1" folded in) over the other back piece so they're lined up. Once you've decided, mark your spacing on the back piece with pins, pen, or chalk marks, and take that sucker over to the sewing machine so the real fun can begin! In the photo below, I'm holding the clasp to show you the false back:
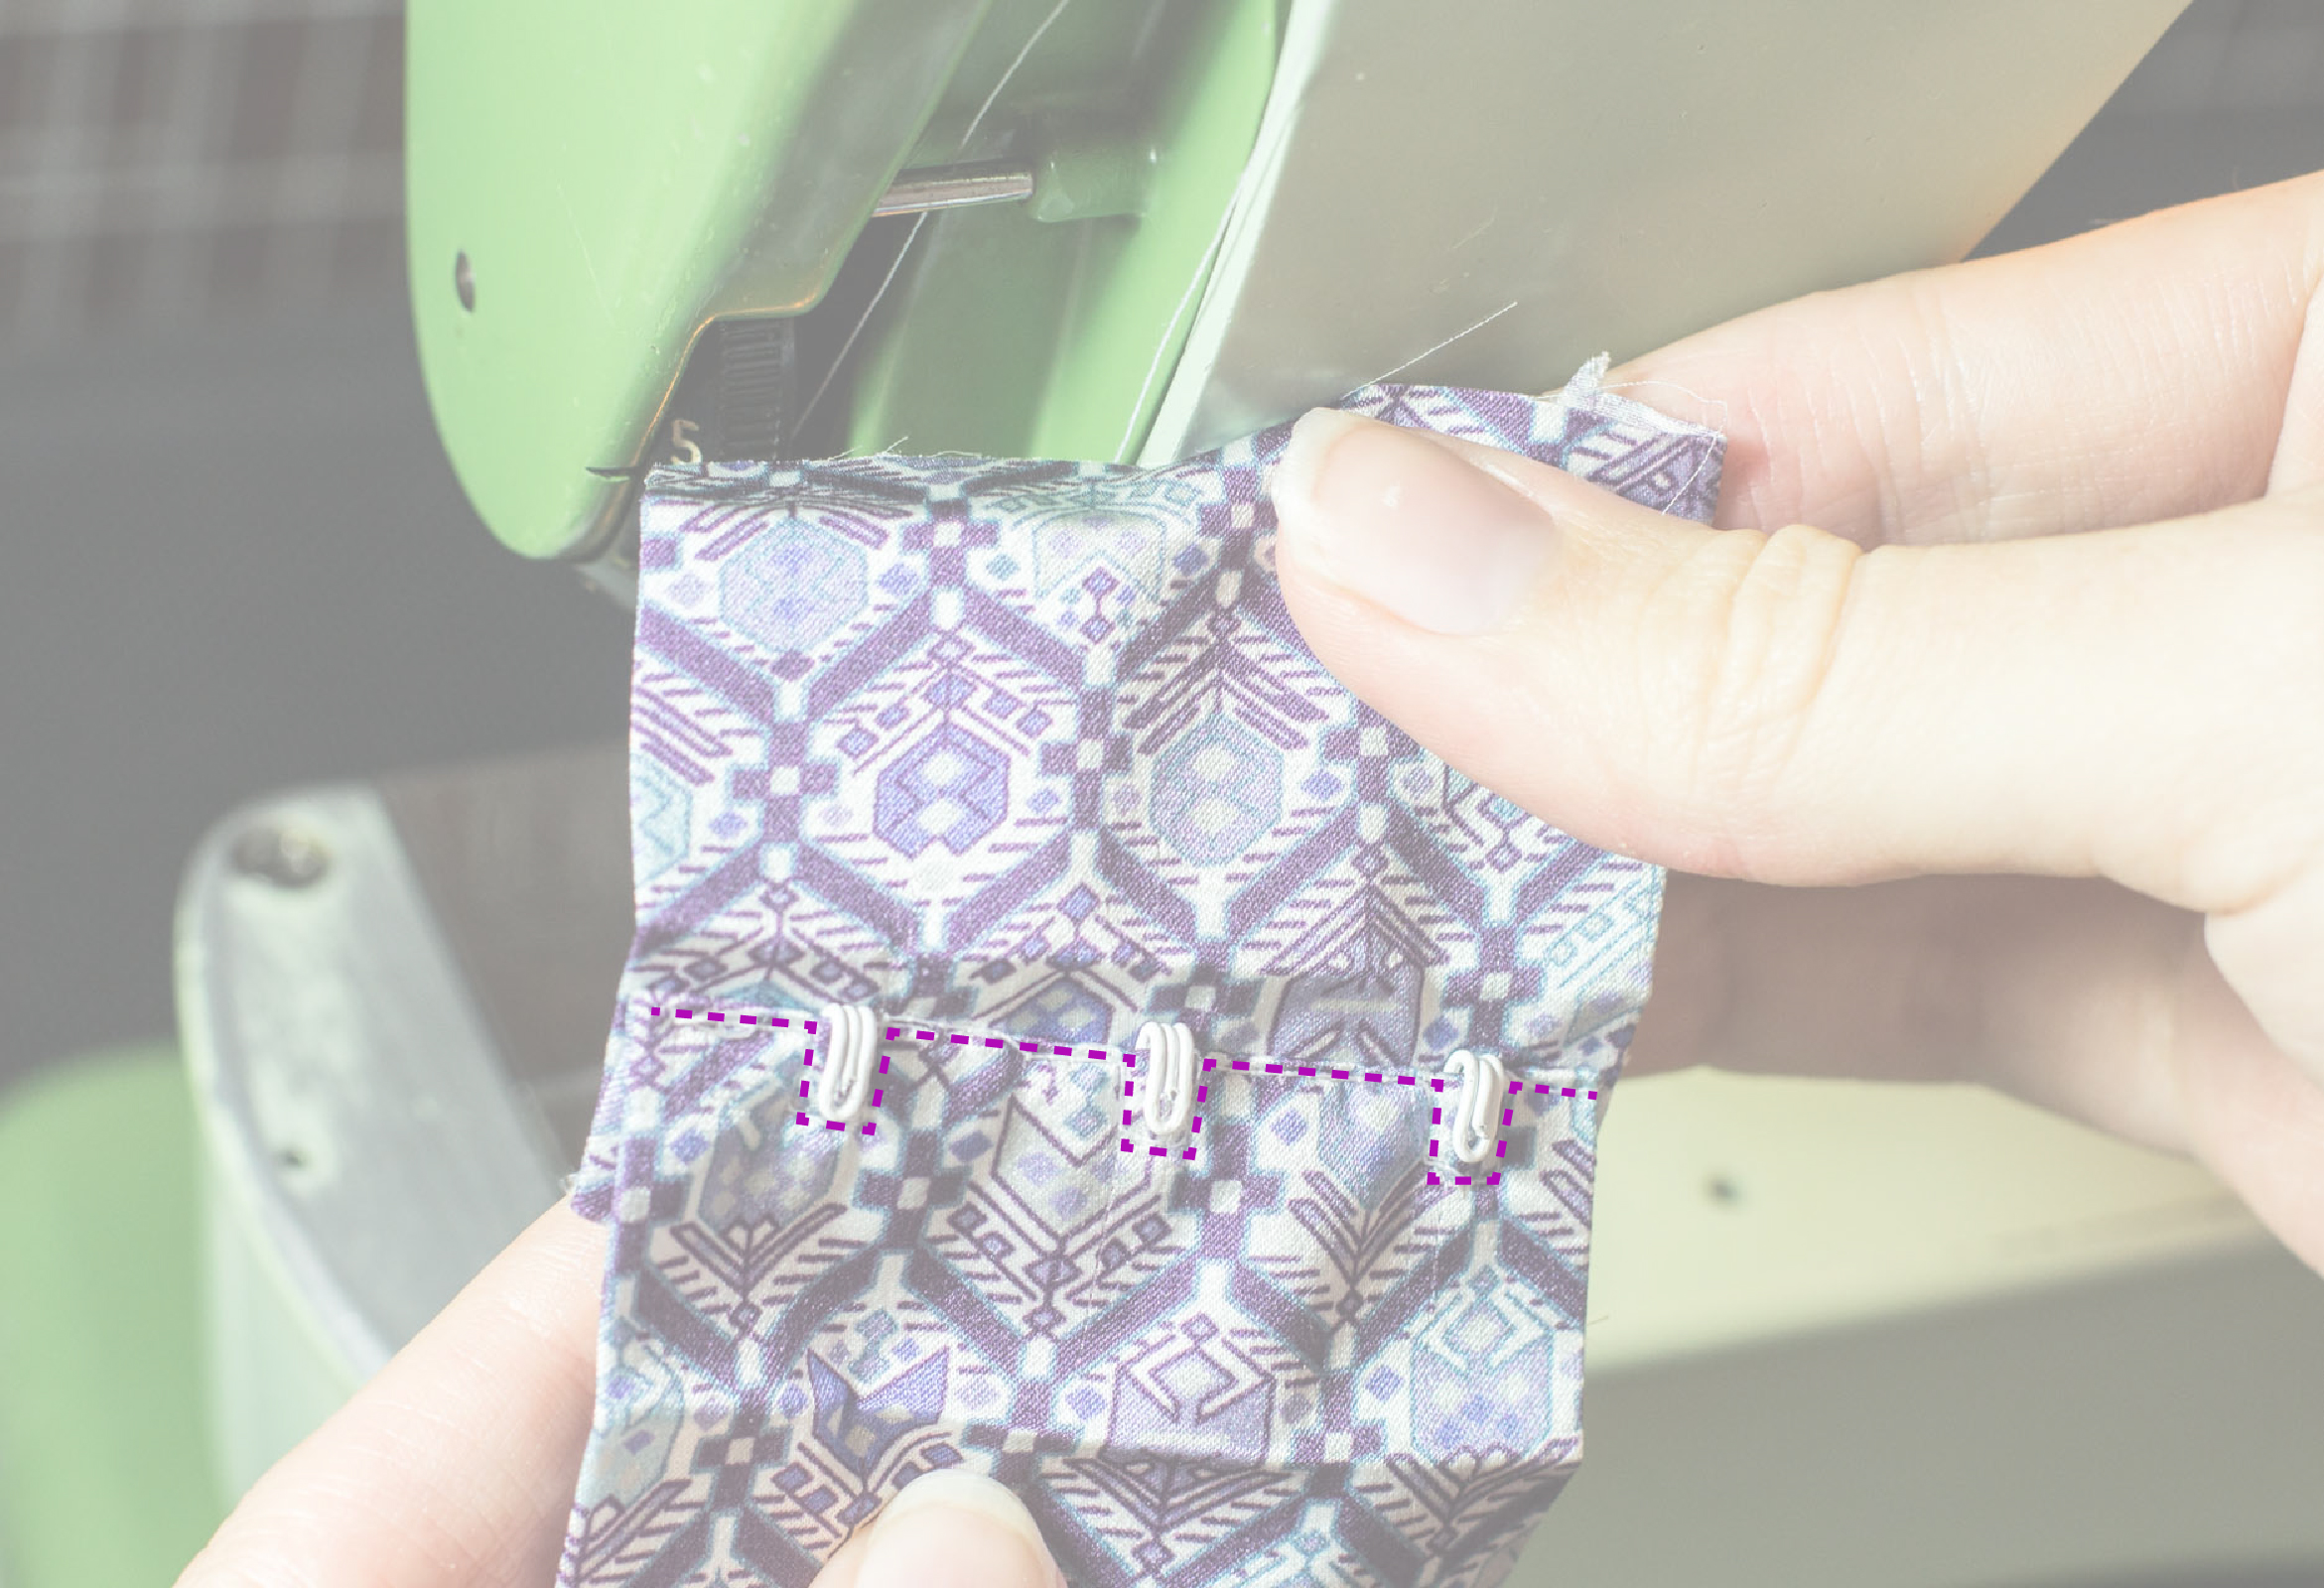
Alright, this is where we set our phasers to 'stun'... or our sewing machines to 'stitch length zero, zig zag width 2ish', as the case may be. Your first row of eyes will be sewn down over the wider folded edge of the back eye piece.We want to sew through each eye individually, rather than through them both with vertical stitches, because this method is sturdier in the long run and your hardware (combined with backstitching) will not be able to work themselves free. Align them so you'll be sewing through all the layers (all except the extra back piece, if you're using that method. I used it for the purple silk but not the stretch floral), place the fabric under your button foot with the base of the eye 1/2" back from the edge of the clasp (see photo below for placement), and, using either the button setting on your machine (if you're fancy) or a medium width zig zag with the stitch length set to 0 (if you're like me) - sew each loop of the eye down! Remember to backstitch! If you don't, your poor clasp will fall apart in your hands and you will loose eyes everywhere, never to be seen again. Ask me how I know. Ask me. Personally, I don't clip threads between the two loops, but you do you.

So. Stitch through one eye, reposition your needle or move your fabric, stitch through the second. Rinse and repeat for each eye down the line, until you've got a pretty little row of backstitched eyes.


Switch to your zipper foot, and position one of the eye strips over your newly sewn eyes right side down with the fold line opened and centered over the eye (through the center of the interfacing section, so that when you fold it down, the wider half will be on top). Now. Some of you are going to begin yelling at your screens right about now, because I'm about to tell you to straight stitch right over 'top of those eyes, and sewing over metal is a Bad Thing - I mean, you're basically sewing over the equivalent of pins! (I agree. Remember the rant in this post? Yeah. I'm with ya for sure) - but it's the only way to get a pretty clean finish, and if you go slow and set yourself a medium stitch length, you'll be just fine. Have an extra needle on hand if you're nervous.

Slowly stitch down the crease, backstitching a few stitches on both ends.. Fold that sucker down, (maybe give it a quick press if your fabric's fighting you) and you should be about here:

It's beginning to look a bit like a clasp!
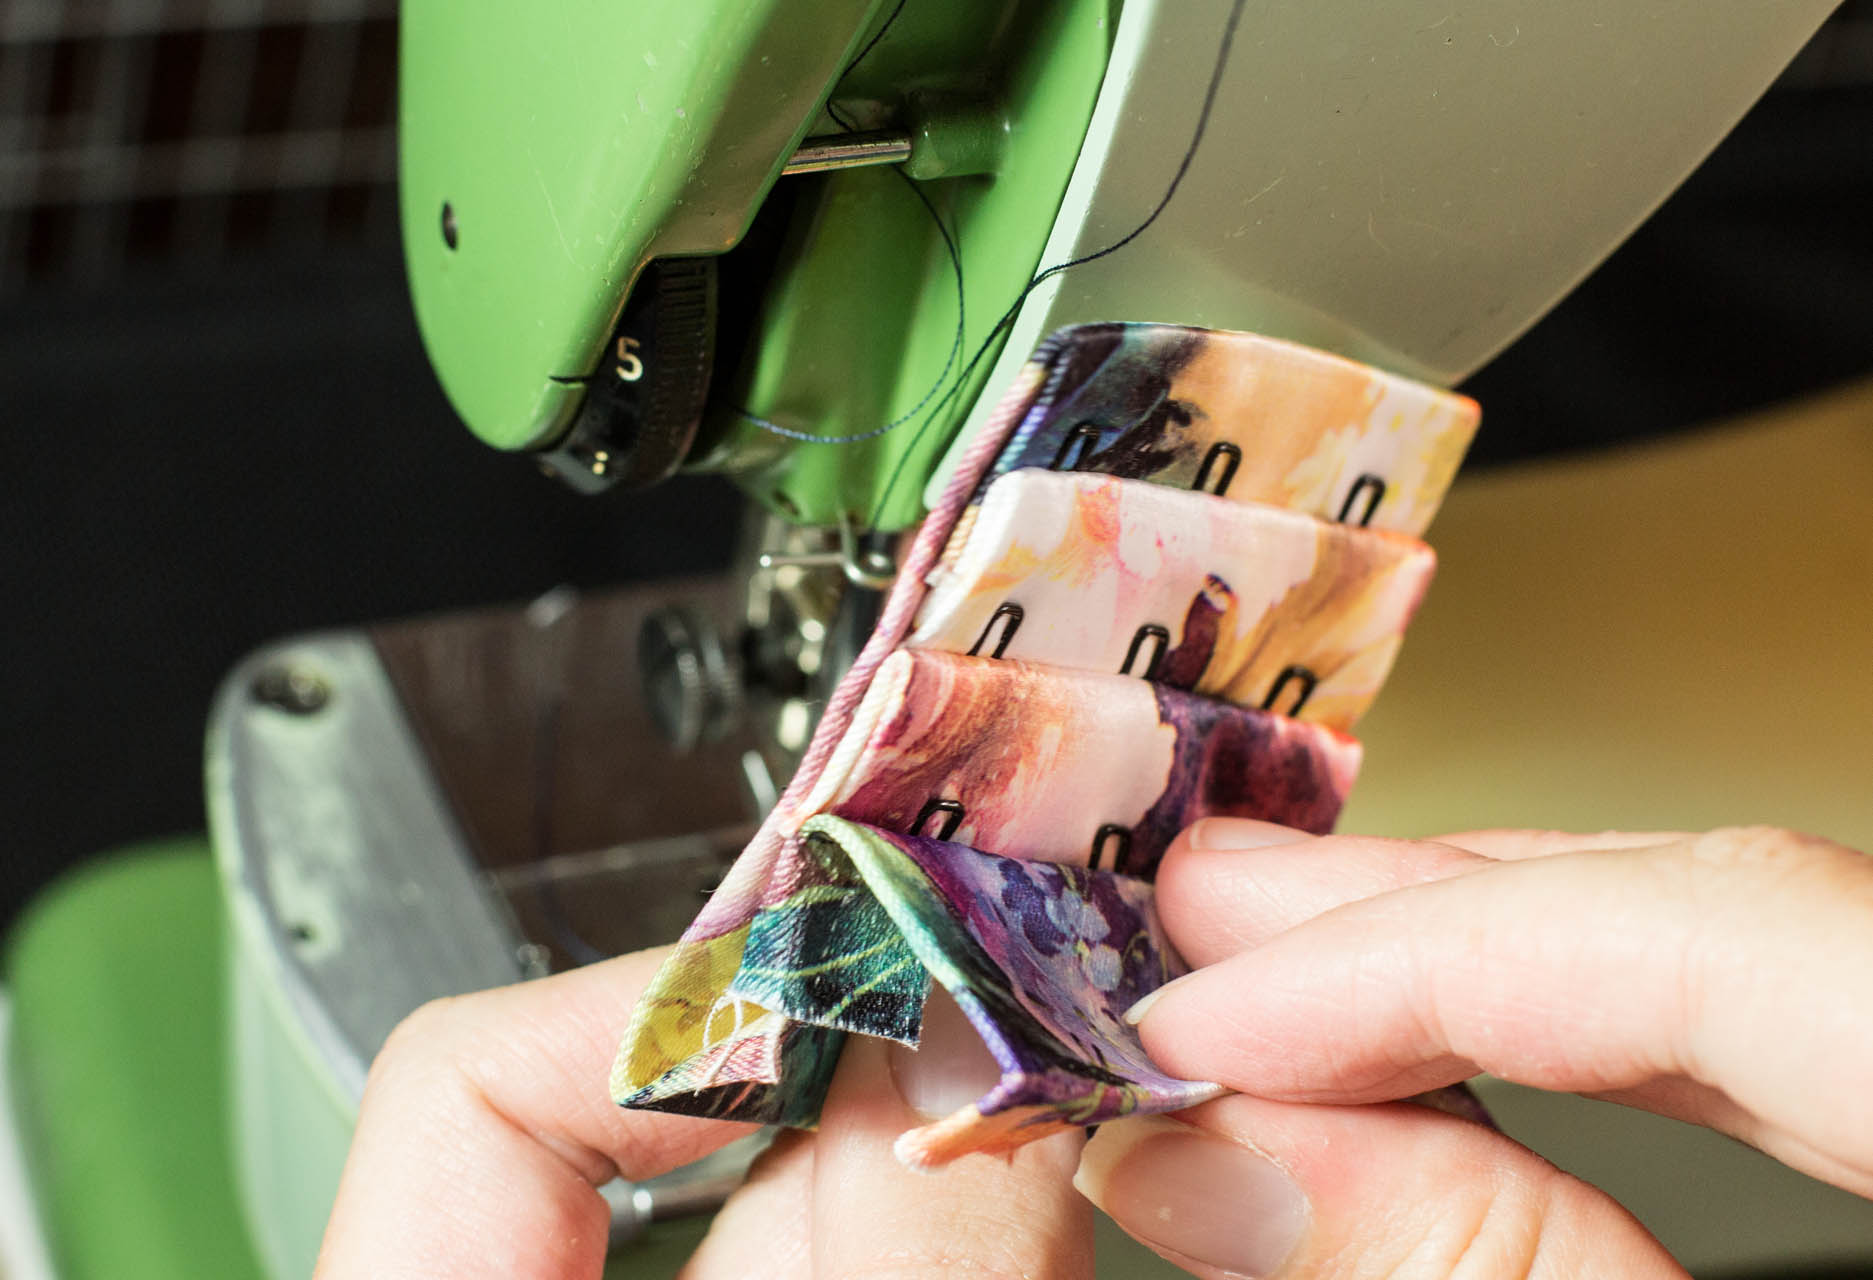
Switch back to the button foot, and stitch a new row of eyes whose heads are down 1/2" from the seamline as before, and then switch to the zipper foot again and sew down your next eye strip.

Then, follow exactly the same procedure for the last row of eyes with your finishing strip: This one has an extra 1/2" folded under which will be very useful when you want to attach your finished clasp to your new bra! Here's where we're at:
Nearly complete! You'll just want to stitch the upper and lower edges together by hand - I do this with a mattress stitch, which will render those seams basically invisible. A lot of storebought clasps I've found use a heat seal here, which is a nice clean finish even if it is sometimes itchy - and this is a similarly clean alternative, even if it can't be machine stitched! If you really can't be bothered to hand stitch, I'd do an edgestitch as close to the top and bottom edges as you could. If you're worried about running over the eyes, pop your zipper foot on and you should be able to avoid them. It's up to you! Don't stitch the edges up quite yet, though - the open sides are really handy for attaching the clasp to your bra, so do that final edge finishing last!
The Hooks
I'd like to say the hard part is over, but unfortunately this is where things start to get really fiddly. Take one of the hook pieces (doesn't matter which, they're identical) and unfold the side on which the interfacing goes all the way to the edge. if you're using sheer nylon for stability, insert it under that fold, and place it under the button foot with your first hook.

You want the head of the hook to be about 1/8" back from the creased edge. Stitch the hook through the middle with a zig zag, then rotate the fabric 90 degrees and stitch into each loop of the base. Repeat this for each of the hooks down the line.

Here's where fiddly gets fiddly-er. Slip the second fabric piece under the hooks. The goal here is to sew along the very edge of this top piece of fabric, while going down and around each hook to secure them in place. Here's a deceptively simple looking diagram:
In reality, your sewing machine (if it's anything like mine) is not going to like this part at all. It's not going to like jumping over the bulky hooks, and it'll probably complain at you about going around them as well. Go slow, and don't rush.

Helpfully, the hooks are already secured so you don't have to worry about them shifting! Watch your fingers though!

This follows the stitching lines of the clasps we see in RTW, and it's arguably the most secure, but if you don't think your machine is up to the task, here's a photo of the way I attached the hooks for the first clasp I made - significantly easier, all you need is a zipper foot and a machine with an adjustable needle position. This method keeps you from having to drive over the hooks.

You'll notice that in placing the hooks 1/8" back from the edge and then sliding the fabric under them, you've offset the back edge of the clasp by about 1/8" as well. This, I've found, will be an extremely helpful development when you go to attach the clasp to your bra. When you're done, re-fold the back part underneath, and you're good to go! Again, you'll want to stitch up the edges with a mattress stitch, but as I said earlier, I'd wait until you're attaching the clasp to your new bra.


Voila! your very own handmade hook and eye bra clasp! I'm not going to show you how to sew it on to your bra just now, because that's a lot up to personal preference, but both of these are obviously destined for bras of my own (The floral satin one is going on a partial band bra with hand dyed navy lace, and the silk is for a full-band with lavender accents that I promise I'll sew just as soon as I'm finished rolling in the fabric) - so if you want to see how I attach them, stick around!

If you've made it to the end, congratulations! This may be the longest post I've ever written, so you deserve recognition. If you've made it to the end with a finished bra clasp, I want to see it! Post it in the comments, email it, or tag me in your success on instagram! Also, I've proofread this thing about 100 times, but if anything is unclear, spelled wrong, or just plain weird, please shout your questions into The Void (or type them in the comments) and I will answer in kind!