
I don't generally like to sew multiple projects from the same fabric. There are certain exceptions of course, like if I feel I can get especially clever with the scraps, use it for pockets, or generally make two completely different things - the fact that this bra is a 2.0 of one draft with the same fabric as another is pretty much unprecedented... although with the success I've had here, maybe repetition is something I should investigate more often.
To be fair, bras don't really require that much fabric, so I had quite a bit of this beautiful floral stretch satin left after my first bustier. I pretty immediately reserved it for converting my draft to a partial band bra, but it's been quite a long time with (so far) no partial band adjustment in sight. I feel like I can still improve the shape and lift of the cups in my full band model, so I've devoted my time to those alterations rather than attempt a partial band (which is generally known to be less supportive and lift-y) at this stage.

In case you missed it last time, the fabric is from Lynda at Elle-Joan's - as is everything else I used, although the lace was white originally. That, I dyed with Dharma's acid dyes in peacock blue with a teensy smidge of midnight blue for depth. The two-tone thing was a happy surprise - presumably the threads used for those bits of the lace have a different fiber content.

After my redraft for bra tulle, I decided that the floral needed to come out of hiding for an encore, and that there'd always be more time to mess with the partial band idea later if I still wanted to. Much to my fabric-hoarding satisfaction, there's still totally enough fabric left for another floral bra: partial band or otherwise. This bra is identical in pattern to the bra-tulle model, but it uses foam, the stretch satin, lace, and sheer cup lining for the cups and band. The cup seams on the inside are finished with more of the floral fabric, and the back (lace overlaid on nude powernet) is finished with one of the self-fabric bra clasps from my tutorial, lookin' very spiffy indeed.

Now: the strap struggle. In the bra tulle version, the straps were easy enough: sewn to the upper cup (right sides together), flipped, trimmed, and bar tacked. Not especially elegant, but job done. That treatment was less applicable here because the upper cup fabric (sheer cup lining and stretch lace) is a bit less stable. With my bustier's similar cup materials, I managed to cleverly attach the strap to the lower cup to avoid lace distortion but when I tried to do the same here, disaster struck.

The direction in which I cut the foam combined with the location of the strap attachment meant the strap was pulling at the foam on the bias. Result: a Big. Ugly. Wrinkle. Right up the side of the cup. More obvious on one side but still present on both. I needed a plan B.

After much deliberation, I decided to attach the strap to the powerbar and reinforce it with the neckline and underarm edge elastics. The pushing effect of the powerbar is magnified with this configuration, and I can't say I'm sad about the resulting effect. I was a bit nervous that it wouldn't be strong enough attached to only the powerbar (even after I decided to reinforce the attachment point with a bit of silk) but in all reality the straps aren't that tight so this particular area shouldn't be under that much pressure. I'll let you know how it ages, though. If I'd planned it this way from the beginning I probably would have chosen different fabric for the powerbar. It's kind of pulling to the side... not in a way I can really photograph unfortunately because the rest of the cup hides it, and I think it's contributing to the added lift in a way... but let it be known in the blogosphere that the powerbar is not lying flat in there.

As promised, here's a side by side comparison of these two bras, made from the same draft: This new one looks totally normal, in my opinion. no odd shaping going on (now that the straps are fixed of course) - so my reservations with the last one must just have been due to the lines and layers created by the sheer fabric. Problem solved, and a lovely new bra added to my rotation, with fabric to spare for at least one more!
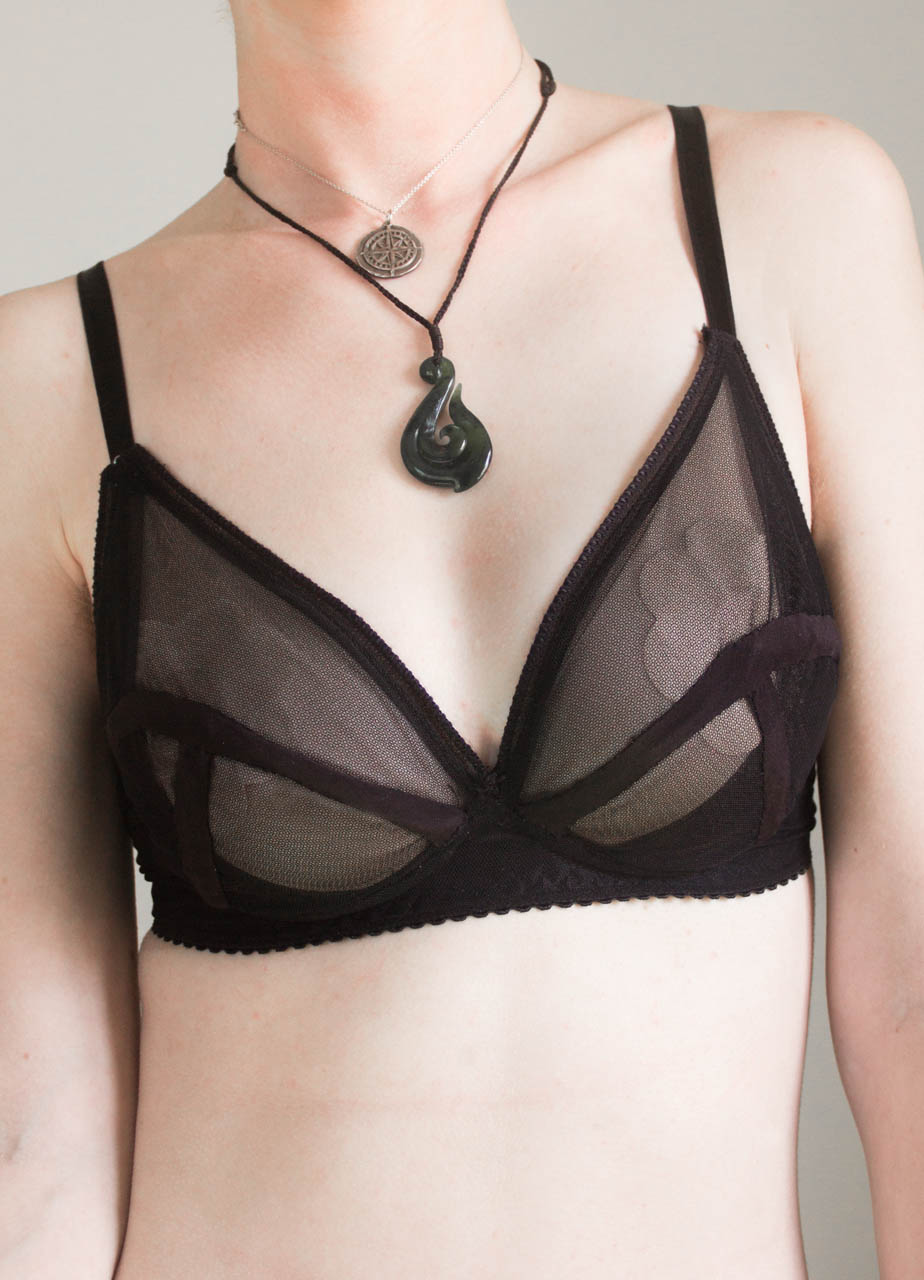
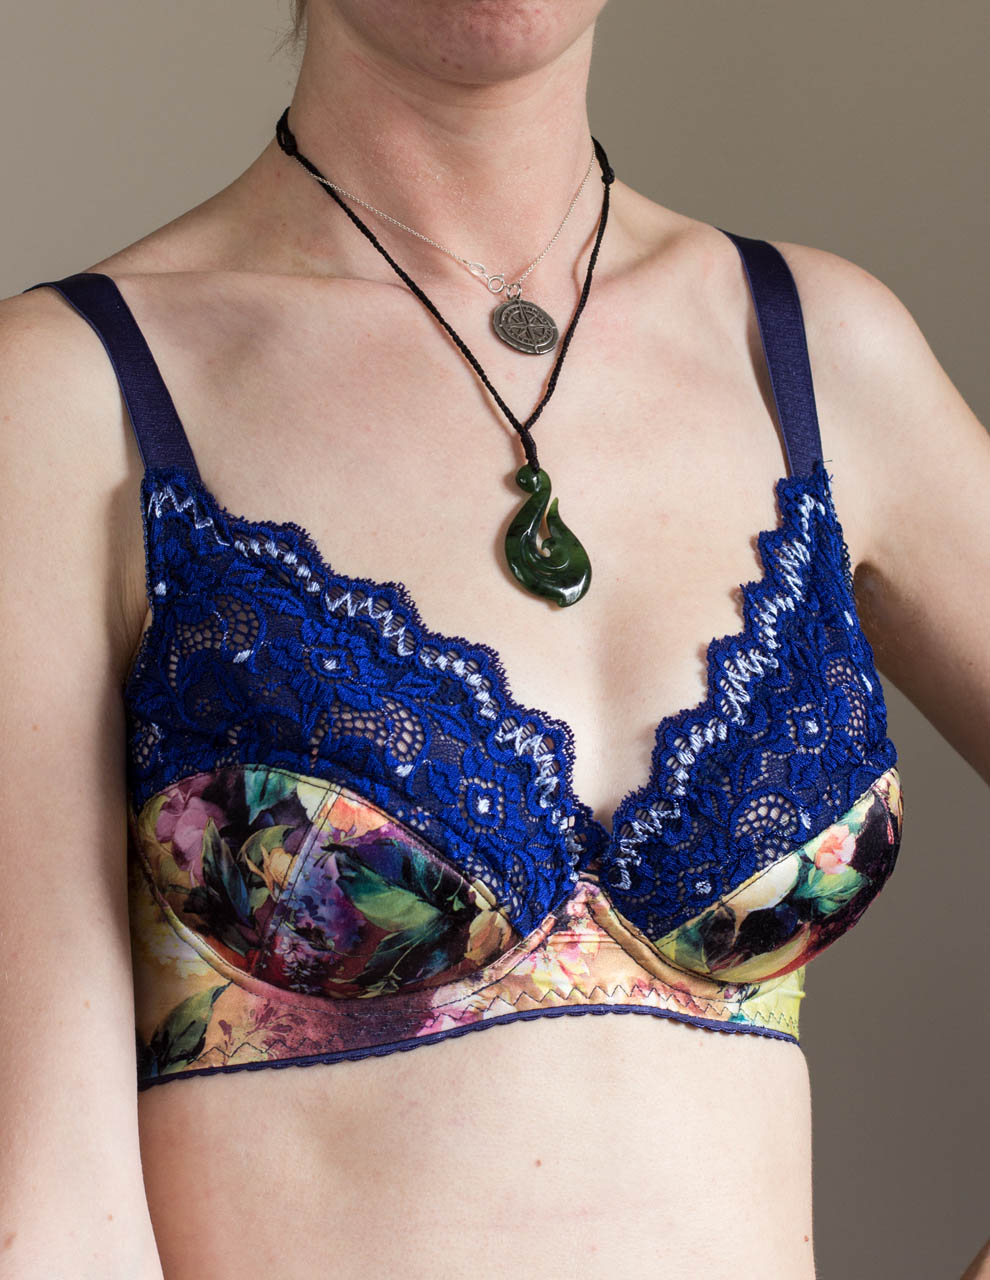
It's weird how different the same pattern can look when you change materials. Looking at these two, I think a future version will see the top cup line lowered a tiny bit, but otherwise, this is a great pattern for daily wear.

My current dilemma is with the foam. I've added cut and sew foam back to the two lower cup pieces, but the top cup is only sheer cup lining and lace. In theory, this should be fine, but in practice I end up with a (small, barely noticeable to anyone but me yet nonetheless still present) ridge at the seam where they connect. I've tried various methods to make this seam less bulky but there's only so much to be done I think. I don't really want a layer of foam in the top cup, because I like the edge finish of the top cup (and general effect) without it, but I think I have to at least try a full foam cup and see if it smooths out that seam.
That, and I've got about 14 other lingerie related experiments I want to work on, plus a Big Plan to tell you about next week, and some catching up to do from secret sewing this Christmas! So many projects, so little time!