

I think that dyeing the wedding dress fabric might have been the single most terrifyingly intense moment of the whole project. Every other step is small and incremental and for the most part, reversible - some things like cutting you can’t take out and start over, but at least even cutting happens slowly. With dyeing, it was everything all at once - the way it had to be to get even color. It’s very hard to lift color back up off silk in a non-damaging way, so it was very much all or nothing.
It would appear that you all really enjoyed the intensely technical nature of the corselet post, so I hope you also enjoy this one - equally technical, but in a very different way!
I’ve done a lot of fabric dyeing in my life. I may be truly terrible at chemistry in most contexts, but I understand the reactions that different fabrics undergo as part of the dyeing process, and what to do to achieve different outcomes, so at least I wasn’t completely inexperienced with this part of the project - I think dyeing 12 yards of crepe back silk satin still makes you tremble at any experience level though!
All the fabrics I’m using for the dress are silk (with the exception of the coutil structure layer and the invisible tulle which is the base for the embroidery) so they take acid dyes. My preferred dyes are the ones from Dharma Trading Company - which is, incidentally, also where I got my silks from*!

I should back up a bit, though. Kat, you crazy lady, why are you dyeing your fabrics? Why don’t you just buy fabrics that are the right color and save yourself the drama? Well. The thing I wanted to achieve here was to get the skirt looking like a flowing [pink] river as it moves - three different intensities of pink-ivory, all blending together in the folds and layers of the skirt, to make it look alive as it moves. I wanted to be in control of that. I also wanted to be able to use the transparency of the layers to get this effect, and although I love shopping online for fabrics, there are some things you just can’t replicate digitally before you commit to buying. It was easier for me to eliminate a variable by choosing white fabric and dealing with the colors on my own. I bought a 30mm silk satin, an 8mm silk chiffon, and a 4mm silk gauze from Dharma Trading Company.
Here’s a fact for you: the mm measurement for silk doesn’t stand for millimeters - it stands for ‘momme’ which is pronounced ‘mommy’, and is the unit of measurement for silks. It’s a similar concept to GSM or Ounces when used to measure the weight of fabrics, but it’s silk-specific, and very useful for determining what type of silk you’ll end up with. In future, I’d recommend a ‘do as I say, not as I do’ approach, and don’t buy anything lighter than an 8mm silk and expect it to hold up over time in a garment. My 4mm silk gauze was so delicate.

the top layer of silk gauze in the dye bath, with a white paper towel corner for color balance purposes ;)
Now. I know I said I’ve done a lot of dyeing, but to be completely honest with you, I’ve never been as critically invested in a color outcome before (something in the general vicinity of ‘blood red’ or ‘deep blue-ish purple’ is usually good enough for me) and also, I have a tendency to dye deep, bright colors so I just add extra dye to make sure the saturation is dialed up.
Neither of those tactics was going to work for this project. I needed to be in control of the color of the silks enough to dye the subtle color shifts I wanted, and I needed to keep my colors very very light and subtle! I needed much more control over my dyes than could be accomplished by using teaspoons and eyeballs as a unit of measurement.
I spent a lot of time thinking about how to make my dyeing more accurate, and eventually the answer presented itself in the form of one of Jon’s reality TV police shows - you know, the ones where the camera crew follow the cops around and film them and arresting folks? One episode, the fellow they arrested was a drug dealer, which they discovered because he had the little baggies of white powder in his bag, along with a little portable scale. They showed the scale on the screen, and I looked up from my flower crown beading just in time to see it - I screeched at it (cue Jon; alarmed face) and said something like ‘That! That’s what I need! I need a drug dealer scale!’
It took me a hot minute to figure out what to Google (‘where to buy drug dealer scale’ seemed ill advised) but apparently they’re also called digital pocket scales, and can be used for measuring things that are not cocaine - like gunpowder for DIY bullets, jewelry, and all sorts of little things. Mine is accurate to .01 grams which is perfect for my needs, and it has a nifty little cover that folds down on itself for storage, to protect the scale plate and buttons. It was only about $40NZ and I’m really excited about the level of control it gave me over my dyes, so I think it’s a worthy investment for future projects!

So. I’ve got my drug dealer scale, I’ve got my fabric. My dyes are Ivory and Valentine Blush from Dharma, and I’ve also got some citric acid which is used to start the reaction that bonds the dye to the fabric. Dharma sells citric, but it’s also popular as a natural preservative in home canning so you can find it in the baking aisle of your neighborhood grocery store - and that way you don’t have to pay for shipping! Vinegar serves exactly the same purpose but I tend not to use it… because it smells like vinegar. I also used a dust mask, my teaspoons (for putting dye onto the scale) and of course, a very large under-the-bed storage container!
Wait, What?

Right. The plastic storage bin is a bit of a trick. Traditionally, this type of dyeing is done on a stovetop in a pot so that you can control the temperature of the water. If I’d tried to dye my 12 yards of extra-wide silk on a stovetop, though…. I think I would have needed a pot the size of the whole kitchen! I didn’t have anywhere to store such a thing, so I decided to go with a plastic bin which I could use to store things (fabric) in afterwords. The water needed to be at 80 degrees Celcius, and our regular hot-water tap turned all the way up does 65, so I supplemented with a bit of boiling water to bring the temperature up. The acid dye reaction happens quickly, so I didn’t need to worry about keeping the water at temperature for longer than about 10 minutes, especially for such a light colored desired outcome.

While my box was filling up with water from the faucet, I started mixing the dyes. I decided to start with the middle layer of the skirt - the chiffon - and go for a mid-range shade of dusty ivory pink. The recommended percentage of dye to fabric to get the shade on the color chip is 2%, so I went with close to that. My 10 yards of chiffon weighed 420 grams, 2% of which is 8.4 grams. I used 4 grams of ivory and 2 grams of valentine blush - mixed it up and added it to the water, dunked a paper towel in the dye bath to check the color, and decided to add another 2 grams of ivory. The beauty of the acid dye reaction is that the citric acid, which is the catalyst, goes in last - I can set up my dye bath, add dye, add fabric, and the whole thing is completely reversible until the citric goes in. I added dye and fabric and allowed them to mingle for a while until everything was well distributed, and then added just under a tablespoon (not so scientific, I know!) of citric. The color exhausted* in under 5 minutes, so that was as long as I left it in the bath. I rinsed, and then gave it a spin in the washing machine before hanging it out to dry.

*let’s talk about dye exhaust, because it’s basically the coolest thing ever: With acid dye (not with others), the chemical reaction is such that the pigments in the dye actually physically bond with the protein fibers that you’re dyeing, rather than just surface staining, which is how some other types of dye reactions occur. This means that the fabric basically sucks all the color right out of the water, and if you get your proportions right, the end of the reaction is a dye bucket full of completely clear water. There is a physical limit to the amount of color a fabric can take, so sometimes there’s pigment left in the water even if you add extra citric to help the reaction along, but it’s usually possible to get it all to absorb. This, in dyeing, is called exhaust, and it’s awesome because first of all, it’s magical to watch the dye just disappear out of the water, and second, it’s great to know you’re not pouring any wasted dye down the drain!
I’m very pleased to say that it turned out exactly the color I wanted it to be - the color I’d intended - but I realized when I held it up next to my embroidery that this beautiful color I’d made was much too pink to go with the beading! It was a bit of a surprise - I expected my dyeing to be inaccurate, but it was not; instead, my vision was. I decided to dye the top layer next and see if that would tone the color down.

The next layer is silk gauze, 12 yards weighed 245 grams. I went for 1% of the weight for my dye (2.5 grams) at the same ratio - 1.7 grams ivory and .84 grams blush. This turned out to be a beautiful color as well - much more subdued but so sheer that the pink chiffon was still too much. Plan C was to lift some of the color out of the chiffon with peroxide, but that didn’t work so well and I didn’t want to damage the fabric - plus, I felt a bit odd destroying such a pretty (albeit not appropriate for this dress) color!

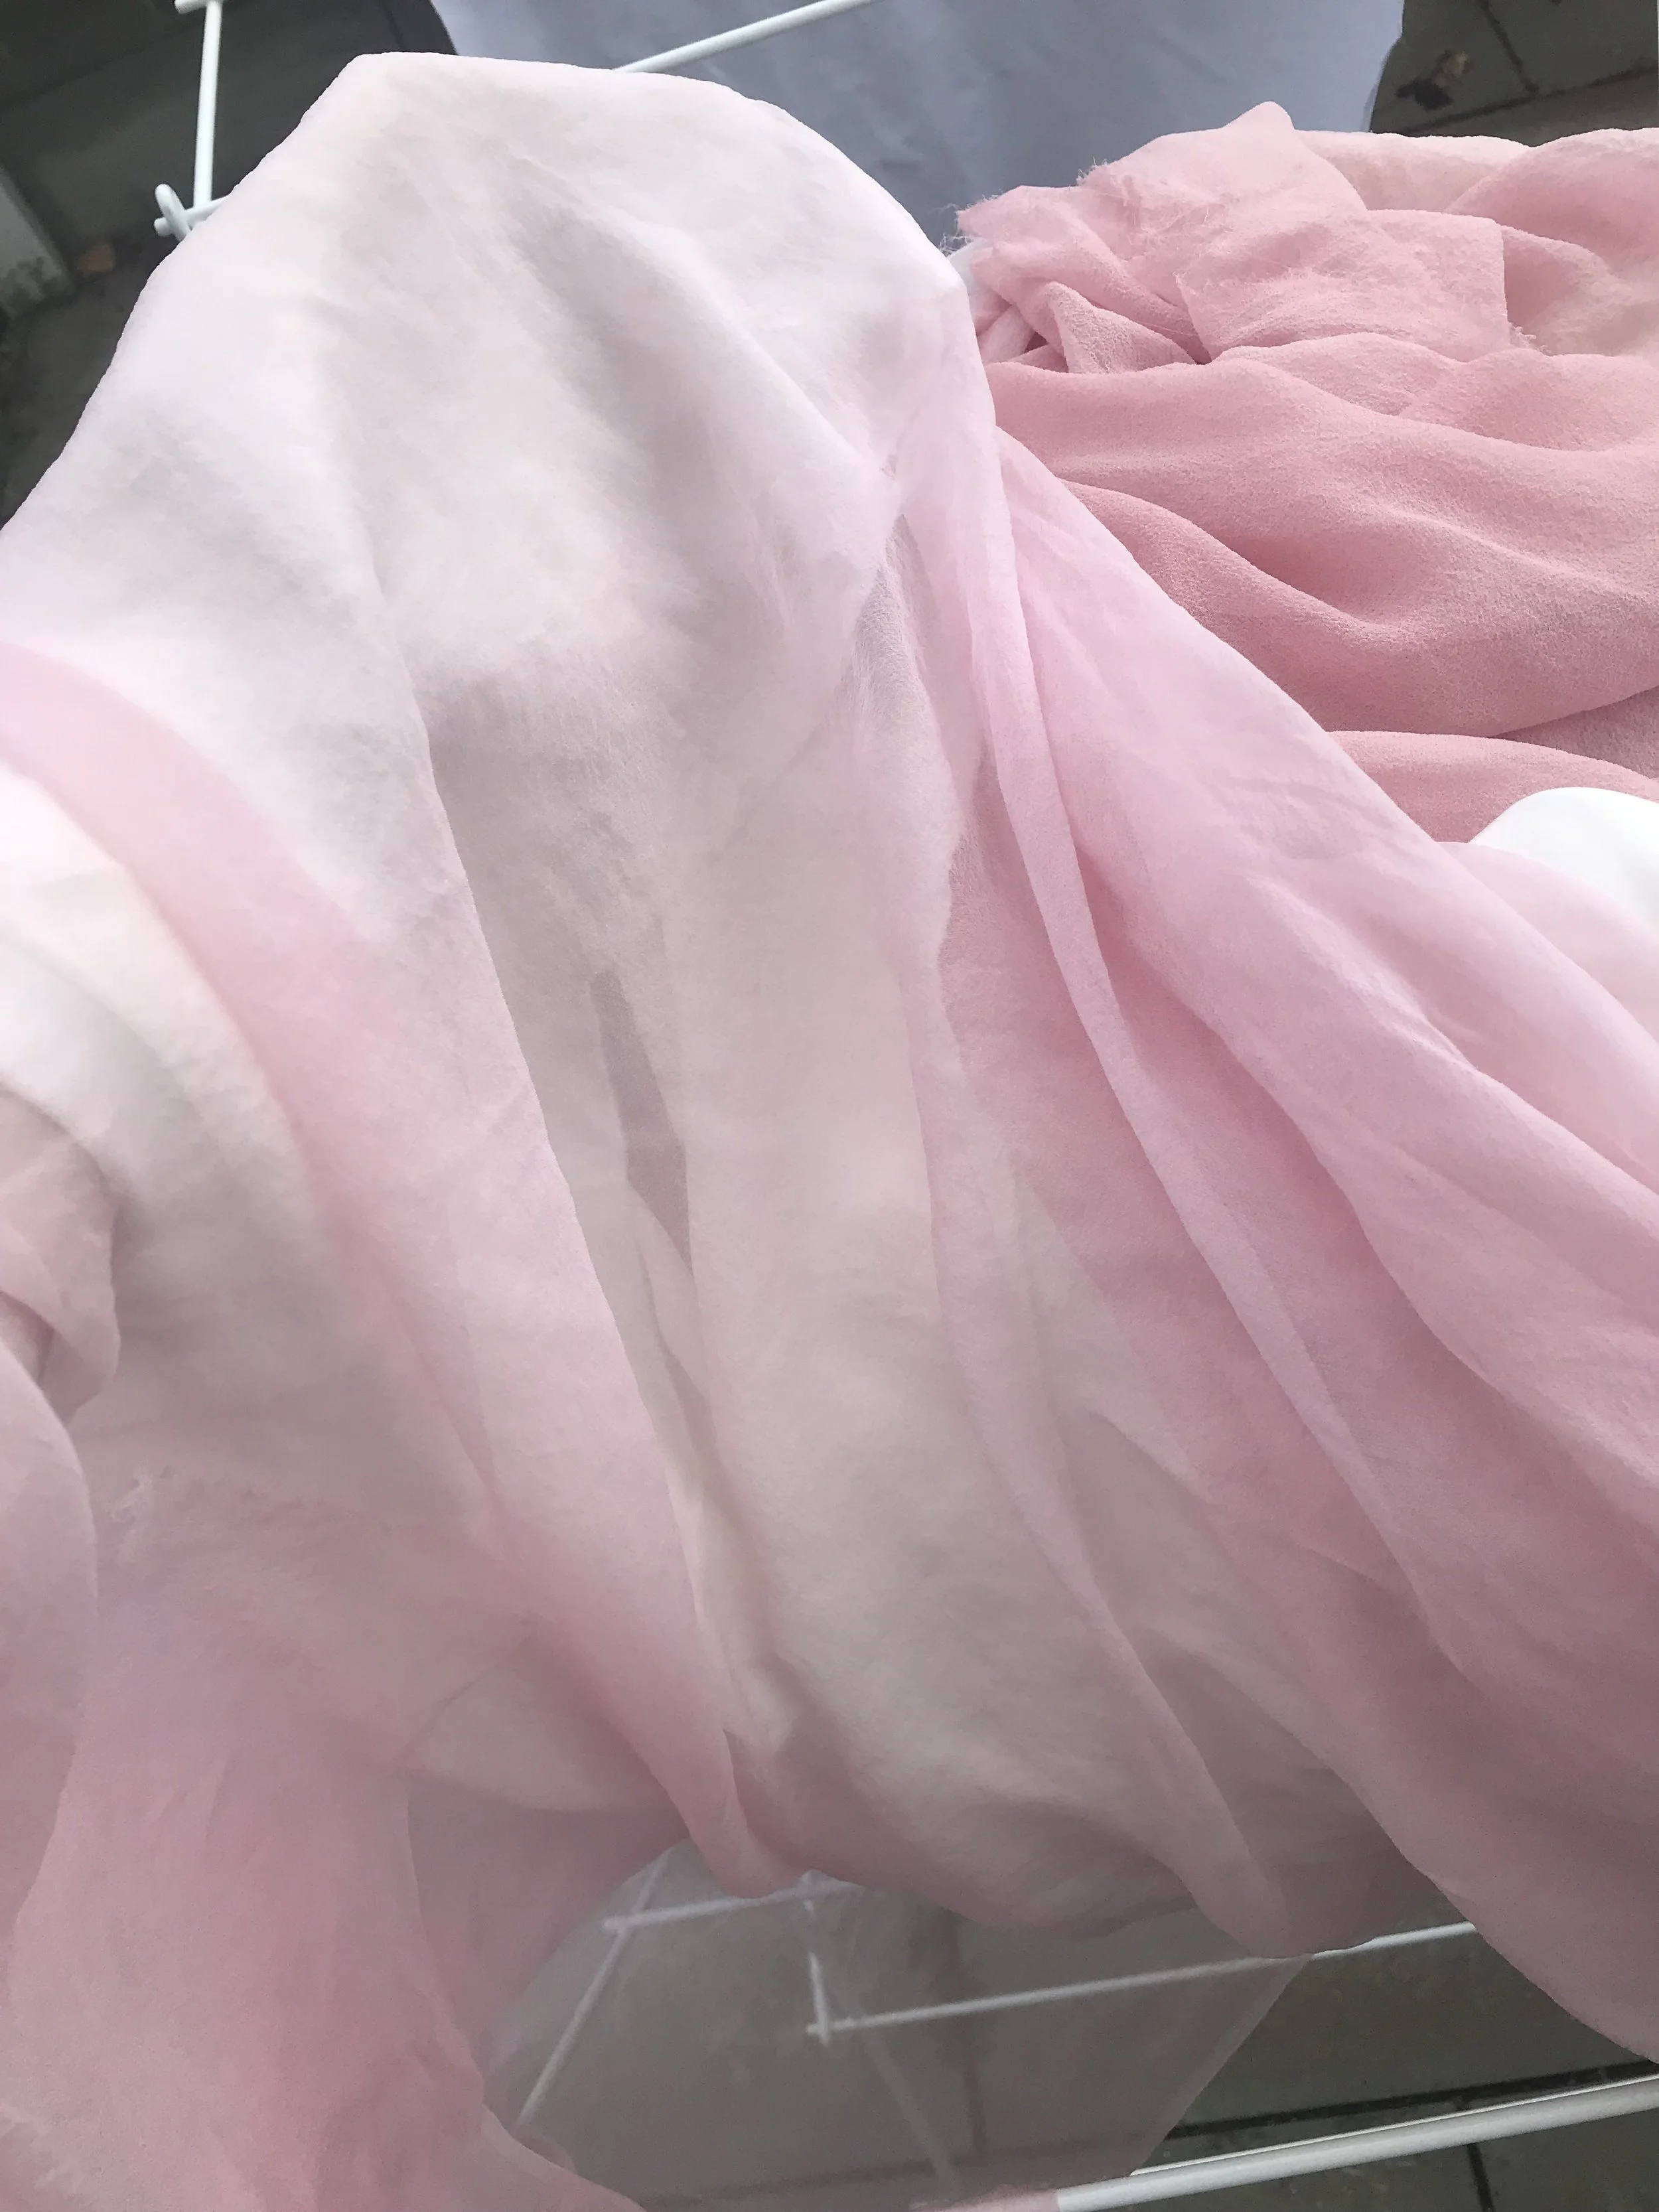
This background doesn’t look too pink, but it’s the pink chiffon under TWO layers of white (yet to be dyed, at this point) gauze. SO PINK!
Plan D won out in the end. I decided to buy more fabric. I realized that to achieve my shifting river of colors, I needed a light satin base layer, a mid-pink middle and an ivory top layer to work well with the colors in the bodice. This was different to my original plan, but that’s how we learn! I also decided to use the chiffon - which I really, really like the color of - as drapery for the archway at the ceremony - and hopefully be careful with it enough that I can turn it into a dress after the wedding.

I ordered* 12 more yards of the silk gauze, instead of chiffon. I liked the texture of that fabric better, and use the silk gauze I’ve already dyed as the middle layer and dye the new silk gauze even lighter to use as the top layer. That left one layer left to take care of - the satin!

the silk satin, in the dye bath
The satin is the heaviest fabric - 8 yards at 831 grams - and 2% of that is 16.62. I went for half a percent - 4.5ish grams of dye, because I was going for only the faintest indication of a color. I used 4 grams of ivory and .5 grams of blush, and I think the color is perfect! It’s a great warm creamy ivory color - it looks like rose petals and I love it. The perfect base color for the dress.
This is the first gauze (middle dress layer) over the white silk satin before dyeing. the too-pink chiffon is in the background.
*A small hiccup in my chosen shipping methods meant that the gauze never arrived - this was a panic for a while (It was set for delivery the week before the wedding, but then we think it was lost because the original package never arrived - the replacement arrived a few days ago - nearly a month after the wedding) but I managed to find exactly the same fabric in the fabric shop in Otara, and that completely saved the day! I seriously don’t know what I would have done without their help, especially since the wonderful owner was kind enough to discount it down to the price I’d paid online for the batch that never turned up. The last layer of silk gauze was 142 grams with 1.25 grams of ivory and .07g of valentine blush -only the littlest hint of pink! It’s almost exactly the same ratio as the satin dye color, actually - it’s perfect and warm and ivory. In the end, all three skirt layers are exactly what I’d pictured - even if I had to make some changes to make that picture happen.
As a bonus, the original too-pink but still beautiful chiffon served beautifully as drapery over our ceremony arch after all. It was the perfect complement to my dress (being the same dye colors!) and it also provided a really wonderful contrast to brighten up our forest space!

I’m pretty thrilled with the advancements I’ve made in predicting my colors with the help of the scale! Post-wedding, I’ve already done a few dye projects with the scale and it’s seriously amazing - the options are going to be endless!